To add the right click menu option for VBS files:
- Download this file
- Extract it
- Right click on ElevateWSHScript.inf and click Install
- Done
You can now right-click on VBS files and use the Run as Administrator option.
Full write up at:
What Revit Wants + Black Grid AI
AI Empowered Project Management
To add the right click menu option for VBS files:
Just hold down Ctrl button while scrolling with mouse wheel… I have tested this (non exhaustively) on Revit 2013 and Windows 7, and it works fine on the following dialogs:
Thanks to this tweet for the heads-up:
@paulfaubin discovering #revit tricks! Ctrl+scroll on family type window to zoom in and out.
— Matias Cena (@onbeesknees) September 18, 2013
Have you ever used Reconcile Hosting? When you click the appropriate button in the Ribbon, a new UI panel appears (see image below). You can also assign a Keyboard Shortcut to this panel, although it doesn’t appear as a checkbox item in the View — User Interface list.
You can use the “Sort” button to change the way the list is sorted, and the Show button will take you directly to the appropriate place in the Model to view and “Pick New Host”.
Simply viewing the Reconcile Hosting panel gives you the View Name and Element ID of the orphaned elements.
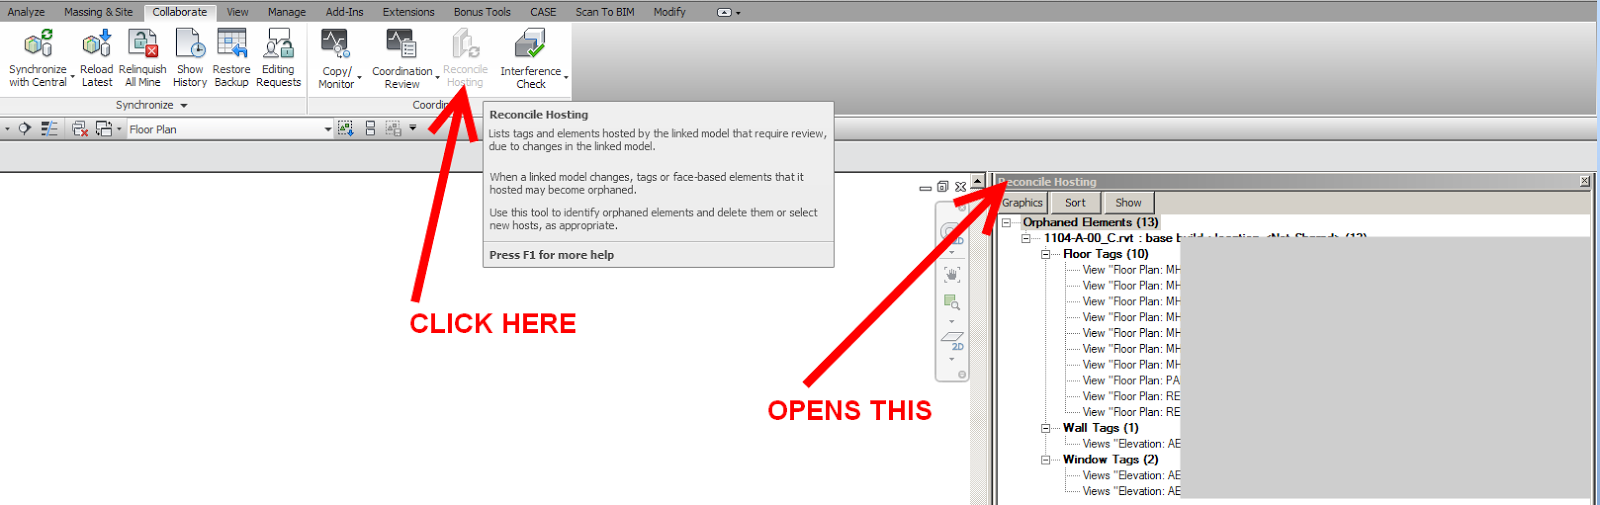
The panel can be closed by using the X in the top right corner.
Read more:
Reviewing Orphaned Elements from Linked Models – WikiHelp
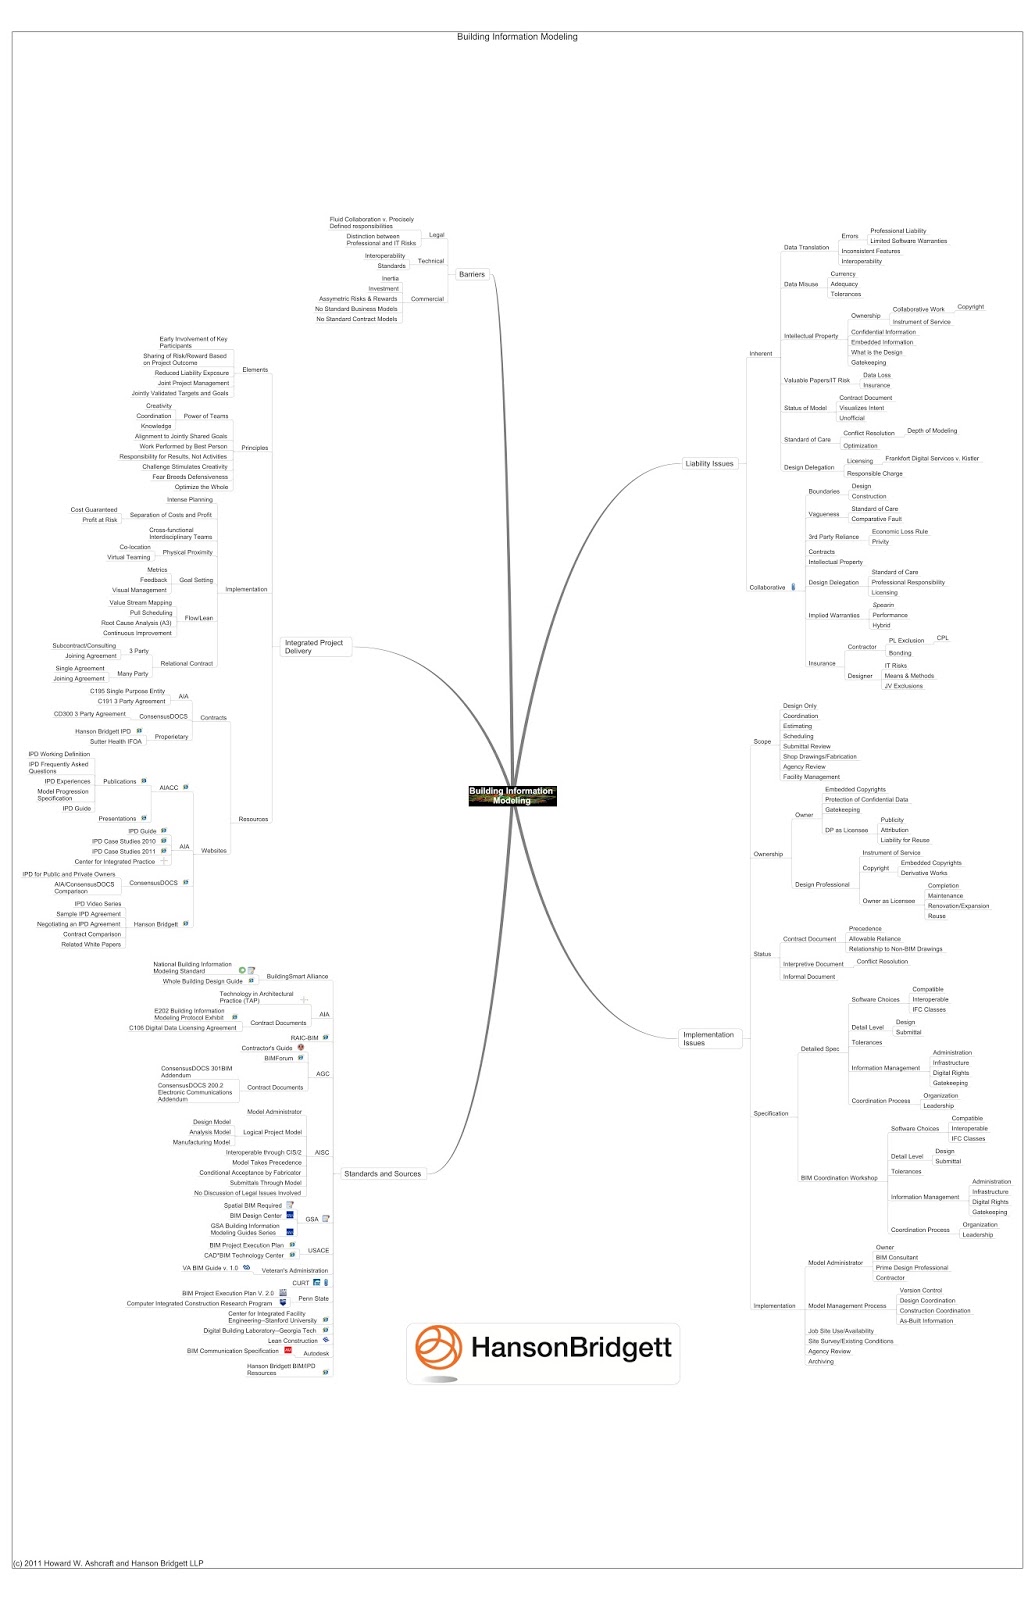
See below a series of links on IPD, VDC and BIM generally. Interestingly, this information comes from a contract / legal perspective:
via
This Page
As most of you probably know, the call for RTC2013 abstracts has gone out. Here are some bits and pieces from RTC2012 that you can check out online.
Reconstructing the AEC process (Jay Zallan):
PDF Download Here
http://cad-vs-bim.blogspot.com/2012/07/rtc-usa-2012-reconstructing-aec.html
Various re-caps of RTC2012:
James Vandezande / HOK
Brian Mackey / Mackay Consulting
Aaron Maller / Beck Group
Paul Aubin / Consulting Services
Lonnie Cumpton / BIM9
Robert Manna / Stantec
Aaron Vorwerk / D|C|CADD
Jeffrey Pinheiro / Fletcher Thompson (here here and here)
Erik Lewis / Devenney Group Ltd.
Links from:
http://www.architecture-tech.com/2012/07/rtc-usa-feedback.html
Revit Add-Ons: RTC NA 2012 Wrap Up – With an Eye Towards Add-ons
Let’s say you get half way through extracting a very large (like 15gb) archive and for some reason the extraction fails. For example, the BDSP 2013 media I downloaded had one RPC file corrupt, and the Adesk extractor failed to push through that problem.
7-zip is not only more robust, you can also “resume” a failed extraction attempt by using some switches:
-aos (skips files already there)
-y (prompts yes to every question)
The whole command looks something like this:
7z x {archive_name_and_path} -o{target dir} -aos -y
… is not easy. Revit prefers that you don’t clog up your drawing with View Templates rather than trying to clean them out later. You can use various methods to transfer just one Template from project to project, such as this example.
I would assume there is an add-in somewhere that finds unused View Templates and allows you to delete them, but it must be done manually with vanilla Revit.
Further reading:
Deleting a View Template – WikiHelp
View Filters & View Templates – Revit
Revit Beginners: Additive Views vs. Subtractive Views
Purging Unused Views – Sheets | BD Mackey Consulting | The Revit Geek Blog
Tutorials for making a house in Autodesk Revit 2011. By Michael Johnston.
Using Windows 7, you can switch the BIOS disk management from AHCI to IDE or IDE to AHCI without reinstalling the OS. However, you need to reset 4 registry “START” keys to 0 before rebooting and changing the BIOS setting. If you don’t change these settings first, you will get repeated blue screens…
Some more info:
1) I assume u have installed Windows Vista or Windows 7 with AHCI set from BIOS !
2) [Add keys from 3 if they don’t exist)
3) Now the manually regedit part Go to :
HKEY_LOCAL_MACHINE_System_CurrentControlSet_Services_Msahci
HKEY_LOCAL_MACHINE_System_CurrentControlSet_Services_iaStor
HKEY_LOCAL_MACHINE_System_CurrentControlSet_Services_iaStorV
And in thease three keys in the right pan u will find a key named “START” change at all three (Msahci,iaStor,iaStorV) values from 0 To 1
Now navigate to HKEY_LOCAL_MACHINE_System_CurrentControlSet_Services_PciIde
,then change the start value to “0”
4) Now u are allmost done , restart your computer/laptop , and go to Bios and set from AHCI to IDE !!! , save settings in Bios and restart
Great render settings to use a starting point – see below.
Render Settings – good quality but much faster to render
Image Precision = 4
Reflections = 2
Refractions = 4
Blurred Reflections = 1
Blurred Refractions = 1
Soft Shadows = OFF
Indirect Illumination = 1
Indirect Smoothness = 1
Indirect Bounces =4
Daylight Portals = OFF
Soft Shadows
Custom
Lighting = 2am
Sky = No Clouds
Exposure = 2-2.5
Clay Render
Custom
New Phase Filter
Materials = Clay
Lighting = 2am
Sky = No Clouds
Background Style = Colour – White
Exposure = 2-2.5
Exposure Settings – realistic and impressive
Custom
Exposure Value = 12.5
Highlights = 0.06
Mid Tones = 0.5
Shadows = 0.2
White Point = 7500
Saturation = 1.1 – Variable
via
BIM Day Out // Tom de Plater
EDIT
More detailed info at:
Revit Rendering – Revit Tutorials Online