Want to quickly tile all your open views and then instantly center all the visible elements in every view?
Category: Uncategorized

New WHQL Nvidia drivers released 18 April 2011:
NVIDIA DRIVERS 270.61 WHQL
And here is the link to the System tools software:
http://www.nvidia.co.uk/object/nvidia_system_tools_6.06_uk.html
View crop boundary has been selected, but Rotate icon is grayed out.
What is the only cause for this issue?
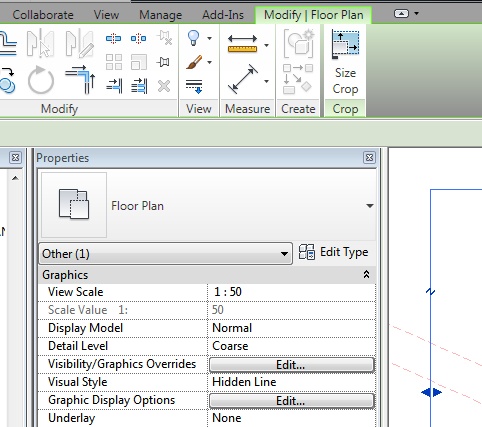
(If you can think of more than one reason, you must truly be a master…)
Here’s an idea – if you have two old but similarly sized hard drives sitting around, plug them into your Windows 7 PC and create a Striped Volume.
Striping increases the access speed of the drive.
This could be useful when working on a local version of a Revit central file – local disk access speed becomes important in this situation.
Here’s how:
- Plug the two extra hard drives into your PC. Then turn the computer on…
- Go to Disk Management (right click on ‘Computer’, then go ‘Manage’)
- Delete all unnecessary volumes from these extra drives.
- Right click on one of them – New – Striped Volume
- Basically follow the prompts – make sure you pick the two correct drives to become part of the Striped configuration.
- Choose quick format / NTFS Default allocation size
- Enjoy the increased speed of your striped volume.
Please be careful with this process – make sure you understand the pro’s and con’s. If you do, it can be a inexpensive way to increase your performance while using Revit.
This guy did a comparison on the speed of Windows 7 ‘Striping’ vs hardware RAID0 – and surprisingly, the results were similar.
RAID on the Cheap: Windows 7 Software RAID vs. inexpensive “fake RAID” � Kevin’s Blog
Office files… have been the major loophole exploited by malicious hackers to inject malformed data such as malformed data to spread malware.
…
Office File Validation add-in is available for free download from Microsoft Download Center, or directly download with the link below. Note that there are several prerequisite architecture updates to Microsoft Word and Microsoft Publisher before you can install Office File Validation as specified in KB2501584, which should have delivered automatically via Microsoft (Windows) Update.
Microsoft Office File Validation Add-in (KB2501584): SFV.exe
From:
Microsoft Office File Validation Add-in Free Download � My Digital Life
A $5 MILLION deal with Autodesk will underpin the growth plans of Australia’s GHD, one of the world’s largest engineering companies.
Key to the contract renewal was a new licensing model dubbed MultiFlex, allowing every GHD user, no matter their location, to rely on a single agreement.
…
Under the deal GHD will be able to access 25 Autodesk products, an increase from 15 applications previously.
…
Read entire article:
Building software to slash costs: an engineering giant adopts Autodesk’s BIM offering | The Australian
Start – Thursday 21 April 2011, 1 am
Finish – Thursday 21 April 2011, 7 am
Converted using http://www.timeanddate.com/worldclock/converter.html
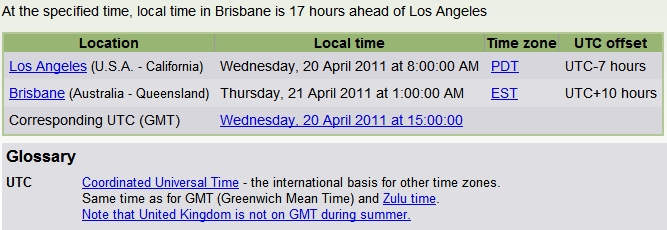
Event name and details:
The Make Your Most Amazing Ideas Happen Virtual Event
On April 20, 2011, we’ll host our live virtual event, showcasing the entire line of 2012 Autodesk products — including comprehensive new design suites. Join us and discover how our latest software can help you accelerate the creation and delivery of your most amazing ideas.
- Download Avisynth and install it.
- Download VirtualDub and unzip / install it.
- You need to have a set of BMP files with sequential numbering. Refer to this post for how to do that.
- In the folder containing the bitmaps, create a text file. Call it READ.AVS (it must have AVS extension).
- Open it in Notepad and put the following line into the file:
ImageSource(“%04d.bmp”, start = 1, end = 1800, use_DevIL = true) - The above syntax is for files with 4 digit filenames, starting at 0001.bmp and ending at 1800.bmp (obviously, if you have more or less frames, change the 1800 value accordingly).
- Open VirtualDub
- Open the READ.AVS file that you created.
- Now you should be able to save this file from VirtualDub to an AVI. Here is some quick settings:
Video – Direct Stream Copy
Audio – No audio - Go File – Save as AVI
- Put your AVI somewhere with plenty of disk space – it could become huge.

You may also want to refer to the master post entitled Distributed Parallel Rendering in Revit.
Are your renders taking ages? Trying to output a big rendered walkthrough? No matter how fast your PC is, these things can take time. Why not enlist a few of the other computers in your office to help produce that high-resolution animation?
Distributed rendering (or Parallel Rendering) is possible when using high end visualization products, including 3D Studio (now part of the Building Design Suite Premium).
In pure Revit (without using 3D Studio), the solution is a little bit more crude. However, it does work.
Here are the basic steps:
- Set up your walkthrough.
- Save the Project or Save to Central.
- Get your other computers running and open the same walkthrough on all of these PCs.
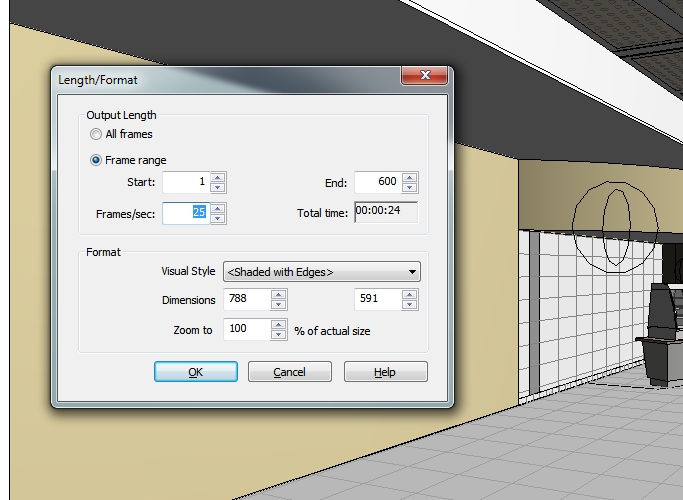
- On PC#1 in Revit, go to Export – Animation – Walkthrough, and pick a set number of frames for that PC to output. For example, frames 1 to 600 out of 1800.
- Make sure you choose BMP for the output, and when naming the file, just put in 1- (this will make sense later.
- On PC#2, export frames 601 to 1200 to BMP. Name it 601-.
- On PC#3, export frames 1201 to 1800 to BMP. Name it 1201-.
- Using Advanced Renamer, rename all the files to suit the appropriate frames. (see associated post)
- Put all the BMPs in one folder on the server or on one of the PCs.
- Using Avisynth and VirtualDub, join the BMPs into an AVI. (see associated post)
- Then, either use some video compression software, or do some post-processing.
There you go, you have successfully done some distributed or parallel rendering in Revit!