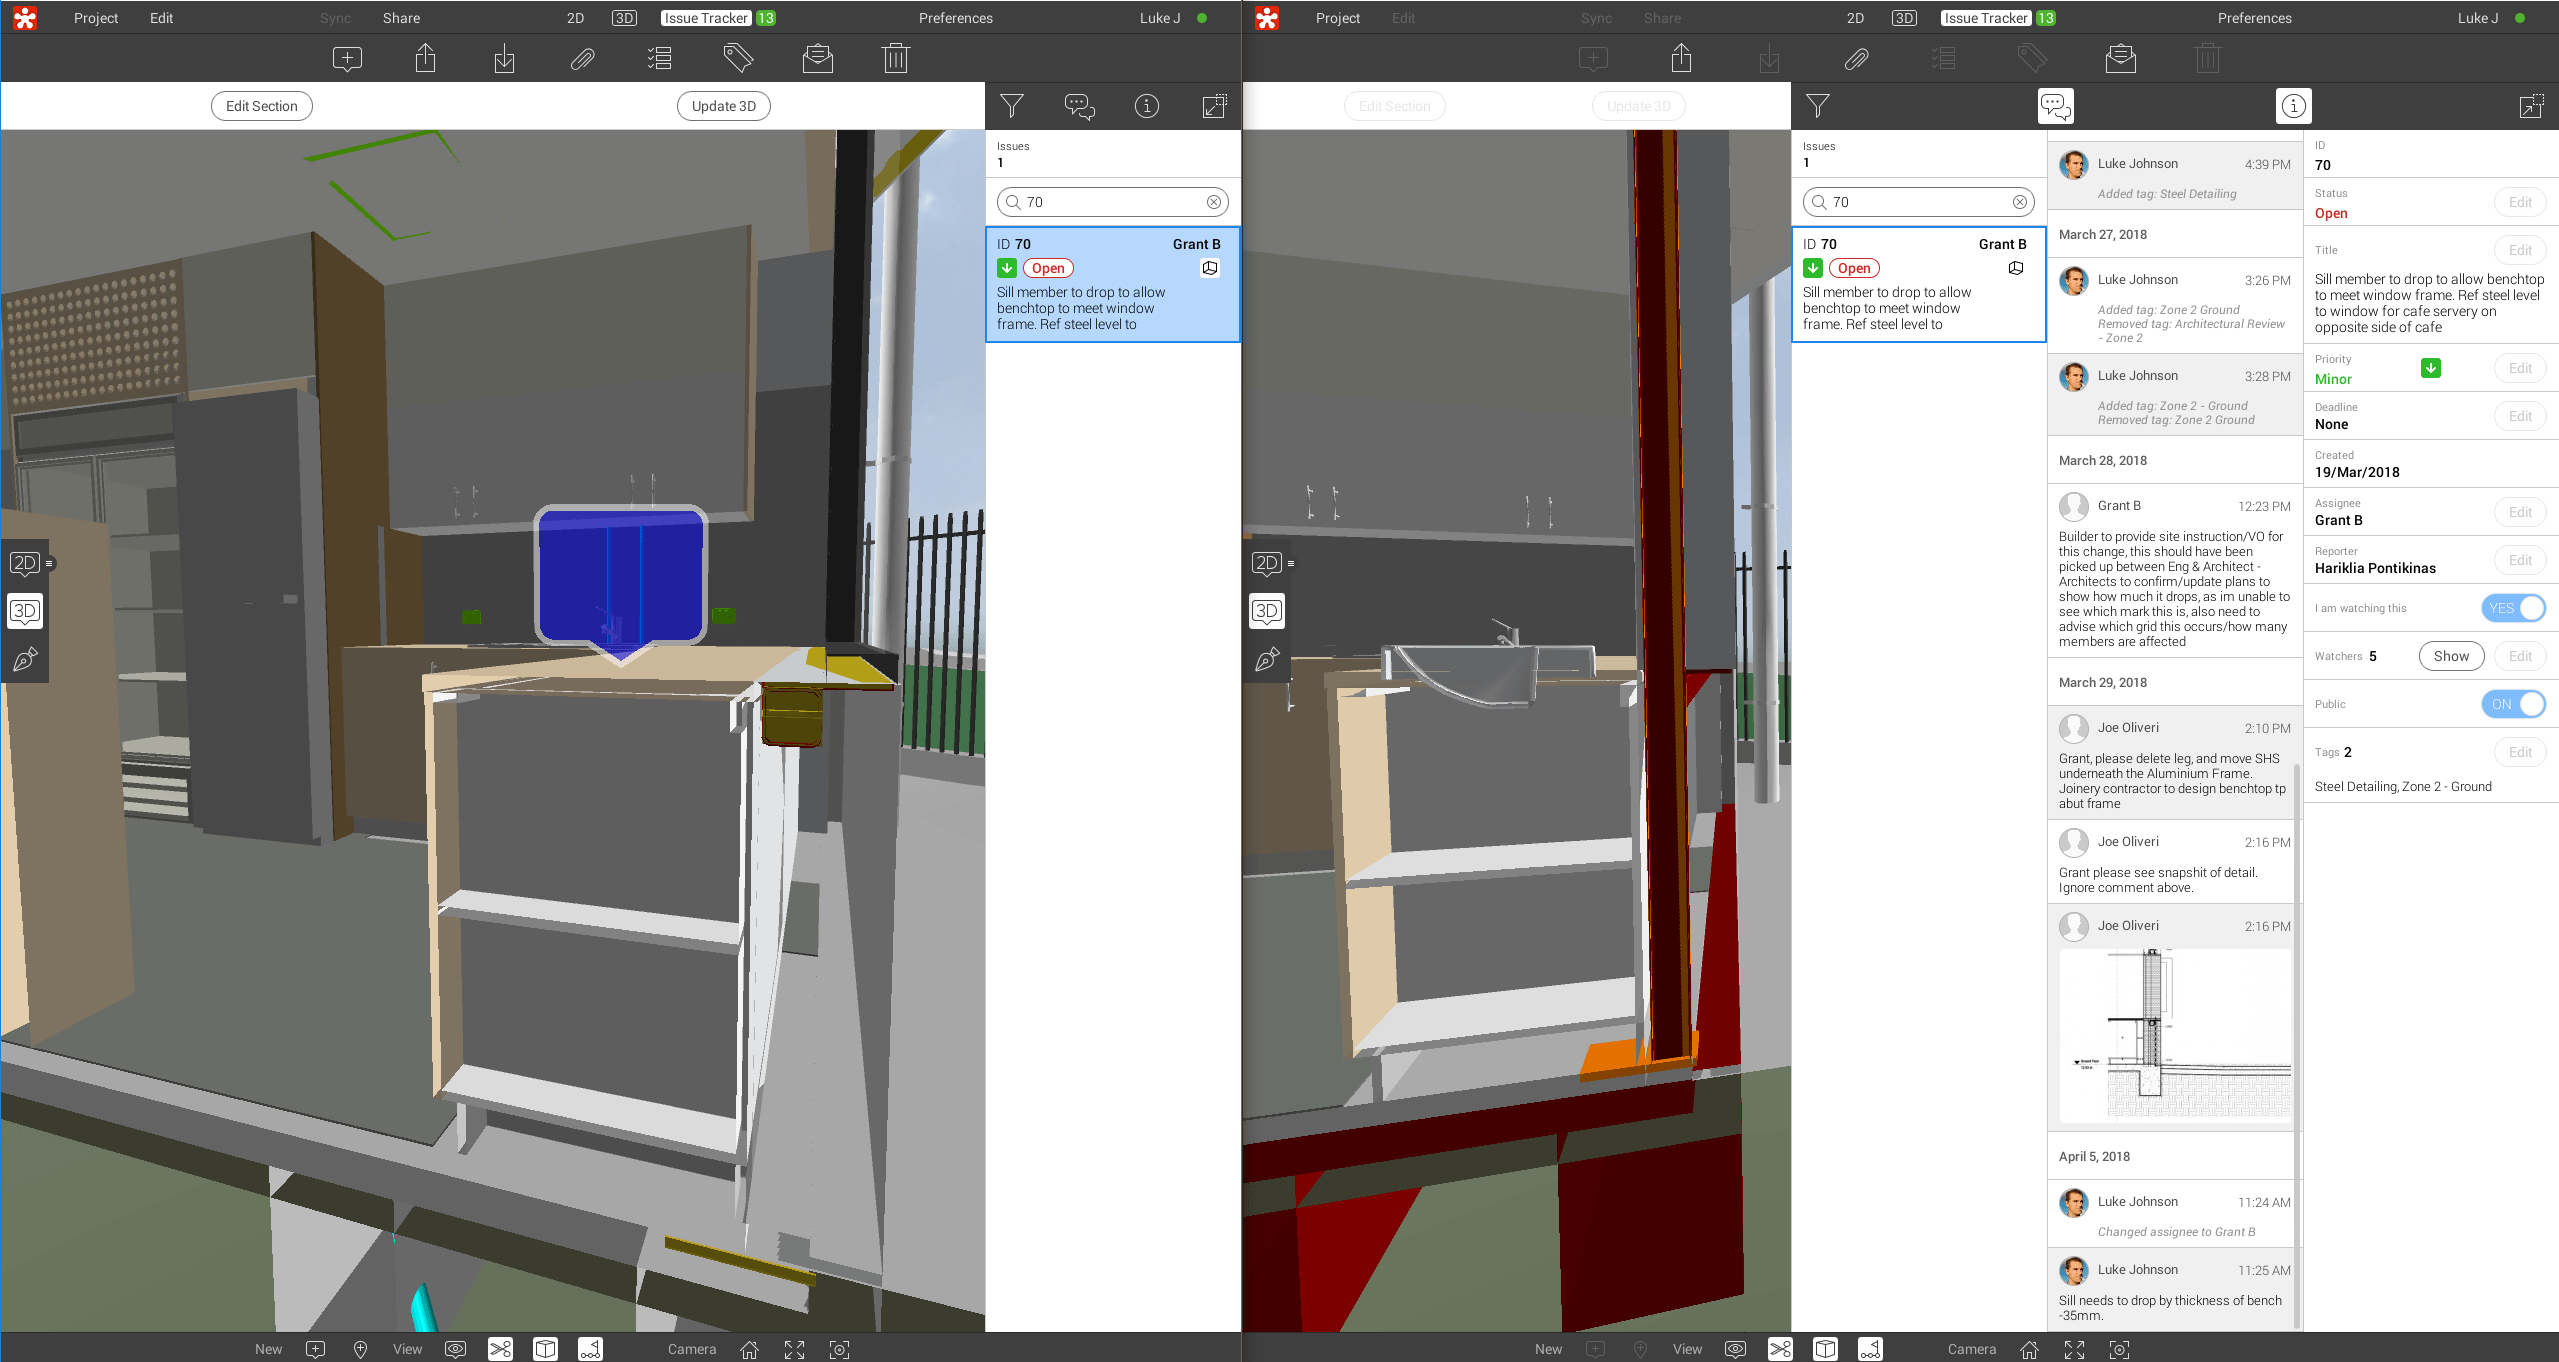
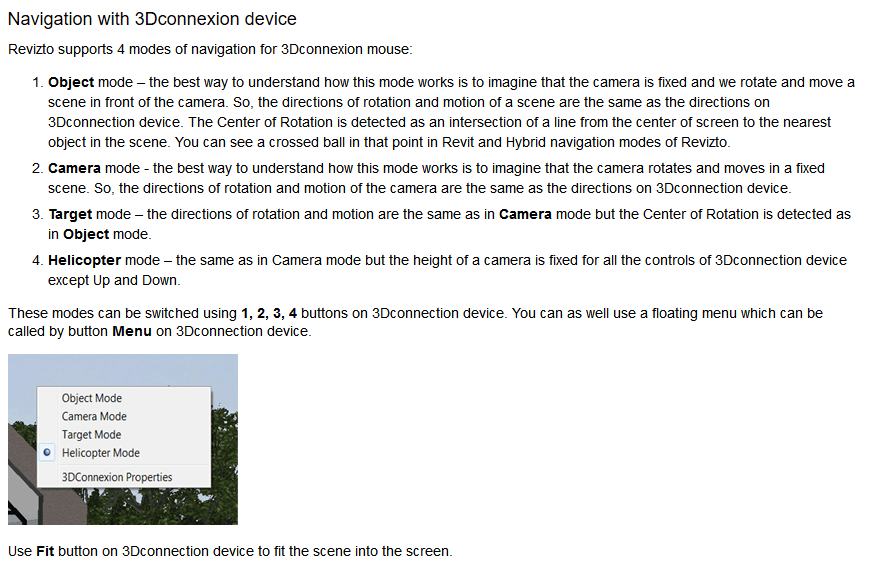
You may have noticed that Revizto notifications now provide a direct link to Open that issue in Revizto. This special hyperlink will prompt to open Revizto, and it will jump to the correct issue in the Issue Tracker.

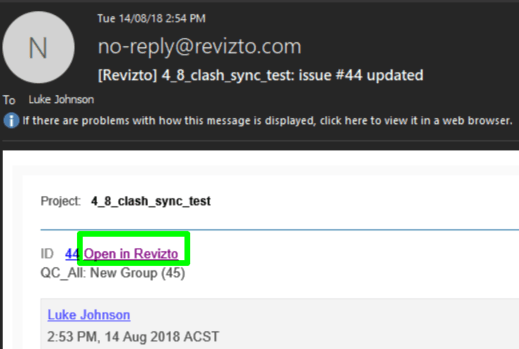
The special link is made of a few parts, notice the project number and issue ID in bold below:

https://api.sydney.revizto.com/v4/region/redirect?url=revizto%3A//viewer/50789/issue_tracker/44

Using the predictable syntax above, you can use your own Revizto regional server, project number and issue ID to create these hyperlinks yourself, either in Excel or programmatically.

You can leverage this mini-api in a number of ways:

  • you can paste these links into the Revizto Issue Tracker to allow you to jump between issues in Revizto
  • paste the links into Word or Excel or other emails as part of a larger report or conversation
  • inject these links into another BIM platform such as a Revit URL field, so that you can jump from a specific item in Revit to the related Revizto issue
  • use these special links in a project portal or project management system

This is just the beginning for a new era of connectedness between the Revizto Issue Tracker and other platforms… watch this space!

Revizto continues to improve its very powerful web Dashboard features. The web Dashboard gives a live view of issues for your team, and can be completely customised to give the most focused overview of your current project Status.

To create a web Dashboard and Group by Tag, just follow these easy steps:

      1. Open https://ws.revizto.com and access the Project you want to work on
      2. Click on Dashboard
      3. Click “Add New Dashboard”
      4. In the Dashboard view, click “Add New Chart”
      5. Customise the chart to include only certain tags, and enable the Grouping by Tags function. Below is an example:

In the above example, you can see how I included only the high level tags that are used (on this project) to keep track of the construction zone of specific issues. Then, the Grouping function slices those issues and gives us quick insight into the Zones requiring immediate action by the project management team.

I’m sure you can see how easy it is to setup powerful and focused dashboards to successfully manage your BIM and Construction team with these new web features in Revizto.

Here are the other currently supported Grouping categories in Revizto:

Models change rapidly at various stages of the project, and it can be useful to review model status between different revisions of the models.  What changed? Why?

There are a number of Model Compare tools out there, Navisworks has one built-in and there are addins for Revit. But what if you just want a quick visual check?

Here is one method using Revizto…

Using Two Instances of Revizto and the Issue Tracker to Compare Models

  1. Open two instances of Revizto and put them side by side on your screen (large monitor will help)
  2. On one of the instances, go to Project -> Revisions and open a previous version of your model

  3. You can now navigate between two different versions in these two instances
  4. The issue tracker data is always up to date, so you can use the Issue Tracker to co-locate yourself in each file and check the differences. Just click on the same issue in the Issue Tracker, and then click on 3D to visually compare the models. Obviously, you can also enter data and snapshots into the Issue Tracker as per usual, perhaps to comment on why a particular model changed between versions.

Another Idea…

Essentially, this idea was to launch two instances of Revizto and use the Camera Share tool to navigate the same model between them.  It was a bit more involved, and it requires you to have access to two different login accounts for Revizto, and two different login accounts for the current machine, and Revizto is installed ‘For Everybody’.

  1. Ensure you have psexec available
  2. Make a CMD with this text:
     psexec -u OtherWindowsUsername -p OtherWindowsUserPassword -d -i "C:\Program Files\Vizerra LLC\Revizto4\Viewer\Revizto.exe" /language ENU

    (needless to say that you should be careful to protect the password above)

  3. Open Revizto normally and login
  4. Run this CMD file, and in the new instance of Revizto you can login to a different Revizto account
  5. Open the same Revizto project in each
  6. You can now use the Camera Share tool to ‘drive’ both instances simultaneously. Pretty cool!
  7. In one of the instances, open a previous Revision of the model
  8. *This is where the idea fell down, as Camera Share no longer offered to share camera between two different versions of the model :)*  Evidently, it won’t let you navigate non-similar models at the same time.

I re-tooled the steps above from my previous post about logging into multiple Autodesk logins at the same time:

How to Workaround A360 SSO issues by Running another Instance of Revit in Same Windows Session as different User

Aerial imagery and 3D models are extremely powerful visual tools. Often, these are used primarily in early design and master planning. Some software tools connect directly to aerial imagery and 3D data providers. Unfortunately, Google has not really opened up the connection to their base 3D data. But we can capture imagery from it, and then rebuild in another photo-to-mesh tool, like Recap Photo. Keep in mind that you will be creating a 3D mesh, from an isometric 3D world view, which was created only from aerial images. Basically, your output will vary, and will probably not be high quality. But for the intended use in early design and master planning, the below workflow may be useful…

Note: Please investigate the license and copyright of this data for such use.

Here’s how:

  1. Open your desired 3D isometric aerial imagery in desired application (such as Google Earth, Google Maps or similar)

    *Note: User to be aware of relevant copyright restrictions
  2. Open ScreenToGif (downloads here). This is used to create snapshot images of the screen very quickly.
  3. Setup the scene, so that you have the ScreenToGif window appropriately overlaid onto your actual imagery
  4. Start recording, and slowly orbit at least 360 degrees as shown
    here
  5. In ScreenToGif, open the image folder
  6. Convert the images from PNG to JPG (I used Irfanview Batch Convert)
  7. Load into Recap Photo, make new Object project, spend 12 cloud credits and start the mesh creation
  8. After meshing, in Recap use the measurement scale tool to scale the model based on the distance between two known points

  9. Export the 3D Model from Recap. Various formats are available. In this case, I exported directly to FBX with Y-Up and imported straight to Revizto. You could also import FBX to AutoCAD and then to Revit, or you could bring it into Meshmixer first to delete some parts of the model via OBJ.

In Revizto, the direct FBX import looks like this:

Sheet overlay in Revizto. Simply with a PDF and some freely available aerial imagery, we now have a 3D collaboration workspace ready to go:

In the latest Revizto update (version 4.6.3, build 41736) you are able to change the UI scale in the General settings. This is very useful for 4K screen resolutions:

You can also set the Default Launch Screen as shown above.

The ability to update existing viewpoints is also present. You navigate to a Viewpoint, then as you move away from it a update icon will appear next to the viewpoint name. Just click that icon to update the Viewpoint. The video below shows this in action:

Currently, exporting a flat 2D DWG file from AutoCAD or Navisworks to Revizto will probably yield the following message:

However, you can simply take these steps to work around the issue:

  1. Open the DWG file
  2. Select all objects
  3. Change the Thickness to something small but non-zero (like 0.1)


  4. Export the model to Revizto (either directly or via Navisworks)

  5. Once in Revizto, you may want to change the background of your Scene to all-white or some solid colour. Just click on Edit -> Lighting and Materials

  6. In the Editor, click on Illumination -> Environment Settings and change the Sky Type to Color

  7. Finally, click Save and Quit

In Revizto Viewer, you can now see your DWG file as thin surfaces where there used to be 2D lines. This also means that you can use the measure tool:

You can use a similar method to the above (change Thickness to non-zero) while using a 2D DWG file, to:

  • export from AutoCAD to Navisworks as ‘3D’ elements
  • export an FBX from AutoCAD as 3D

Revizto doesn’t strictly offer an API (yet) for connecting to its data. But you can use the command line to export an Excel file of all of the current issue tracker data. And you could schedule this export as a Windows Task. If you are in the habit of creating custom dashboards and connecting a whole lot of data together (as I am), then this could prove to be a pretty powerful way to access and share issue tracker data with the wider team. Further, it provides an opportunity for accessing model markup information even in a non-cloud-connected state

Here’s how to export from Revizto using the command line tool, called ReviztoConsole :

Get the Revizto Project ID by hovering over the project name in the Viewer:


The command line syntax is like this (notice the project ID):

C:\Program Files\Vizerra LLC\Revizto4\Service>ReviztoConsole issues --project 12845 --export xlsx --outfile E:\temp\12845_issue_export.xlsx

Which looks like this in Explorer:

And the Excel file looks like this:

As you can see, a lot of the issue tracker fields are available here. The Snapshot and Comment fields also may include hyperlinks to a web-hosted version of the issue snapshot as well.

Note: you can use the command ReviztoConsole projects to show a list of your current project IDs and their parent folder name on your system.

Here is a list of the main Revizto Keyboard Shortcuts:

(Shortcut) – Action

(2) – 2D

(3) – 3D

(4) – Issue Tracker

(ctrl+O) – Open project gallery

(ctrl+shift+O) – Import project

(ctrl+R) – Rooms

(ctrl+X) – Section Cut

(ctrl+B) – Objects

(ctrl+I) – Issue Tracker

(ctrl+M) – Ruler

(Home or ctrl+H) – Home

(ctrl+T) – Create video track

(ctrl+E) – Sheets

(ctrl+shift+I) – Create a new issue

(ctrl+W) – Viewpoints

(M) – Opens a map

(ctrl+click) – multiple objects selection

(alt+click) – teleport

(+) – Increases a field of view

(-) – Decreases a field of view

(0) “zero” – Restores a default field of view

(tab) – hides the right vertical tool bar menu in the Issue Tracker, objects, rooms, viewpoints, camera share

(Esc) – Exit

Navigation modes:

(F5) – Sets navigation mode to Like in Video Game

(F6) – Sets navigation mode to Like in Revit

(F7) – Sets navigation mode to Like in SketchUp

(F8) – Sets navigation mode to Hybrid

(F9) – Sets navigation mode to Navisworks Walk

(R) – Toggles the Fly/Walk modes (if available)

Markup mode:

(P) – Pen

(Q) – Callout

(T) – Text

(L) – Line

(A) – Arrow

(E) – Ellipse

(shift+P) – Polyline

(R) – Rectangle

(space) or (V) – Edit Mode

From here
——————————————————————————-
You can also read about the different navigation modes at:
Navigation

Also this information on 3dconnexion:

Revizto works by maintaining a local copy of cloud models, that are synced periodically with the cloud. The Issue Tracker will always try and automatically remain in-sync if an internet connection is available. This allows you to do things like download all current models and sheets to an iPad, head out on site (where you may have no internet) and do some work, come back to the office and then sync the changes.

However, from time to time you may want to clear the cache of a particular project. Typically, this is so you can confirm you are running an identical version to the current cloud model. To do that, you have to clear your local cache of that particular model. Here is how you do it:

1. Sync the model if you have any recent local changes (this is to upload all of your local work)
2. Close Revizto.
3. Open Revizto. While in the project gallery, click on “Edit” button in the top right corner. Then click on that project and choose “Clear cache” option.


4. Open Revizto project. Your project will re-sync with the latest cloud version.

What if you want to completely remove all local project data at once? Or possibly, you are running out of disk space in the normal ‘working folder’ location (yourUser\Documents\Revizto4). In that case, you want to move the working folder. Then Revizto will download the latest cloud data for every project. As above, ensure you have synced all your local models first… Then take these steps:

  1. Open Revizto
  2. Click Preferences
  3. Click General tab
  4. Select ‘Change’ next to ‘Working folder’ and choose a new, empty folder. It should have sufficient disk space to download all the project data:

You probably should close and re-open Revizto, and then go ahead and open your project. Again, it will sync all data from the cloud for you.

In this webinar, LHB’s Dan Stine walks through a proven workflow for collaboration and client engagement using Revizto. This presentation simulates a client meeting, highlighting ways Revitzo can be used to explore the model and capture client comments and requested changes. You can see how several Revizto features can be used collectively to demonstrate the design intent and react to client questions with minimal effort.

You can view it at: