Revizto doesn’t strictly offer an API (yet) for connecting to its data. But you can use the command line to export an Excel file of all of the current issue tracker data. And you could schedule this export as a Windows Task. If you are in the habit of creating custom dashboards and connecting a whole lot of data together (as I am), then this could prove to be a pretty powerful way to access and share issue tracker data with the wider team. Further, it provides an opportunity for accessing model markup information even in a non-cloud-connected state

Here’s how to export from Revizto using the command line tool, called ReviztoConsole :

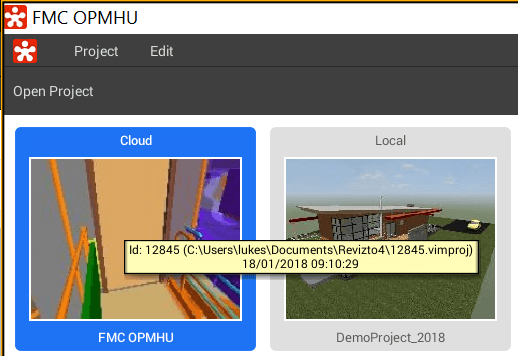
Get the Revizto Project ID by hovering over the project name in the Viewer:


The command line syntax is like this (notice the project ID):

C:\Program Files\Vizerra LLC\Revizto4\Service>ReviztoConsole issues --project 12845 --export xlsx --outfile E:\temp\12845_issue_export.xlsx

Which looks like this in Explorer:

And the Excel file looks like this:

As you can see, a lot of the issue tracker fields are available here. The Snapshot and Comment fields also may include hyperlinks to a web-hosted version of the issue snapshot as well.

Note: you can use the command ReviztoConsole projects to show a list of your current project IDs and their parent folder name on your system.

Lets say you want to create a HTML file that has a linked list of all of the RFA Family files in your company directory.  You can then click on each hyperlink to open the family in Revit.

Here’s how you do it:

  1. Open Notepad
  2. Download the file at this link
  3. Rename the file with a CMD extension.
  4. Now, right-click on the CMD file, and click ‘Edit’ to open it in Notepad. 
  5. Change the text to the right of  set target= to suit the top-level directory of your family file library.
  6. If you want to get links for all subdirectories, retain the /S switch (its already there), otherwise remove it.
  7. Now, just run the CMD.  It will create a file called LinkList.html in the target directory, and it should automatically open it in Internet Explorer.  Just click on a link and away you go!  You should be able to open the rfa files directly from these hyperlinks.


I have set this CMD script to sort results alphabetically (that is the /O:n part of the DIR command).  However, you may find the sorting a little unusual, because I think it respects the directory as well as the name.


You can now use the Find feature in Internet Explorer to quickly search for parts of filenames / family names.


You could also point this at a top-level project directory to extract links to all the RFA files in that ‘job’.

If you want to know more about the DIR command, check out this link.

EDIT – if you want a GUI option, check out:

Snap2HTML – Create fancy dir listings

What happens behind the scenes in Revit?  The Revit Command Prompt utility developed by Jose Guia can help you learn.

Here is a direct link to the addon:
http://blog.bimkicks.com/file.axd?file=2011%2f3%2fRevCmdPrompt.zip

To install:

  1. Download the ZIP
  2. Extract anywhere
  3. RIGHT CLICK the INSTALL.cmd file and select “Run As Administrator”
  4. Restart Revit.
  5. Under Add-Ins, External Tools, you will have a new option called Command Prompt

Via:
blog.bimkicks.com | REVIT COMMAND PROMPT – aww yeah!!!!!!!