Revit Wants you to transmit ‘detached copies’ of Central files for linking into other models. If you ignore this and transmit your Local copy instead, Revit always remembers where that instance of the Local file was saved, and it causes havoc in a federated model situation. You can use the free CTC explorer extension to quickly check this:

Or you could use Dynamo with my Bakery package:

 Hypothetically, let’s say you have received a file from a consultant, and after reloading you realise it was a Local file, not a Central. Now, your federated model may already have changed the name of the file to match whatever the local was called. Let’s say this problem has caused another problem: multiple instances of that same model have been loaded into this file.

If you are using View Templates, only one of these instances will be the point-of-truth for your View Template Revit Link Overrides. Time to get out your magnifying glass and investigate. Firstly, we will create multiple copies of the RVT file with different names, and then use Reload From (in Manage Links) to get these loaded into the current Revit session. This will create a Local alias:

Now, only one of these is the historical, correct link in the context of this federated model. How do we know which one to keep and which ones to remove?

We can use our View Template Revit Link Overrides to tell us… after all, they are the reason we are going through this process, right? We want Revit to ‘remember’ the overrides we have made in those templates. So let’s have a look at the View Template and see what it tells us.

Basically, by reviewing the Custom overrides here, I was able to determine which version of the Link to keep. It just so happens that the correct historical link had:

  • a lower number as its instance name (shown above as 149), and
  • a lower number as its element ID (450048 compared to 1288492). I found this by using Project Browser, Select All Instances – In Entire Project and then Manage – IDs of Selection

The above two ‘numerical’ investigative methods are probably not 100% reliable, but they may give you a good idea of which link instance is older in terms of this project.

Now, simply Remove the wrong links using the Manage Links dialog, and be aware of not re-linking multiple new instances if you just so happen to get a Local copy from someone in the project team. And remember…

What does Revit Want? Central copies for linking purposes.

ArchVision has just released a new content subscription service, initially focused on Revit construction details, called Detail Warehouse. What is it and how does it work? Read on below…

Quote:
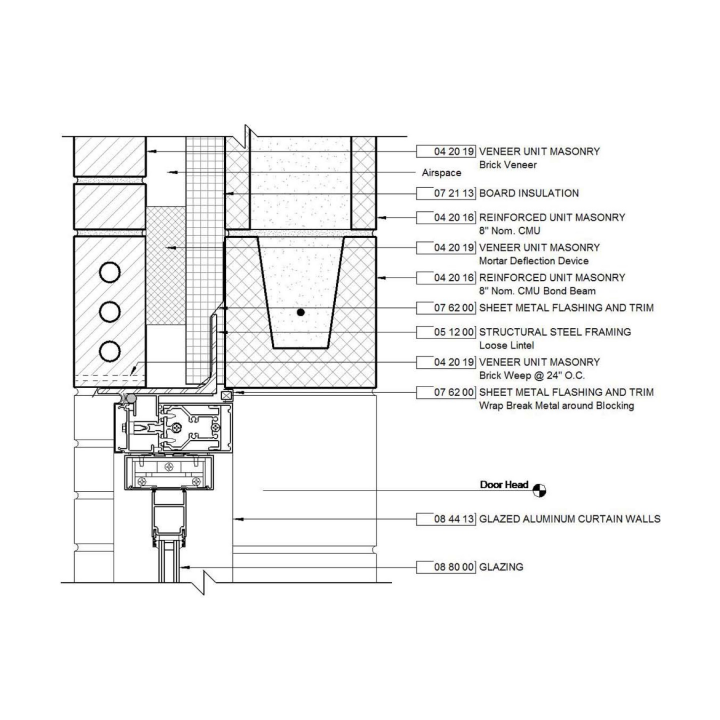
The DETAIL WAREHOUSE provides access to over 27,500 native Revit Drafting Views designed to kick-start or supplement your in-house Revit standards library. The collection is comprised of foundation, door, window and roof details representing 50 sub-categories of construction details. In addition, you’ll also have access to nearly 1000 Revit Components.

0014668-9809515

The goal of DETAIL WAREHOUSE is to provide you with an efficient starting point and ongoing complement to your own internal library. For only $499 per year you can access the entire reference library drawing on what you need, when you need it. Learn more at DETAIL WAREHOUSE.
AVAIL

dw_avail_channels2-3606332

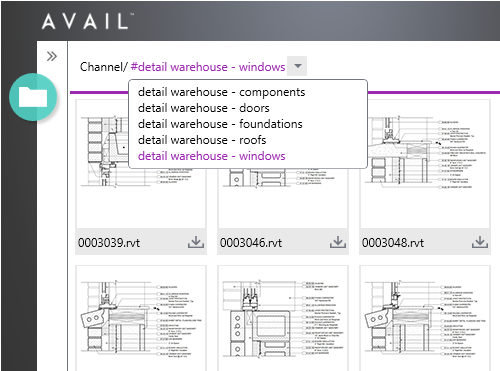
Besides offering the most extensive collection of Revit Drafting Views available anywhere, access to the DETAIL WAREHOUSE is provided via ArchVision’s innovative new content management platform called AVAIL. Through AVAIL, DETAIL WAREHOUSE subscribers can access foundation, door, window and roof “Channels” and search and download content closely matching their needs. A Properties Panel presents high-resolution previews of each Drafting View. AVAIL let’s users browse or search the content in a Channel but also offers an innovative new way to find content we call “Panoply”.

From:
DETAIL WAREHOUSE, AVAIL & PANOPLY | ArchVision Blog
Press release:
ArchVision DETAIL WAREHOUSE
The World’s Most Comprehensive Collection of Revit Details

ArchVision is pleased to announce the immediate availability of a new BIM content subscription service called DETAIL WAREHOUSE DETAIL WAREHOUSE provides access to over 27,500 native Revit Drafting Views and nearly 1000 Revit Components designed to kick-start or supplement in-house Revit standards libraries.

The collection, comprised of foundation, door, window and roof details representing 50 sub-categories of construction details, saves customers hundreds of hours searching, converting or re-creating details, and allows users to focus more time on design and less time on details.

“This extensive collection of Revit details was designed to help AEC firms build their internal standards libraries which can cost tens of thousands of dollars in labor costs to produce” says Randall Stevens, ArchVision CEO. “The details were painstakingly crafted natively in Revit and fully customizable to each firm’s specific needs.”

Managing thousands of details demands rethinking how they are organized and retrieved. The DETAIL WAREHOUSE is managed through AVAIL, a new content management platform also developed by ArchVision. Through AVAIL and it’s integrated Panoply filtering technology, DETAIL WAREHOUSE subscribers access foundation, door, window and roof “Channels” and download content closely matching their needs. AVAIL provides a robust solution for managing, publishing, and accessing content in an efficient, user-friendly way.

Yearly access to the DETAIL WAREHOUSE is available immediately for $499 at archvision.com/products/detailwarehouse.

###

About ArchVision
ArchVision improves design modeling and visualization with content and content management solutions. Our RPC technology provides architectural entourage in the form of people, tree & plant, and automobile content. Our AVAIL content management platform provides content organization and search tools for managing vast amounts of design content. DETAIL WAREHOUSE, a collection of ready-to-use Revit Drafting Views, holds over 27,500 Roof, Window, Door and Foundation details with unlimited downloads.

Contact
Kela Lester
Marketing Coordinator
klester@archvision.com

Links
archvision.com/products/detailwarehouse
avail.archvision.com

A couple of interesting new endeavors have appeared online recently that I wanted to share. The first is from Autodesk, and they are encouraging you to learn and use keyboard shortcuts. I have posted about keyboard shortcuts plenty of times in the past. I’m not sure this particular site will help me much, because over the years I have customized my Revit shortcuts and they don’t match up with the default anymore 🙂

Check it out at:
Revit Shortcuts | Keyboard Shortcuts and Commands | Autodesk

I have also posted previously about warnings and error reports (including how to solve them). The Revit Warnings Project  wants to take your Revit error reports and turn them into some useful, browse-able statistics data and graphs. It is an interesting read, if only to see how your errors compare to some others. I would like to see the Revit Warnings Project expanded to included recommended solutions to the warnings too.

My less-serious take on Revit Warnings and Errors can be viewed here:
What Revit Wants: Funny Revit Error Messages

There was an API addin available a while back, but in recent years I have used:

  • the Case Batch Export Family RFA’s tool
    https://wrw.is/2012/12/how-to-determine-if-family-is-in-place.html
    This way is pretty robust, as it also gives you a list of inplace families and masses that it couldn’t save to rfas. Unfortunately, it is pretty hard to get now that Case have shut down their free app downloads 🙁 Hopefully someone in your office already has it installed? Just copy all the files starting with Case between the relevant addin folders to get it going.
  • You could also use the builtin method File – Save As – Library – Family – All Families to export the rfas, and then (for 2013 version only) the free Kiwi Codes Family Categorizer to sort them into Category folders. More on that here:
    https://wrw.is/2012/11/free-utility-that-will-sort-all-of-your.html

These are the steps to export the families using the builtin workflow:

Personally, I now usually use Unifi to export and manage Revit content.

Thanks to Matt Wash for prompting me to do an update post on these different methods.

This is a pretty basic lesson, but just in case you aren’t doing it already… Adding a default value to your input nodes can make your custom nodes much more useful (and possibly easier for others to use). Obviously, not every input always needs a default, but in some cases you probably know that “in 9 times out of 10 use cases, this value should be xyz”. To add this default value in Dynamo:

  1. Edit the custom node
  2. In the input node label, after the label name type a space, followed by a colon, followed by a space
  3. You are now in ‘default value land’. Dynamo will prompt you for a datatype.
  4. Choose or enter an appropriate datatype, then type a space, followed by an equals sign, followed by the default value
  5. Obviously, the value must match the datatype.

An explanatory image and a 1 minute screencast are provided below.

Screencast: