Aaron Maller, aka twiceroadsfool, has been sharing his Revit door family package on RevitForum for the past few years. If you haven’t seen it yet, you can check out his post in the thread here:
http://www.revitforum.org/architecture-family-creation/1242-doors-download-nested-panels-nested-frames.html

In the thread, he gives instructions on how the door families work, and a link to download the 179mb zip package:
First important part. The way they work is you only place the ones that say DOOR at the beginning of their name, obviously.

Download Link for the v4 Doors, a sample file with the doors in them, and the Door Schedule accompanying them, is here:
 https://www.dropbox.com/s/lcr5gobpuv…015v4.zip?dl=0

Thanks for sharing Aaron!

Older posts:
Doors for download, Nested Panels and Nested Frames..

Heads-up via http://notanotherrevit.blogspot.com.au/

If you are having problems, try manually loading families like this:
“Hi Russ.
I believe the issue is that you first need to load the Site Designer families (from C:ProgramDataAutodeskSite Designer for Revit 2015Library) into the project before you try creating roads/walks/etc., and then convert your toposurface into a Base Toposurface (via the Set Base Toposurface  button).  After that, I was able to create roads, walks, retaining walls, etc.
Hope that helps.
Ross Kirby”
via
Revit 2015 R2 – Site Designer – Autodesk Community

or it might be visibility related:
“got it working.  I have mass unticked by default in visibility view graphics.  all works after turning on mass.
Russ Green”
(from the same thread)

I previously posted about Site Designer here.

You can also download an interesting review by Aaron Maller here (link from RFO).

You should be able to find your manual here:
“C:ProgramDataAutodeskApplicationPluginsAutodeskSiteDesignerForRevit2015.bundleContentsSite Designer for Revit 2015 Reference Manual.pdf”

Have you ever tried getting thumbnail images to show up for Entourage families? After reading a few tweets on this recently… I’ll admit, using a Journal “script” to open family, switch to Elevation View, enable Realistic mode and save the thumbnail is not too shabby (by Aaron Maller):

While the above method is definitely cool, it still relies on you having a good RPC Entourage library in the first place. So, are you looking for a plug-and-play software solution to manage all of your Entourage and RPC content? And do you want to be able to preview the RPC, and then use it in Revit or Photoshop?

Then you may want to check out the latest update released for Archvision Dashboard. I’ve posted recently about how easy the RPC creation is now – it is literally drag and drop, and pretty much automatic, meaning that your potential for generating custom RPCs is virtually unlimited. Now with the preview mode and Photoshop drag-and-drop integration, Archvision Dashboard is starting to feel like one of those things that just “makes sense” if you are doing any kind of rendering and presentation work in Revit (and / or Photoshop).

Here’s a video of the new Viewport feature:

Download it from this page
The next time you fire up your ArchVision Dashboard you should see a prompt to update to the latest version (v 2.1) which includes the new Viewport viewing mode.
Viewport for Dashboard not only lets you preview and spin around any 3D or 3D+ RPC but you can also drag & drop directly into applications like Photoshop! Just hit the Render button and drag the thumbnail into Photoshop. Viewport for Dashboard improves the workflow for using RPCs in Photoshop and does away with the need for the Photoshop Viewport plug-in.

This new version of Dashboard also include a new Filters feature which works hand-in-hand with Channels letting you drill down to the right content in just a few clicks.

via email

Previewing RPCs and using them in Photoshop just got easier! We’ve added a new viewing mode within Dashboard called Viewport. Not only can you preview and spin around any 3D or 3D+ RPC but you can also drag & drop directly from Viewport into applications like Photoshop! Just hit the Render button and drag the thumbnail into Photoshop.
via email

Link:
Archvision Dashboard

In case you missed it:

also:
Drag and Drop updated build of ArchVision Dashboard available that just came out as a ‘pull’ update. This includes the admin license panel tools and also has Drag & Drop enabled for Revit 2013 and later / 3ds Max / AutoCad. We expect to deploy a new RPC creation feature at the end of April, where you will be able to take any 2D image with an alpha channel, drag it into our creation tool, assign a name and height and have an RPC available to use immediately in any supported application.

You may also be interested in my previous posts about Archvision:
https://wrw.is/search/label/archvision

A great way to test if you know What Revit Wants is to try and run a complicated high rise or health facility using model groups. The principle and general functionality of groups is fine, but they can get very difficult to manage if not treated properly. However, they can be mastered.

As Ceilidh Higgins puts it:
Whilst groups are error prone and seem to have a lot of bugs … they are still the best available solution within revit for collecting together repetitive sets of objects. 

She recently presented at RTC on this subject, and she has provided the associated presentation slides for download and viewing.

Embedded here:

via
Get your groupon! A guide to Revit groups | The Midnight Lunch

You may also be interested in this AU class by Aaron Maller:
Autodesk® Revit® Links, Groups, and Documentation: How to Make It Really Work!

“You can’t do that in Revit” is a common catch-phrase for those who do not know the program well.  Happily, there are people out there who do know how to do those things in Revit – you just have to find those people and take the time to learn from them.  One such person is Paul F Aubin.

He is the author of many Revit-related books, but the most recently published edition focuses on using Revit to make and present Classical and Renaissance building forms and architecture.  What I like about this particular work is that it does not just cover simple “how-to” steps for certain tasks.  It has a larger and more interesting scope.

Combining elements of history, architectural theory, good Revit practices, and of course, the “how-to” bit as well, Renaissance Revit is well worth a read.

It is hard to put it better than Andy Milburn in the Forward:
“The fact that you are reading this foreword suggests that you too are excited by what Revit can do. Take my advice. Grasp the nettle. Don’t look back.
(yes, I did have to look up what “grasp the nettle” meant 🙂

The book delves into proper use of the two key Revit family environments: the traditional Family Editor, and the Massing Environment.  While it may initially seem that the content of this edition is for advanced users only, in actual fact Paul has provided appropriately basic parts to help beginner Revit users, and at the same time even highly experienced users will have the occasional moment where they say “ah, that’s much better than the way I currently do that…”

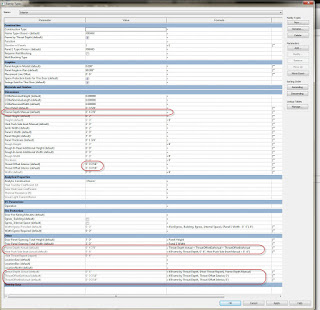
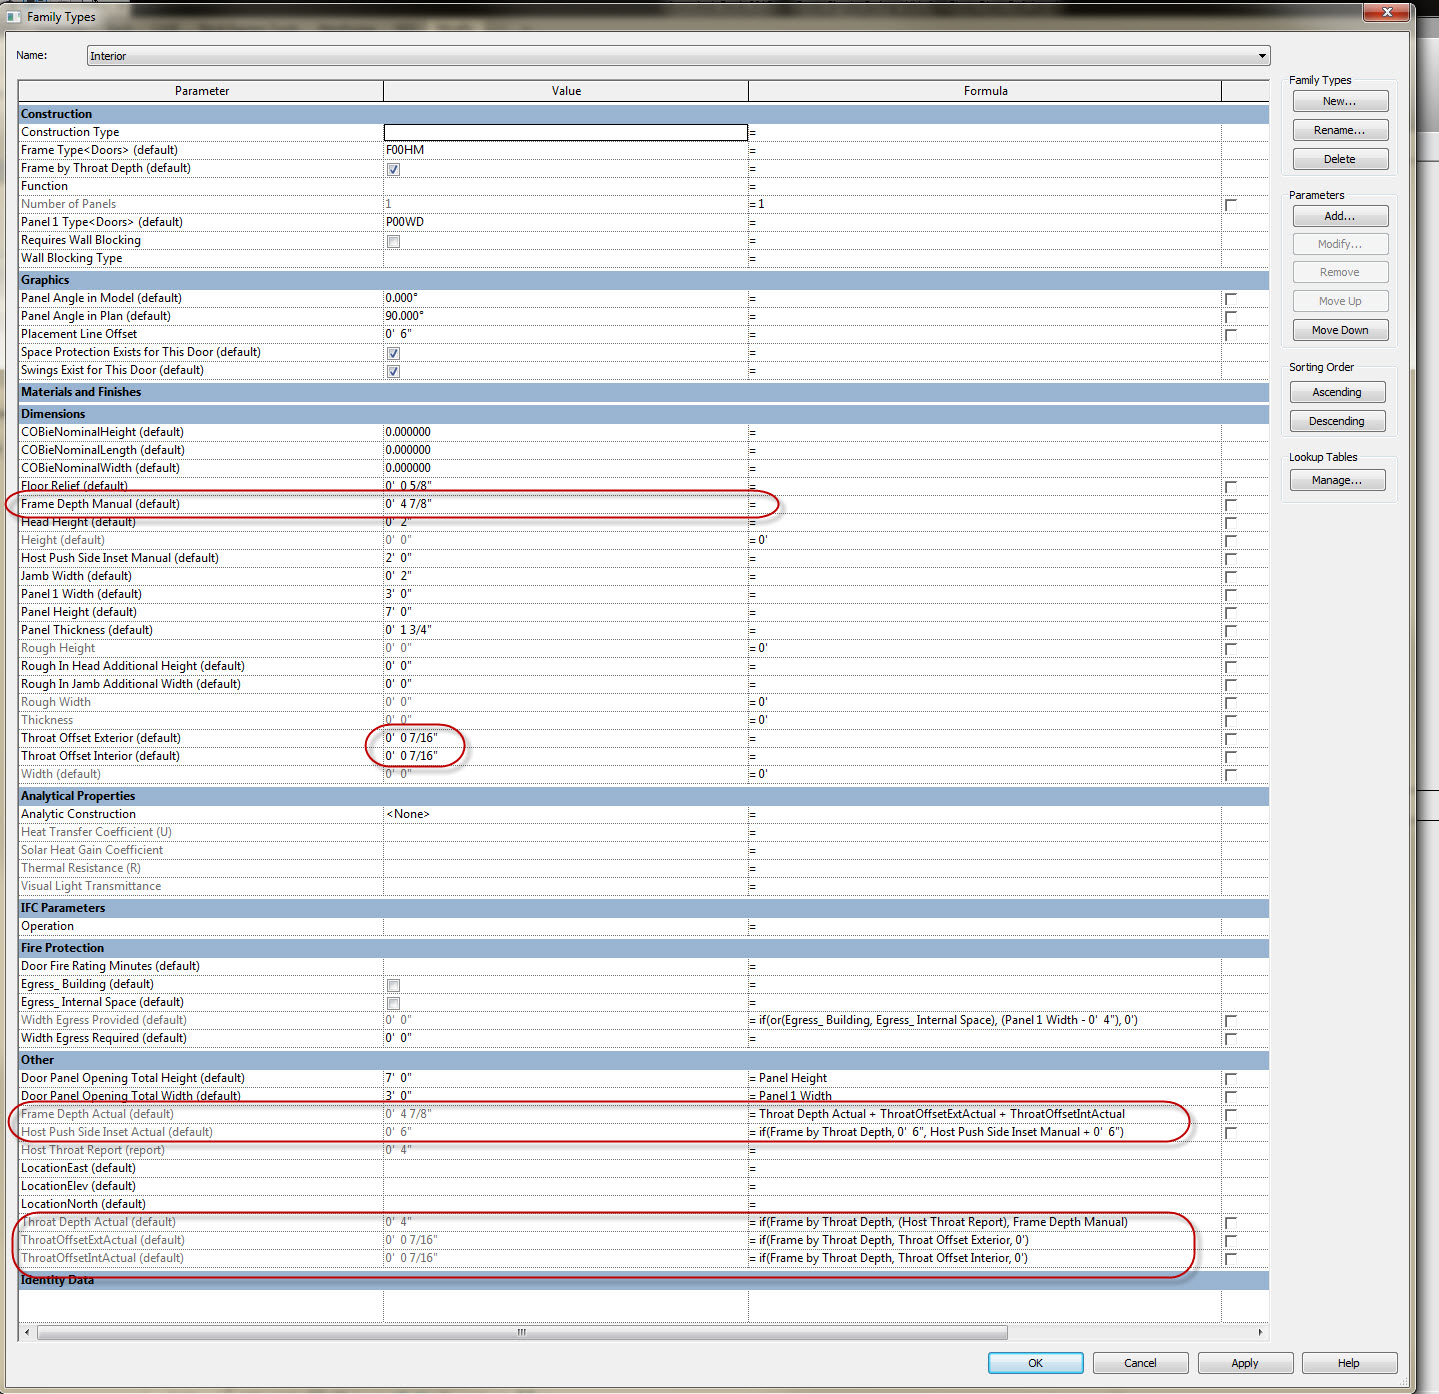
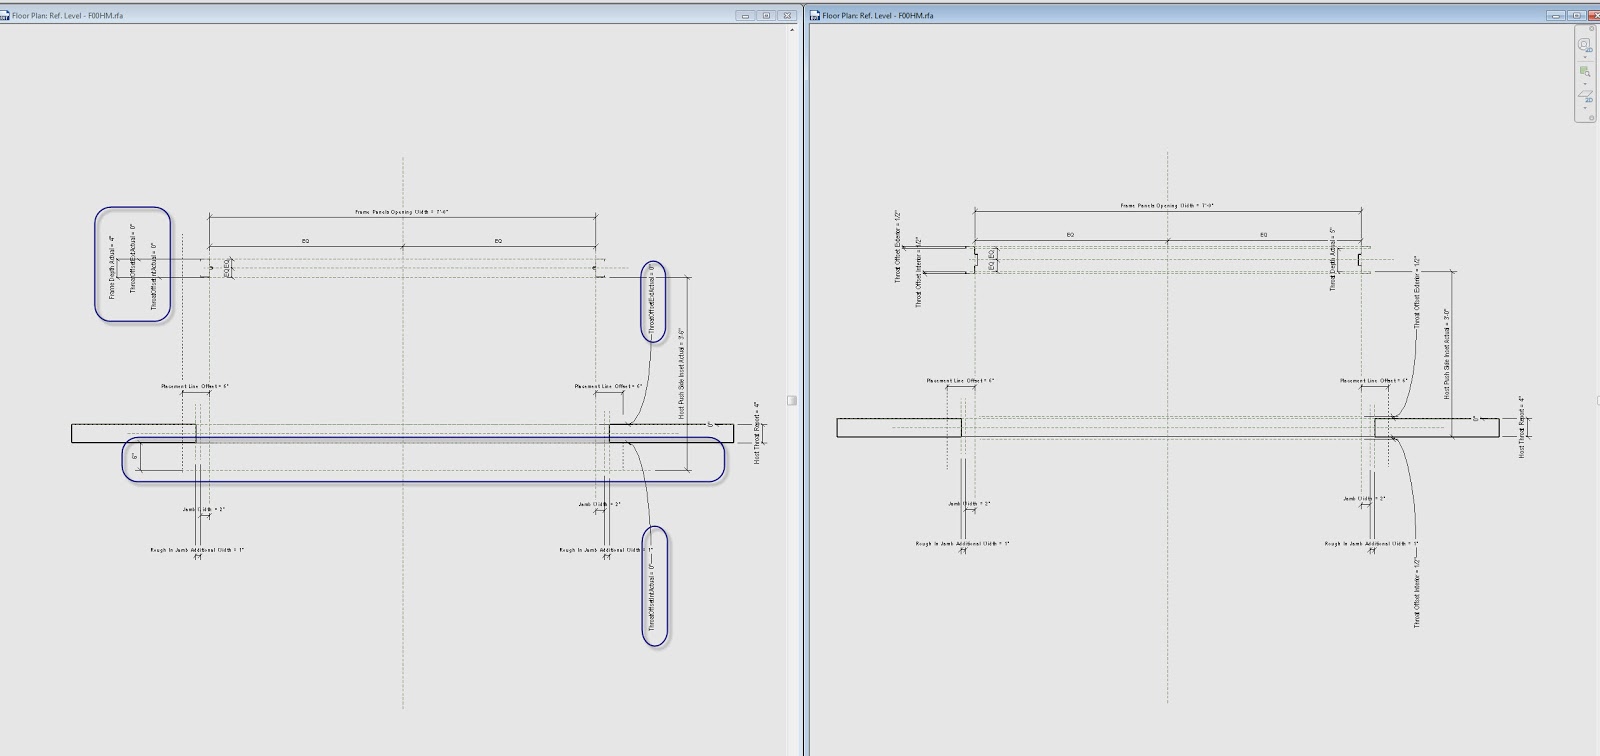
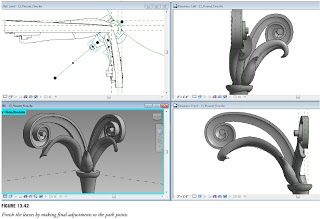
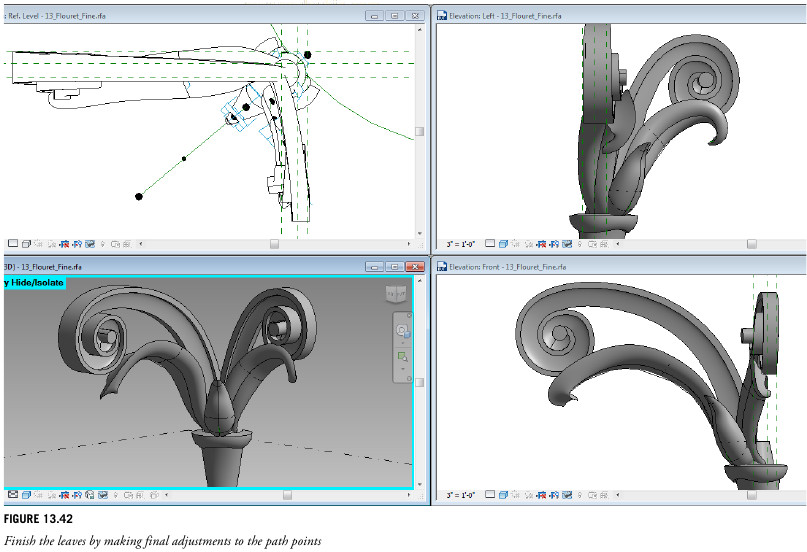
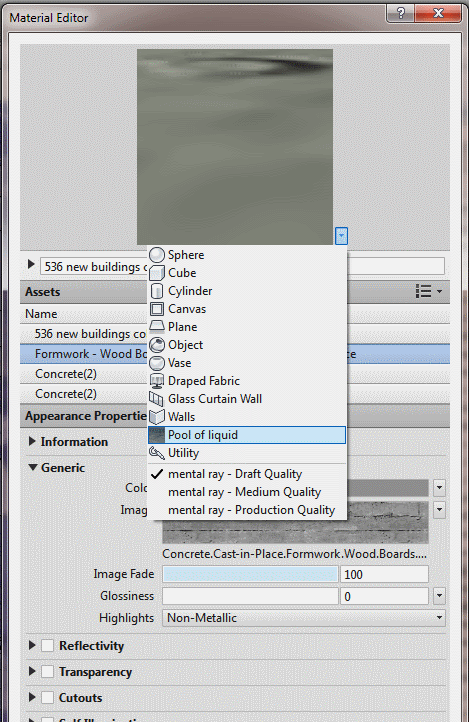
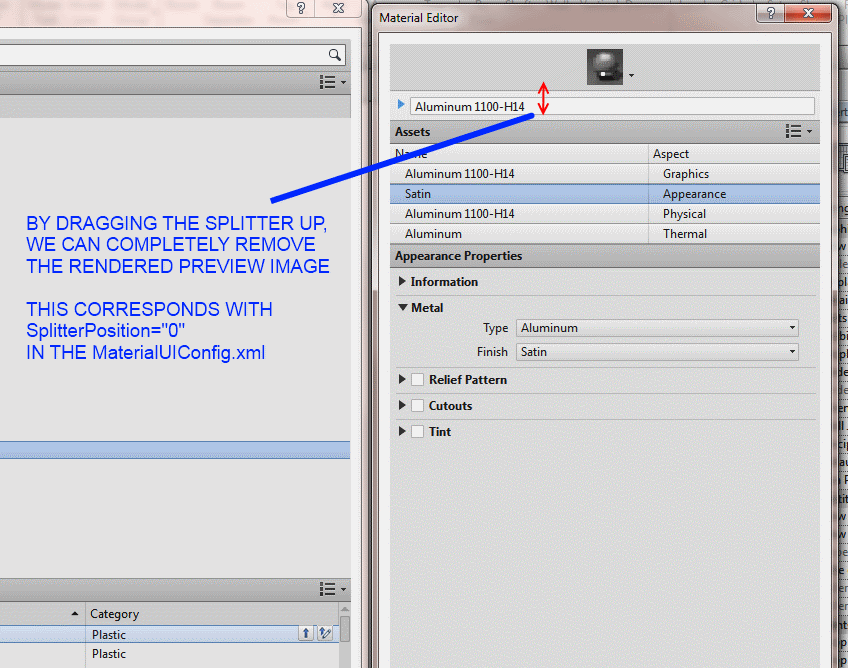
It is packed with detailed diagrams, images, formulas and workflows.  Here is just one example:

Datasets of lessons are included, with additional progress files provided at logical points through the lesson.  You will be able to download “completed” versions of those families by registering at paulaubin.com.  Also of note – Aaron Maller is the technical editor, and I’m sure most of you are aware of his excellent Revit reputation. 

Discounted pricing available at:
Renaissance Revit: Creating Classical Architecture with Modern Software | Paul F. Aubin

(You can choose between a Black and White or a Full Colour version)

You can also read Paul’s post:
Renaissance Revit Now Available | Paul F. Aubin

Lastly, consider this brief list as a “teaser” of the real scope and value of what is included in this book:
“we will look at practical examples of how to approach many common Revit challenges, such as:

  • Strategies to planning and building reusable family content
  • How to control scale and proportion reliably
  • How to parametrically control curves like arcs, ellipses and compound curves
  • Strategies for working with appropriate levels of detail
  • Approaches to effectively managing repetitive elements
  • Building rules, relationships and design intent into your content
  • Strategies to use two-dimensional geometry instead of 3D

Thank you, Paul Aubin, for bringing a new level of depth and class to the greater Revit bibliography.

DisableMPPAutoApply is the revit.ini setting which essentially stops Revit from automatically applying changes from Properties Palette based on cursor movement.

Interesting, Aaron’s tweet below shows that now you can move cursor at will, and a click in the drawing canvas will “Apply” properties changes.  Do we need to make a T-shirt for AU?

DisableMPPAutoApply=1

Enables or disables the ability to save changes to the Properties palette by moving the cursor out of the palette without clicking Apply.
Type = integer
Valid values: 0 = no (default), 1 = yes

from
http://help.autodesk.com/cloudhelp/2014/ENU/Revit/files/GUID-30C62836-F3F1-4B78-B1AF-DB4E3FD79FDF.htm

Aaron Maller has been travelling a lot lately, but he still found the time to upload some of the recent presentations that he has delivered:


Flicking through the Glasgow RUG PDF, you will find cool stuff like:
 
 
I also like these words from his post:

Its really not enough to be doing the best that i can in one country.

We need a vehicle, for reaching a Global platform.

i dont post these thinking they are anything more than what they are:  One small groups workflow that happens to get us through some specific needs.

Read more / via:
Malleristic Revitation: Malleristic BIM travels

Many of us were quite disturbed by the 2013 Revit Materials Editor.  Aside from its usability (or lack thereof), it seems to be much slower than the 2012 Materials dialog.  Until Revit 2014 comes around, what can you do to speed up the Materials Editor?

A recent and highly informative post from Aaron Maller (focused particularly on Revit deployment), gives us a few clues:
Switch all the mat lists to text style, no rendered preview, open the Mat Editor and place it next to the Mat selector, then close it. 
Read the whole post here

Have a look at the images below for some ‘hidden’ options:

Appears to be no way to adjust the rendered swatch?
After switching to Appearance aspect, a tiny arrow appears…

We can now adjust this to speed up the Materials Editor.  The above settings seemed to be the fastest
(Pool of liquid / Draft Quality)

We can also completely remove the rendered preview image by dragging the splitter just below it:

Aaron made similar comments in this post on RFO.

In my case (Building Design Suite 2013 / Revit OneBox), the currently in use MaterialUIconfig was at
“C:UsersLukeAppDataRoamingAutodeskRevitAutodesk Revit 2013MaterialUIConfig.xml” 

Upon opening the MaterialUIConfig.xml, you will notice a few settings like:

MaterialBrowser inSceneMaterialViewHeight=”502″ navigationPaneWidth=”241″ isInSceneMaterialPreviewEnabled=”0″ isNavigationPaneVisible=”1″

and

MaterialEditor SplitterPosition=”0″ OGSRenderQuality=”0″ PreviewRenderQuality=”0″ PreviewRenderType=”2″

I would like to see some documentation from Autodesk to clarify what all of these actually do, but you can see the settings I am using.  If you use Notepad++, you can also open MaterialUIConfig.xml, make some changes in Revit, and then when you switch back to Notepad++ it will prompt you to reload the xml – you can then easily see what each change you make in the Materials Browser / Editor actually does.

Steve Stafford and Aaron Maller are both awesome Revit guys.  Both of them have a Screencast library of videos that you can freely view.  Here are the links:

RevitOpEd’s library

aaronmaller’s library

You can also subscribe to an RSS feed of Steve’s Screencast videos.

Do you have a set of Revit-related videos in a library that you would like to share with us?  Please leave a comment with a link…