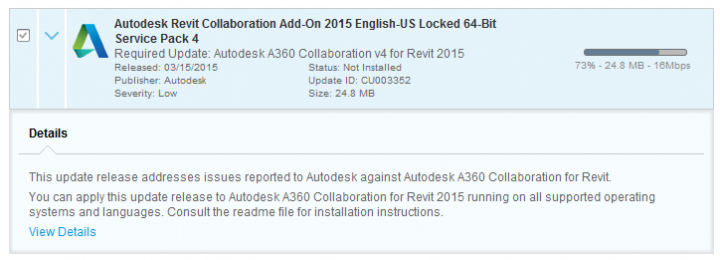
Also known as Autodesk Revit Collaboration Add-On 2015 English-US Locked 64-Bit Service Pack 4. This goes hand-in-hand with Revit 2015 Update 7.
Direct link:
http://download.autodesk.com/SWDLDDLM/Updates/RVT/v4/A360_Collab_v4_for_Revit_2015_EN_Win_64bit_dlm.sfx.exe
Known issues:
http://download.autodesk.com/SWDLDDLM/Updates/RVT/v4/KnownIssues_A360Collaboration_v4_Revit_2015.pdf

Installation and Known issues text copied here:
Installation
Autodesk A360 Collaboration for Revit version 2015.4 can be applied to Autodesk Revit 2015 as a new installation, or as an update to Autodesk A360 Collaboration for Revit versions 2015.1, 2015.1.1, 2015.2, or 2015.3.
Note that this is a mandatory update; previous versions may cease to function at a future date.
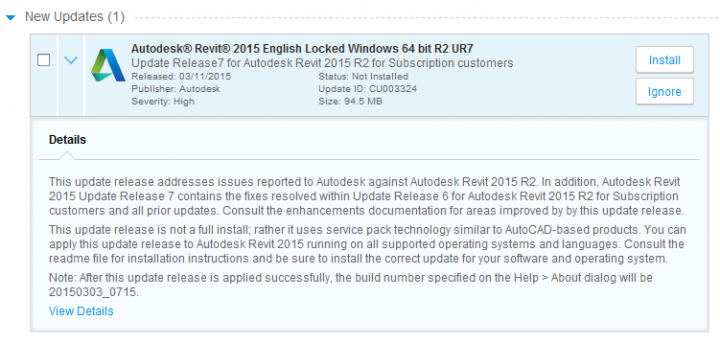
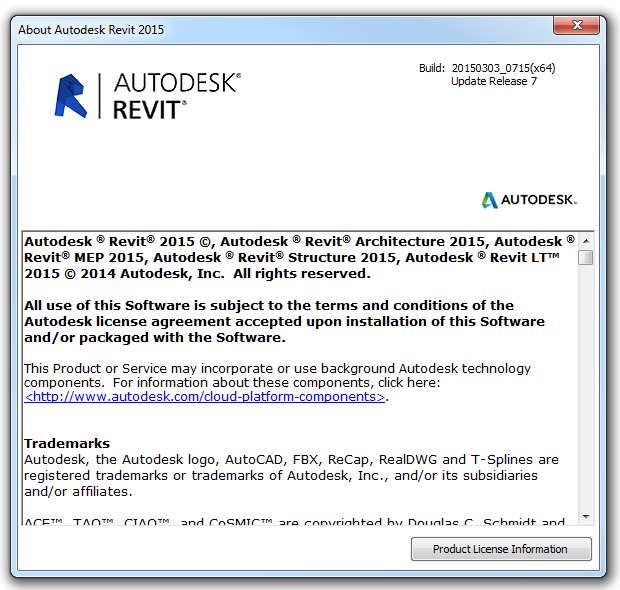
Before installing Autodesk A360 Collaboration for Revit you will need to update Autodesk Revit with Update Release 7. Note that the installer for UR7 is specific to the variant of Autodesk Revit 2015 that you have, for example, Autodesk Revit 2015 vs. Autodesk Revit 2015 R2 (available only to subscription customers) or Autodesk Revit Architecture vs. Autodesk Revit MEP. Please be sure to install the correct update for your installed version of Autodesk Revit. Once you have installed Update Release 7 you are ready to install Autodesk 360 Collaboration for Revit.
New Installation
1. Close all instances of Autodesk Revit 2015.
2. Launch the installer, select the option to Install, accept the License and Services Agreement, and click the Install button. This will complete the installation.
3. At this point, your Autodesk Revit has been updated and is ready for use. You will need the appropriate entitlements to access the new functionality. (Please refer to the About A360 Entitlements section of the Autodesk Revit 2015 help for more information, link.)
Updating Existing Installation
1. Close all instances of Autodesk Revit 2015.
2. Launch the installer, select the option to Install, accept the License and Services Agreement, and click the Install button. You will be informed that there is a previous version of Collaboration installed; be sure to confirm and allow the installer to remove the old version. This will complete the installation.
What’s new in this release?
1. Performance improvements when Revit is downloading data from the Collaboration service.2. Users now have the ability to control the model views that are published to the A360 project. The default behavior, to publish the default 3D view and all sheets, remains unchanged.To change which views are published, click the Views for A360 button in the Manage Models panel of the Collaborate tab. Make the appropriate selections in the resulting dialog and then Sync with Central.
Subsequent publishing operations will make these views available to A360. For more information, refer to the “Select Views to Publish on A360” topic in the Revit 2015 help.
3. The A360 project page can now distinguish between models that have been published via the Collaboration service and RVT files that have been directly uploaded via the web page. Models that have been published have been changed as follows:o Special icon badging
o Dedicated file type identification (“Cloud Revit…,” rather than “Revit Files”)
o File actions that should not have been possible have been removed from the user interfaceNote that these changes will only manifest for models that have been published using Collaboration 2015.4; those published with previous versions of Collaboration will continue to be indistinguishable from RVT files that were directly uploaded via the project web page.
Known Issues
Issues related to install
1. Collaboration users who have updated Revit with UR7 but have failed to install the 2015.4 Collaboration update will experience an error on startup, stating Revit “Could not load file or assembly ‘Autodesk.RevitServer.Versioning.Client, Version=1.3.0.0…” To resolve this, be sure to install the Collaboration update after installing the Revit update.
2. If the Modified date for the revit.exe.config file (located in the Revit program folder, e.g., c:Program FilesAutodeskRevit 2015) is newer than the Created date, the patch installer will fail to update it and Revit may not launch correctly. It is extremely unlikely that this will occur as the file is not intended to be edited, but if it does please contact Autodesk for guidance on how to repair and properly update the installation.
3. The A360 icon may appear in the wrong position of the file navigation when Revit and the Collaboration Add On are first installed. This condition will self-heal.
4. In rare cases, the ribbon will fail to update after all components are installed. If buttons or groups of buttons seem to be missing and do not match what is expected according to Revit’s help documentation, please reset the ribbon state by deleting %roamingappdata%AutodeskRevit[flavor of Revit 2015]UIState.dat. This is a one-time correction and will not be required thereafter.
Issues related to A360 projects and the A360 web interface
1. When a project is renamed, it may be necessary to perform a SWC (and, for links, a Reload… from the Manage Links dialog) in order for paths to update and resolve correctly. Refer to the help documentation for more information.
2. Project names should NOT include slashes or backslashes, or Revit may behave erratically.
3. Projects that have been deactivated in A360 may still be visible from certain parts of Revit.
4. A360’s filter by ‘Me’ function may display items from other users.
5. Preview images for models that have been published to A360 may fail to update automatically, requiring a manual refresh.
6. The A360 model viewer may incorrectly report that there are no views found, if only a single view is published.
7. Notifications of newly published versions of a model may not be displayed in the Activity Stream.
8. The commenting feature in the A360 model viewer is not supported for 2D sheet views.
Issues related to model or project access
1. During a network outage it may not be possible to work in a model, even if worksharing operations are avoided. For best results, save the model locally and wait until connectivity is restored. Note that the save process may take more time than usual, but it will complete successfully.
2. If a user is added to a project as a contributor, they must click the project link in their invitation email before the project can be accessed through Revit.
3. If a user is added to a closed project as a member, a project moderator will still need to approve their membership even though they have been explicitly invited to join the project.Issues related to initiating collaboration (saving a model to A360)1. Initiate collaboration may fail and cause Revit to hang if the model’s current view is a 3D perspective view. To avoid this condition, be sure to switch to another view before initiating collaboration.
2. If a user does not have a valid Collaboration entitlement and they attempt to initiate collaboration, Revit will report “You cannot use the option “Collaborate Using A360″ because you do not have access to any A360 projects.” This is potentially confusing because the message does not indicate the true root cause of the failure (i.e., the lack of an appropriate entitlement.)
3. If initiate collaboration fails, entries may be created in Revit’s Most Recently Used file list and the zero document screen, even though the model was not actually saved to A360.
Issues related to the Communicator panel
1. The Communicator panel will lose the context of the current project if the user attempts to save a loaded family to the local disk. The context will be reacquired when the user switches views or closes and reopens the model. Similarly, editing a family may cause the panel to falsely claim that the user have been removed from the active project. When the family editor session ends, the status will be refreshed and updated to the correct state.
2. The Communicator button will still be active even when the panel is open, but it won’t actually do anything.
3. User profile updates on A360 may fail to reflect in the Communicator panel.
4. The Communicate panel may fail to sign in if the user signs out from Revit, closes the Communicate panel, and then signs back again.
5. Sending image content in a chat session may fail, requiring a retry.
Issues related to publishing models or selecting views to be published to A360
1. Publishing a model that has been renamed will generate a new RVT by that name in A360. When this occurs, the user will see published RVTs with the old name as well as the new name.
2. Publishing a model to A360 may fail for large RVT files.
3. Column sort by name does not function correctly in the Views for A360 dialog.
4. The initial state of the Views for A360 dialog shows no views selected to be published, however, the default behavior (to publish the default 3D view and all sheets) still remains.
5. Using the Views for A360 dialog may cause an update and redraw of current active view in Revit.
6. Section views may not be published to A360 unless at least one 3D view is published too.
Issues related to models that have been rolled back or deleted
1. Revit may incorrectly claim that a user is not a member of a project if they attempt to open a model that was previously deleted.
2. The vertical scrollbars in the Manage A360 Models dialog may deactivate after a model has been deleted. To restore them, close the dialog and reopen it.
Also helpful:
How to Get Started with Your A360 Collaboration for Revit Subscription | Revit Products | Autodesk Knowledge Network
Some details on the different project types:
Project types
If you are using the free version of A360, your project is Secret by default, requiring you to invite people by email addresses; the project type cannot be changed. If you are using the paid version, A360 Team, you can choose between three project types, Open, Closed, or Secret; the project type can be changed. You can see the project type on both the project card and on the project Profile page.
Open : A360 Team only. Use for projects where the intent is to share information broadly to everyone. All Open project information is searchable and accessible to all members of the organization. Anyone in the organization can join and leave an Open project at any time. People outside the organization are not allowed to be invited to Open projects.
Closed : A360 Team only. Use for projects that require some privacy. Anyone in the organization can see the Closed project name in search results, as well as the Closed project Profile and People pages. All items in the Closed project shared with the entire hub (Hub All) are also visible. Only members of the Closed project can search for and access the project page, activities, and content. The Closed project’s moderator must approve membership requests. An organization’s hub settings determine if people outside the organization can be invited to join Closed projects.
Secret : Use for personal projects or projects that require extra privacy. Secret projects are hidden from people who weren’t invited to the project. Only existing project members of a Secret project can search for and access the project page, activities, and content. Team Administrators can’t view content inside Secret projects. Membership to a Secret project is by invitation only. If you are using the paid version, A360 Team, the hub settings determine if people outside the organization can be invited to join Secret projects.
From http://help.autodesk.com/view/ADSK360/ENU/?guid=GUID-C6DC09BF-1680-4EE6-853A-563AC4B5E953