Non-recent comment from Kyle (Autodesk staffer):
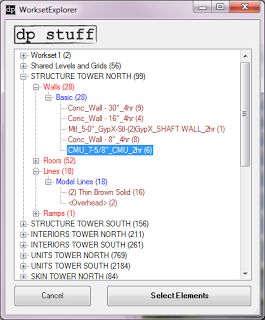
Recognizing that Worksets alone were not flexible enough to facilitate productive collaboration in many cases, we implemented Element Borrowing. This enabled the transparent borrowing of elements when a user operation required them to be editable, without the need to explicitly “check out” of the entire Workset that contained them.

So Element Borrowing is really the implementation of Worksharing in modern Revit. Worksets were never deprecated, since many existing users at the time still used them for their original purpose. Even today, we see the pre-Element Borrowing understanding of Worksets discussed and implemented in the market. Ultimately, that’s our fault for not communicating as effectively as possible with the Revit community. 

Check out the whole thread:
Some thoughts on Revit Worksets and Worksharing | LinkedIn

A new Revit addin from Dima over at dp stuff can do that – it looks like this:


The tool is pretty straightforward, so I will try to describe just in a few words how it works (the demo video in the beginning of the post shows it as well).
– assuming you already installed the WorksetExplorer, run the tool from dpStuff Utils in Add-on tab.
– the dialog box will open and in the “tree” your elements will be sorted by workset, then by category, then by family, then by type.
– every “branch” will have a name and the amount of elements on it in parentheses.
– once you see something that shouldn’t be on a particular workset then you can select the branch and click “Select Elements” button – that will add elements that belong to this branch to selection.
– now you can send them to the workset they are supposed to be on.
– repeat until all worksets are in good shape.
You can download the WorksetExplorer add-on from our download page or directly from this link.

via
dp Stuff: WorksetExplorer Revit Add In – What’s On Your Worksets?

Until Revit comes up with some kind of advanced and granular permissions management for workshared files, we are left with a situation that requires best-practice Revit use combined with 100% obedient staff.  If you would like to take matters into your own hands in the meantime, you can use this somewhat scary hack to check out worksets using a concealed user name.  As with many posts on What Revit Wants – use at your own risk!

In short:

  1. Copy the username into Microsoft Word and change it to a different font in this example the font called AIGDT. (which is just associate symbols to letters).
  2. Copy the username (AIGDT font) back into Revit and as you can see Revit just shows it as bullets.
  3. Worksets checked out to that user will appear to others like this:

 
Image and idea by Navid at:
Locking WorkSet with a hidden user name!

Nice idea from bim42:
Each trade model contain a limited amount of worksets, each draftsman working on his own linked model, so I was able to create the same worksets in my compiled model.
Worksets in the Coordination Model
These worksets can now be used to create filters containing every element of the specified trade.

via
Revit linked models visibility | BIM 42

I just became aware of an issue that I wanted to pass on to you all right away.  Workset1 is special.  It should never be renamed, because it can lead to fairly serious problems down the track, including the This action has caused deletion of non-editable workset: issue.

So you should make it part of your Revit standard that no one can rename Workset1 – ever.

As usual, this is something that Steve already knew, and already told us.  Thanks Steve!

One other habit I have is to never rename Workset 1 because Revit won’t let us delete it. It’s the “original” workset and Revit just doesn’t let us delete it.
via
Revit OpEd: Delete a Workset’s Contents?

An old discussion on AUGI also touches on the issue:

sweiser
2009-04-16, 12:27 PM
I just followed Shruti’s instructions and got the same error. For me it says I am deleting “non-editable Workset ‘Workset1’ ” Any other ideas?

via
http://forums.augi.com/archive/index.php/t-84855.html