Right-click the ViewCube and click Lock to Selection. If Lock to Selection is checked when a view orientation change occurs, the ViewCube uses the selected objects to calculate the center of the view and zooms to the extents of the selected objects. When the option is unchecked, the ViewCube uses the selected objects to calculate the center of the view and zooms to the extents of the model.
To examine an individual object with the ViewCube
In the model, select one or more objects to define the center point of the view.
Click one of the preset locations on the ViewCube, or click and drag the ViewCube to reorient the view of the model. The ViewCube reorients the view of the model based on the center point of the selected objects.
A great post over at Revitdialog has unlocked this mystery for us. Just a little addition to that post – I think it is important to tile your windows first, then do the ordering process. In other words:
View – Tile
Here you have your currently ‘open’ views in Revit – now, use the Revitdialog tip to re-order them (clicking them in reverse order, finishing at the view you want in the top-left)
Then hit View – Tile again.
To get the right order you have to work backwards, so if you have 5 panes, you start with picking for the 5th position and work backwards – 4, 3, 2, then 1. However, Revit places the panes in ascending order – meaning the views get placed starting at 1 and goes to 5.
In the right-click menu, select Orient to a View, Floor Plans, and then select the desired floor plan to orient to.
Image from Applied Software Blog
The view will automatically crop the view using the Section Box to match the View Range for the view that was selected. It will also rotate the view to view it from the Top direction. You can orbit the view any direction you want but the view is now cropped to match the floor plan’s View Range.
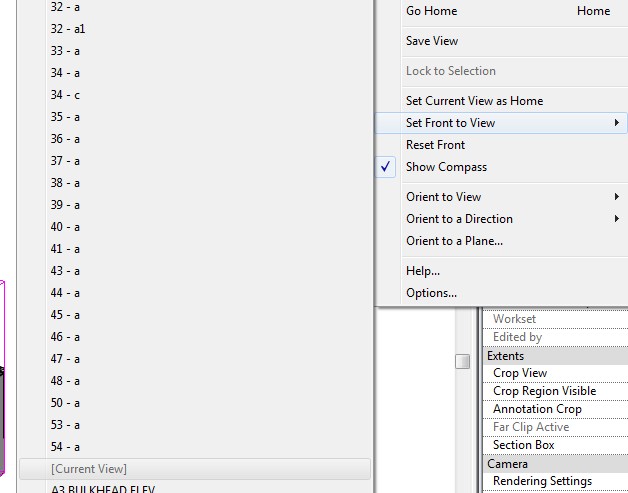
To change which orientation that the Revit ViewCube thinks is the ‘Front’ for a specific view, check out the video below, or scroll down for the quick step-by-step.
Orient the view to the orientation you would like to be the Front. This will have to be a ‘horizontal’ view.
Right-click on ViewCube, go to Set Front to View
Click on [Current View]. Note: Press the letter ‘A’ on your keyboard if views with numbers in front are hiding the [Current View] option – it is quicker than scrolling!
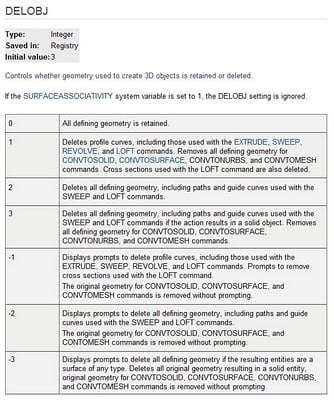
The main point of the video is – if you want to work with Solids in AutoCAD effectively, you should correctly set the DELOBJ system variable. What does this variable mean?
As Revit users, if we ever use AutoCAD for 3D modeling, we want to try and create a form that is a true ‘solid’, something that Revit can understand properly (as opposed to messy meshes).
It seems that this workflow is becoming easier. Of course, Revit itself is becoming a more powerful 3D modeling tool. Check out my post on Bending the Rules with Adaptive Points.
As we all know, Revit really wants you to be able to properly visualize your building. You may have experimented with Section Boxes in normal 3D views, but you can also use them in Perspective/Camera views.
Make a new Camera View.
Go to the View Properties of the Camera View, and select ‘Section Box’
To modify it, select the Section Box and then switch to a Plan View. The Section Box should still be selected, and you can modify the grips (you can modify these grips in many views).
Using this technique, you should be able to make some awesome cutaway views. These views can really help you to visualize and optimize your design.
There are many ways to present a building in context (with trees, vehicles and other entourage) in Revit 2010, but they fall into two main categories – using a Shaded view or using a Rendered view. At Dimond Architects we use both methods, depending on the project and the situation.
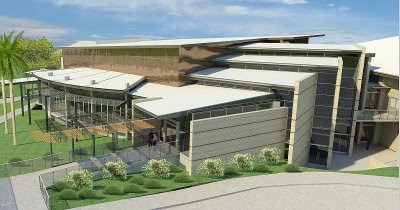
We are currently working on a number of school projects. One such project is a large Multipurpose Building (meaning it can be used as a sports hall, theatre and the like) for a local private school. The Client wants the building to achieve an ‘iconic’ status. One of our staff members recently produced the rendered view below: The above image was produced from Revit 2010 using some standard RPC. Some work was done in Photoshop (mainly on the sky).
Now, to shaded views – why would you want to use them?
They can take less time to produce than rendered
Indicates less ‘finality’ to the Client – conveys ideas without being heavy handed
WYSIWYG – don’t need to worry about materials not being applied etc
The negatives? Shaded views can:
Clog up your model
Be hard to find content for.
The workarounds to the above two points:
If detailed shaded views really slow things down for you, try this – make a new phase after the final construction phase. Call it ‘Drafting Phase 1’ or similar. Select the ‘detailed’ 3D objects (cars, trees, people) and set them to this phase. Now, set your shaded 3D presentation view to this phase. This stops Revit from thinking about and drawing those objects when you are working in the project generally.
Content for shaded views can be found at Google’s 3D Warehouse. First, download some of the Sketchup models that you like the look of. In Revit, create a New-Generic Model family. Then, import the SKP file using Import CAD. Make sure the resulting geometry is of an appropriate size. Save the family and load it into your project. Heaps of shaded content is available for everyone!
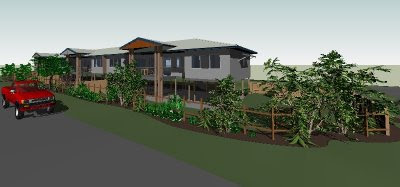
Here’s a shaded view I worked on this week: In some cases, you may need to use ‘Shaded’ instead of ‘Shaded with Edges’ (as the Sketchup files may present with a heap of edges – nasty). This technique is not for everyone, and it certainly is not useful in every instance. But once you have some content in your library, it can be a very quick way to convey how a building looks in context. Let me know what you thought of this tip – feel free to comment.