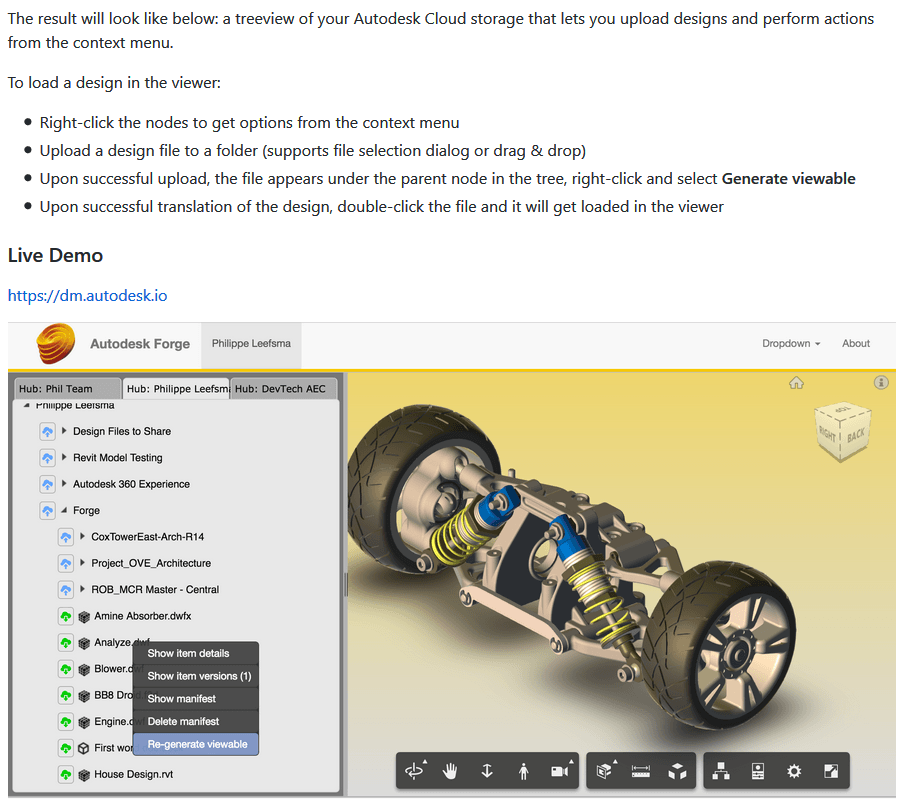
As you probably know, Forge is kind of like Autodesk’s way of opening up a model API for anything and anybody to connect to (over-simplified description, I know).
If you do want to start playing with Forge, Philippe Leefsma has put together a whole lot of boilerplate code that you can deploy on Heroku. He has shared a collection of node.js-based boiler projects for the Autodesk Forge Web Services APIs.
The main page includes step-by-step workflows on how to get started, deploy the code, and test the framework:
Revizto doesn’t strictly offer an API (yet) for connecting to its data. But you can use the command line to export an Excel file of all of the current issue tracker data. And you could schedule this export as a Windows Task. If you are in the habit of creating custom dashboards and connecting a whole lot of data together (as I am), then this could prove to be a pretty powerful way to access and share issue tracker data with the wider team. Further, it provides an opportunity for accessing model markup information even in a non-cloud-connected state
Here’s how to export from Revizto using the command line tool, called ReviztoConsole :
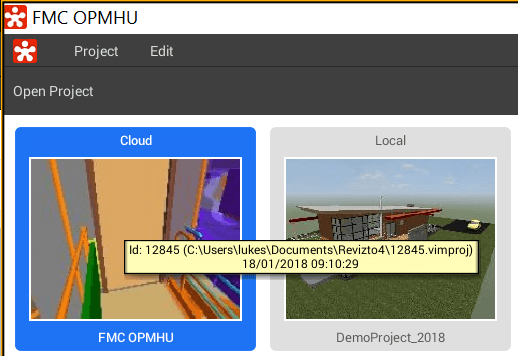
Get the Revizto Project ID by hovering over the project name in the Viewer:
The command line syntax is like this (notice the project ID):
As you can see, a lot of the issue tracker fields are available here. The Snapshot and Comment fields also may include hyperlinks to a web-hosted version of the issue snapshot as well.
Note: you can use the command ReviztoConsole projects to show a list of your current project IDs and their parent folder name on your system.
The first time you opened Revit, you likely found it pretty confusing. So many commands, so many ribbons, so many little buttons and drop down menus. Dialog box after dialog box… What’s a Family and how do I place one? What is a View or a Schedule, and how do I make one? As time goes on, the User Interface becomes less of a barrier, but in those early stages, it can be daunting.
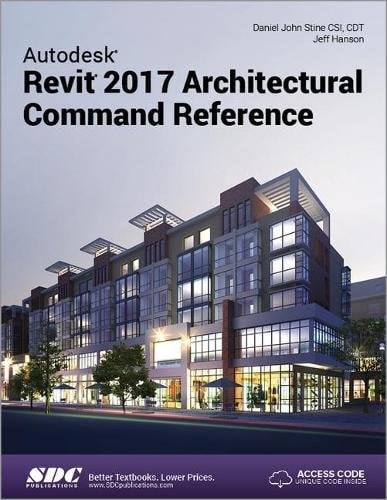
Perhaps you are a student using Revit for the first time, or perhaps you have used Revit for a while but want to deepen your understanding? Happily, Dan Stine (and Jeff Hanson) have put together the Revit 2017 Architectural Command Reference. This is a book that can serve as a guide through the maze of Revit commands and the user interface in general.
The book is well composed and logical, and includes some nice features along the way such as Tips and Quick Steps. It includes a lot of graphical content, so that you can easily follow along whether you are using Revit as you read it, or simply kicking back on the couch with a coffee (and studying Revit 🙂
There is a lot of depth in this book, and I can’t really do it justice in this short post. But have ever wondered how Revit calculates reflectivity from RGB values and percentages? There is an explanation and a table for that in this book, along with a lot more.
You know how when you are first learning something, you have to go over and over it a few times until you get it? This book is a perfect accompaniment to that kind of learning, as it provides a step-by-step consideration of how the commands work and the user input required.
The Authors
Dan Stine is a well known and widely respected Revit professional. He has written or contributed to numerous publications and he is also a prolific speaker and instructor about Revit, Architecture and BIM. You can check out his own blog here.
Jeff Hanson is a Senior User Experience Designer at Autodesk Inc and he brings a deep knowledge of Revit from inside the Factory.
Summary
This book provides you with an easy to use reference for all of the usual Architectural Commands available in Autodesk Revit. It can be used daily as you are working in Revit and learning the software. It can help you understand what each command does and how it may be used in your overall workflow. The book is organized in the same way the Revit user interface is presented. Each tab of the Ribbon is represented as a chapter in the book. Within the chapter each button is represented in the book as it appears on the Ribbon. It is a very logical and methodical reference to use when learning the Revit user interface.
Personally, I was pleased to see a detailed index of commands, which allows you to quickly locate the relevant command in the book. In that sense, it is truly a reference. Along the way, Dan doesn’t just explain the basics of a command, but in some cases offers additional insight and even alternative commands or ways of accomplishing a similar task. I recommend that you check out the Revit 2017 Architectural Command Reference, and it may help you find your way the maze of the Revit UI.
Bonus Content
Also included with this book are nearly 100 videos tutorials which will further help you master Autodesk Revit. You can use the provided code and login details one you obtain the book. There are 96 videos amounting to around 1.7 GB of content!
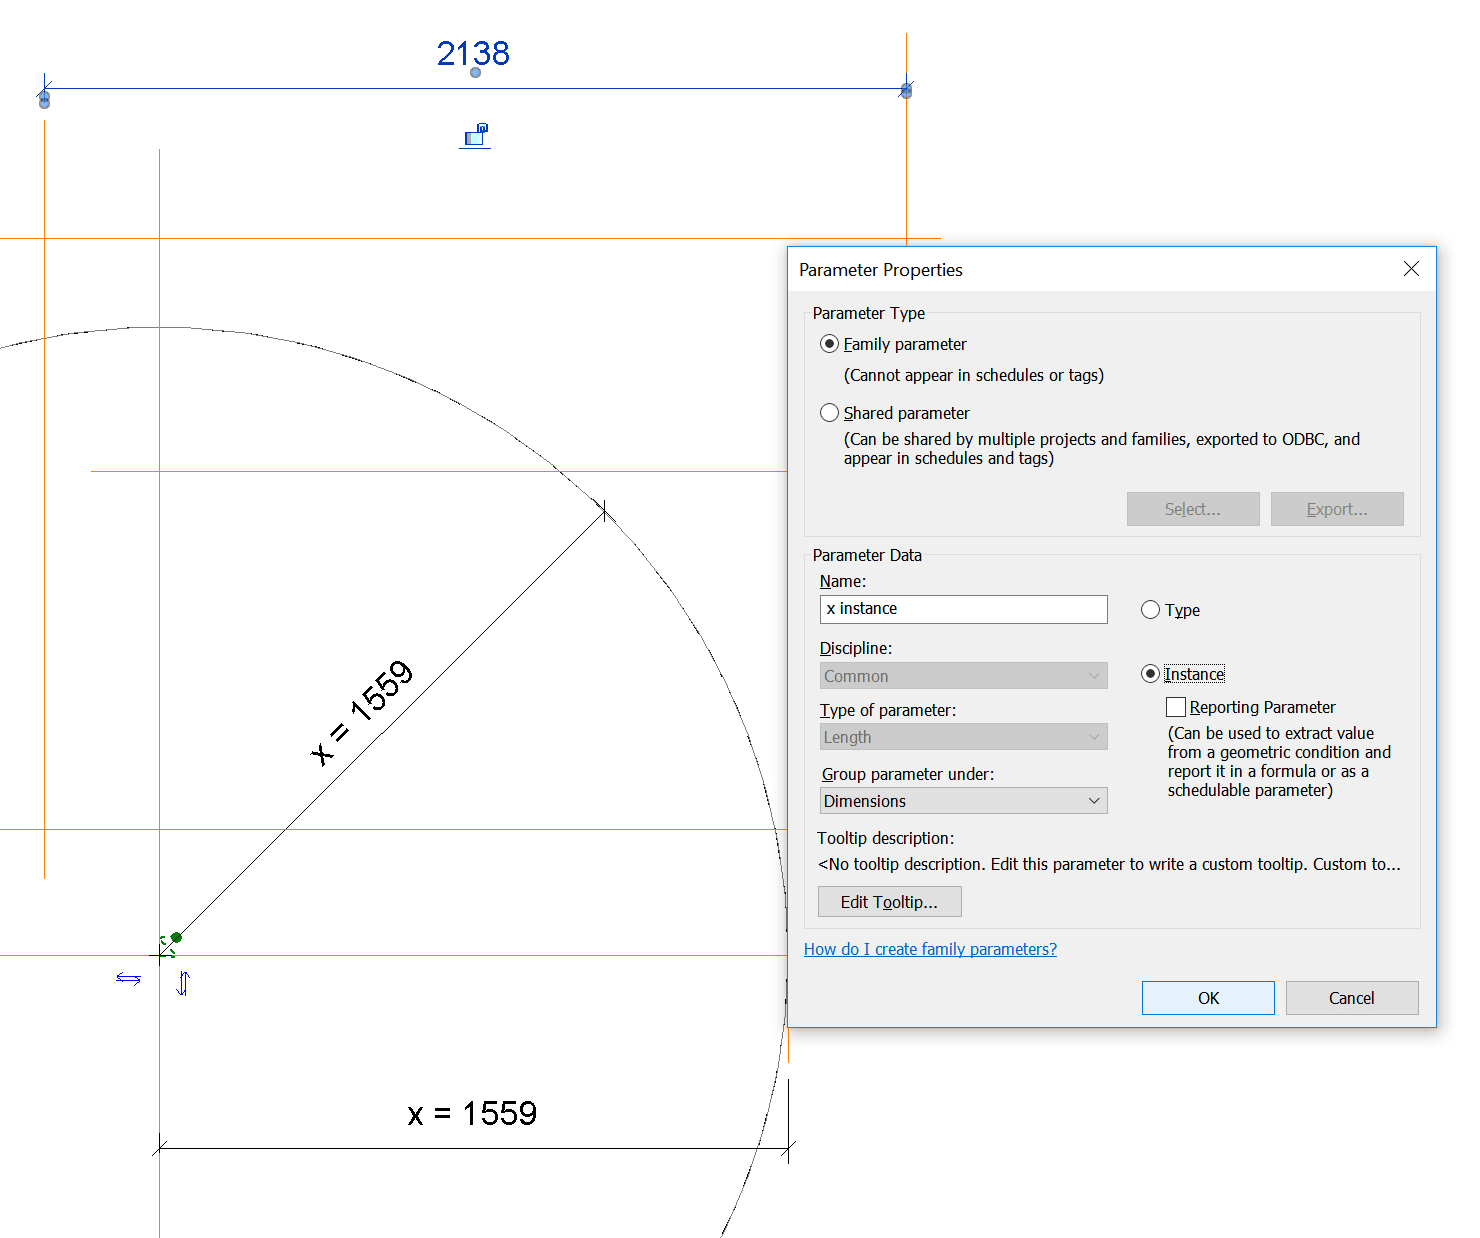
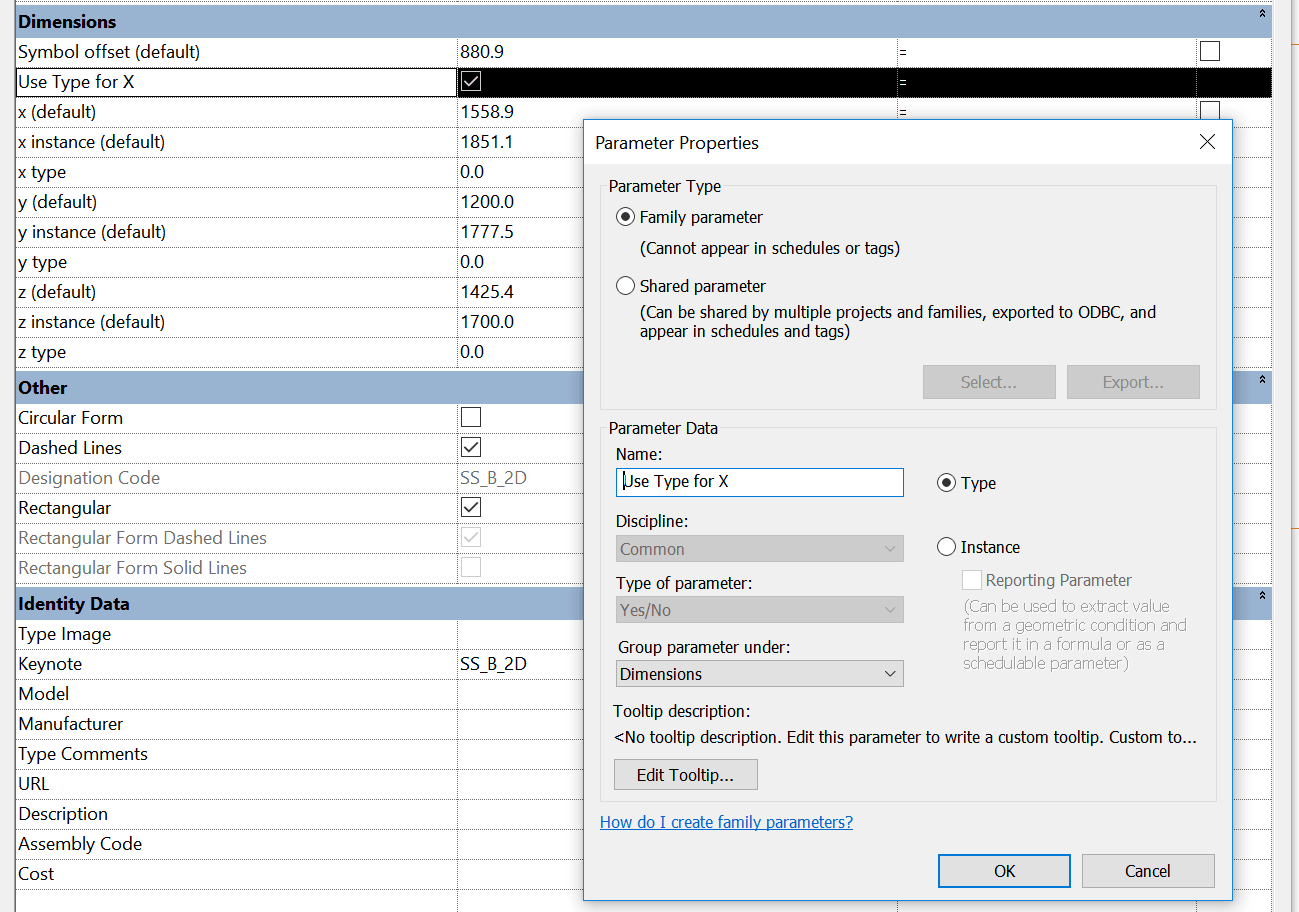
Let’s say you have a family that has shape handles for instance dimensions (Length Parameters). What if you want to use it for quick prototyping, and then switch that same family into a version that uses Type based parameters?
Here’s how I went about it:
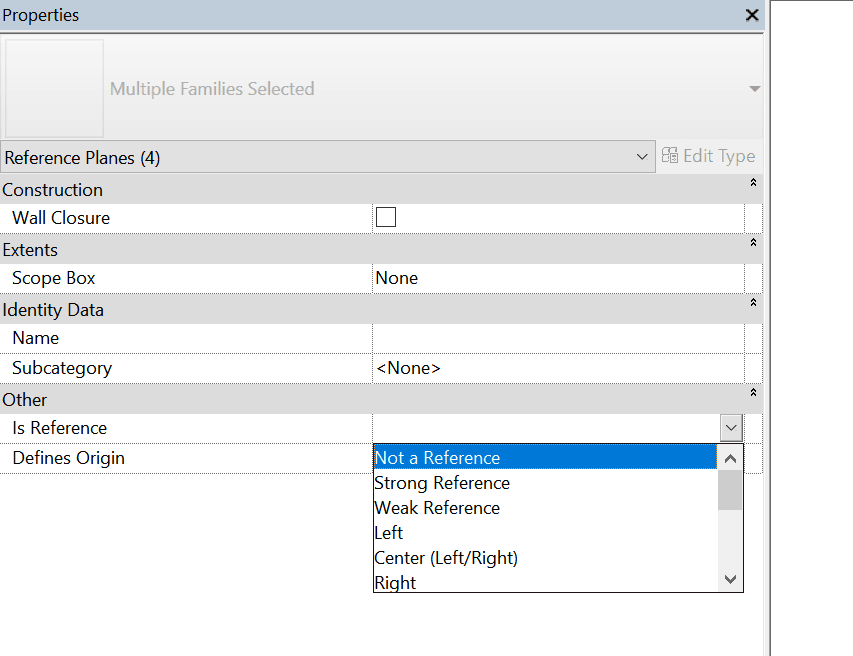
Change all existing Reference Planes to “Not a Reference”
Create new Reference Planes
Create new instance parameters bound to those Reference Planes
Lock one of the planes on each Dimension to existing origin planes
Create a corresponding set of Type dimensions
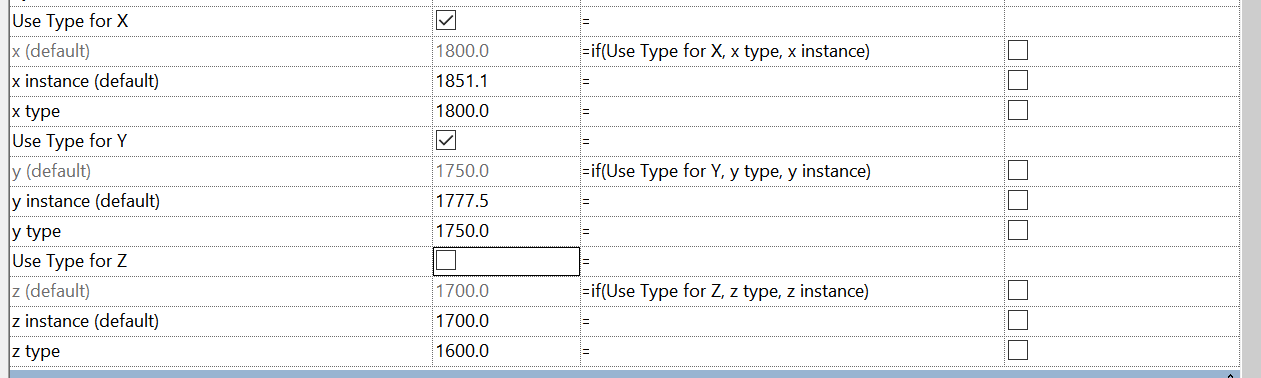
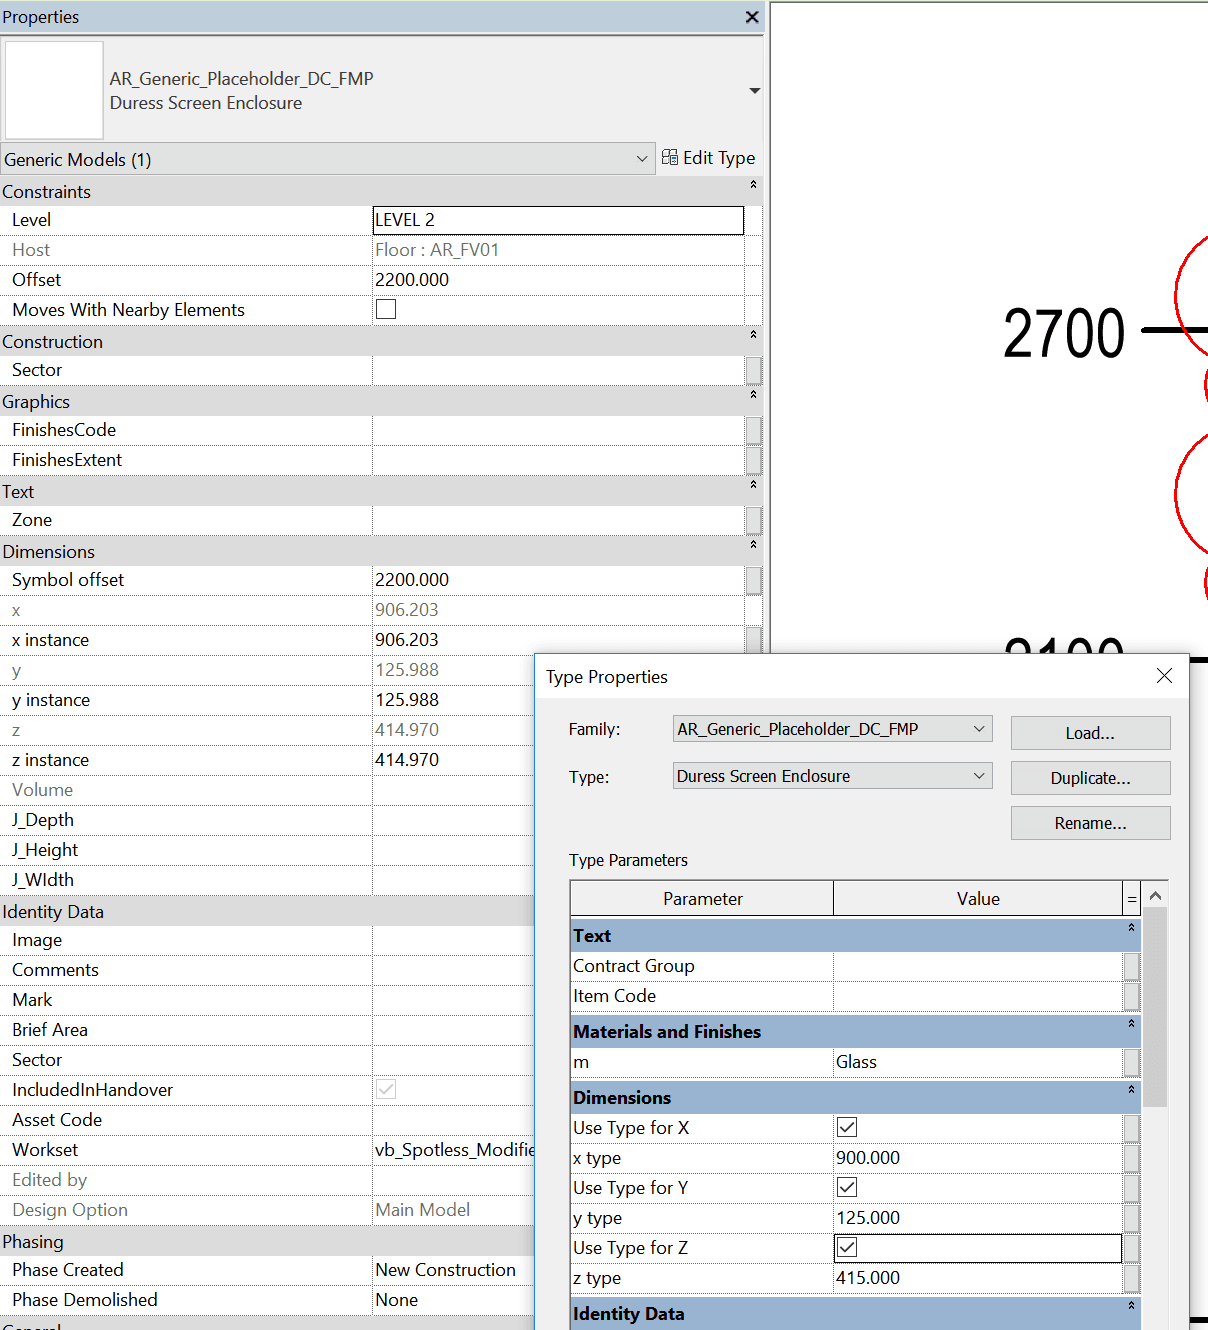
Create a set of Yes / No parameters for “Use Type for …”
Create formula like: if(Use Type for X, x type, x instance)
Apply it to the original parameters (the ones that are driving geometry):
How to Use:
Place the family
Resize using the shape handles (instance dimensions)
Then,
Create a Type
Modify the type Values and Tick the “Use Type” box
At this point, the Shape Handles are still visible, but only the Type values are used for the geometry.
Note: A future development of this family could be to make an inverse visibility parameter that switches off the Shape Handles once the Type Value is enforced.
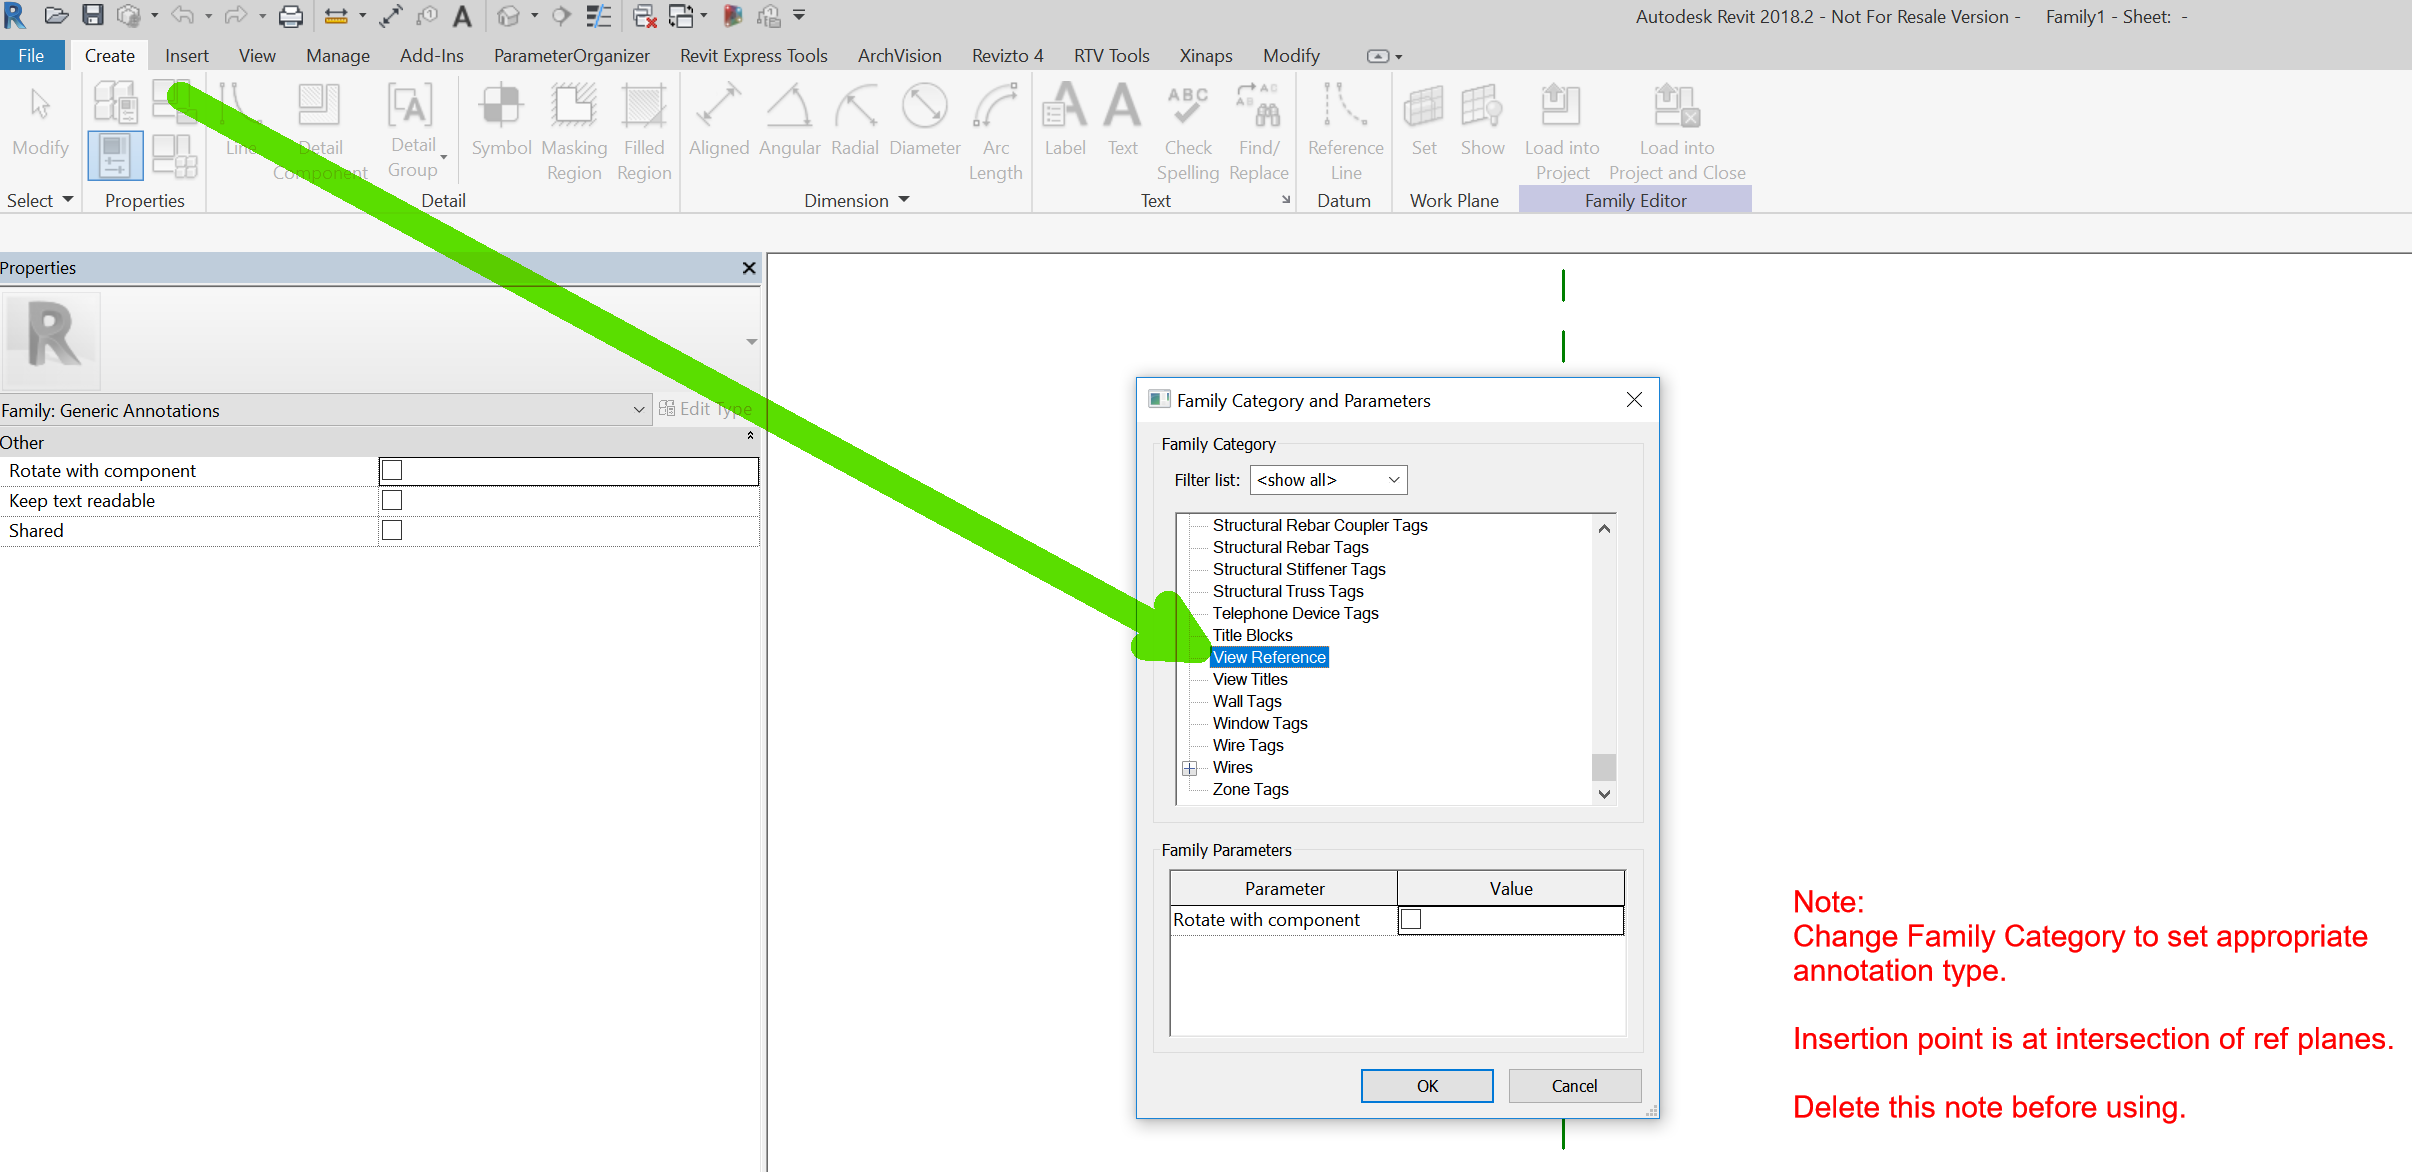
Sometimes, What Revit Wants is a specific Annotation Tag family of a unique Family Category, like View Reference. When you go to create a new Family, you probably won’t find a Family Template for ‘Metric View Reference’ or similar. You need to create a family with the Generic Annotation template, and then change the Family Category.
Here’s how:
Create a new Family -> Generic Annotation template
Change the Family Category to the desired Category (like View Reference)
Save the family, then go ahead and add the Text, Labels and Lines as desired. Load into your project and you can then select it in the relevant dialog box:
Keep in mind that you can use a View Reference to “Go to View”, such as for an adjoining Floor Plan:
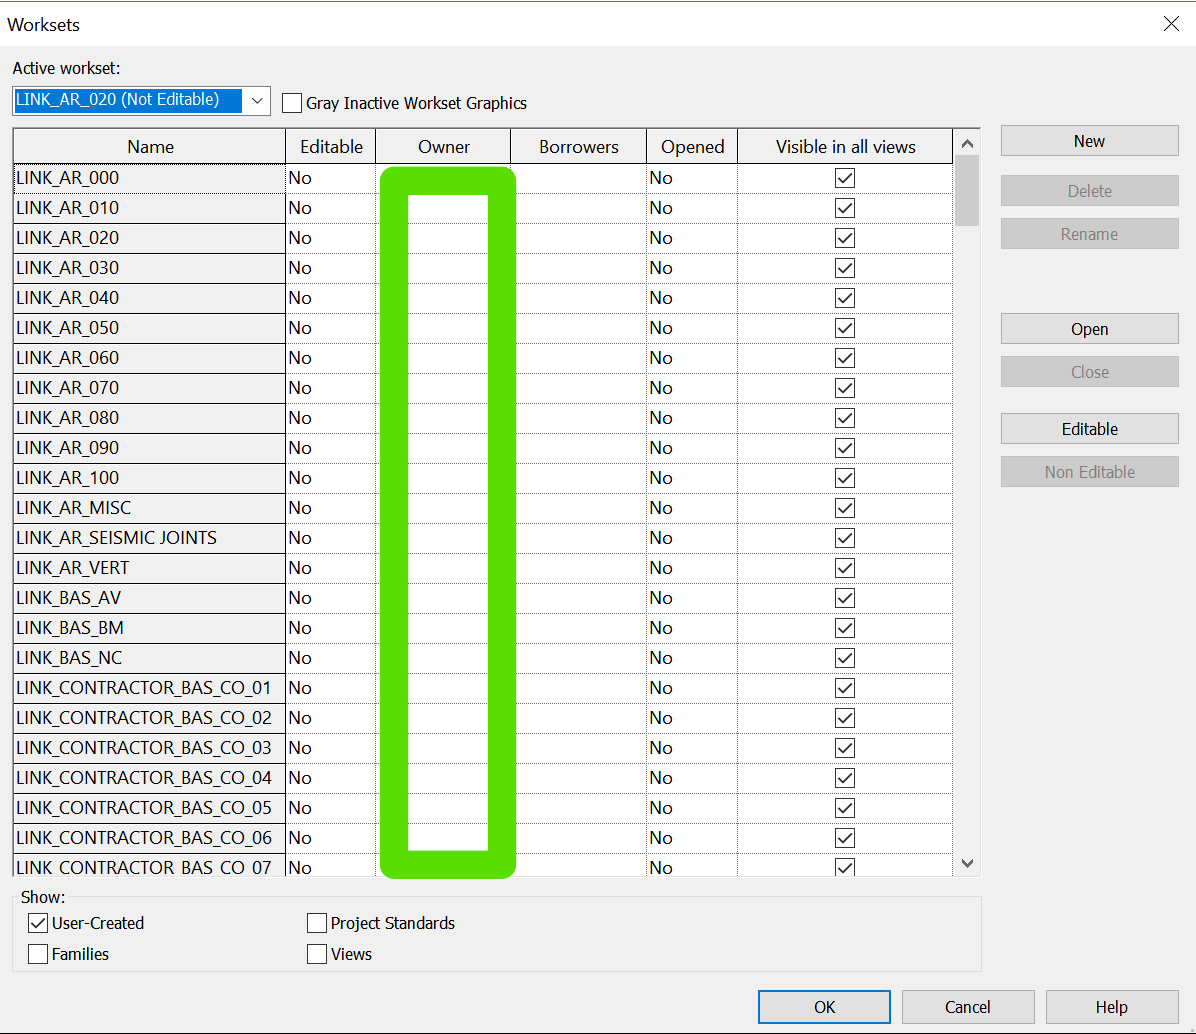
If you have gone through a process of saving Central models, and you have forgotten to ‘Synchronize with Central’ before closing them for the first time, you may find that your user has all User Created Worksets checked out in those files. A quick recap:
Workshared Revit files use a persons Revit user name (sometimes linked to an Autodesk SSO login) to determine if things are checked out
If someone has a User Workset checked out, you won’t be able to edit it until they Relinquish. (Note: you can Detach and recreate the file but that is dangerous if you have multiple people working on something)
Basically I had a bunch of Revit files that had all User Worksets from certain usernames checked out. They were upgraded and they were Central files. All that was needed was a simple Open and Relinquish. As I didn’t want to do this manually, I sourced some macro code from here and adapted it for my situation.
What does it do?
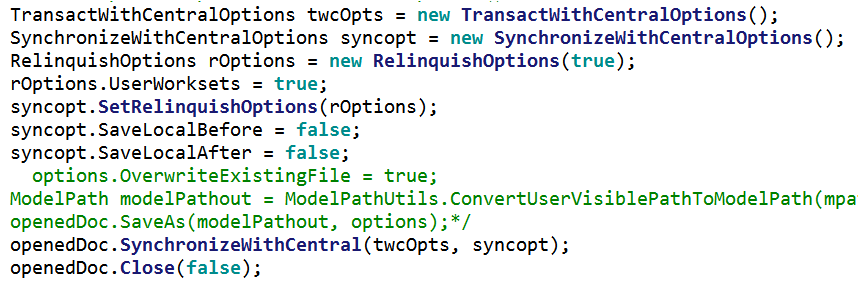
This Application level macro starts with a dialog box where you can select files. After you select them, it then loops over each file and Opens it, then does a Relinquish All Mine on User Created Worksets, and then it Syncs with Central and Closes the file. The key part of the code is here:
How to set it up?
First, get the code below. Copy and paste it into a new Application Macro in Revit.
 /*
  * Created by SharpDevelop.
  * User: lukes
  * Date: 1/10/2018
  * Time: 2:54 PM
  *
  * To change this template use Tools | Options | Coding | Edit Standard Headers.
  */
 using System;
 using Autodesk.Revit.UI;
 using Autodesk.Revit.DB;
 using Autodesk.Revit.UI.Selection;
 using System.Collections.Generic;
 using System.Linq;
 using Autodesk.Revit.ApplicationServices;
 using System.IO;
 using System.Windows.Forms;

 namespace relinquish
 {
     [Autodesk.Revit.Attributes.Transaction(Autodesk.Revit.Attributes.TransactionMode.Manual)]
     [Autodesk.Revit.DB.Macros.AddInId("30EBC375-5A4C-4917-AB07-D7212C9ED3FA")]
     public partial class ThisApplication
     {
         private void Module_Startup(object sender, EventArgs e)
         {

         }

         private void Module_Shutdown(object sender, EventArgs e)
         {

         }

         #region Revit Macros generated code
         private void InternalStartup()
         {
             this.Startup += new System.EventHandler(Module_Startup);
             this.Shutdown += new System.EventHandler(Module_Shutdown);
         }
         #endregion
         public void RelinquishMineFromFiles()
         {


 OpenFileDialog theDialogRevit = new OpenFileDialog();
 theDialogRevit.Title = "Select Revit Project Files";
 theDialogRevit.Filter = "RVT files|*.rvt";
 theDialogRevit.FilterIndex = 1;
 theDialogRevit.InitialDirectory = @"C:\";
 theDialogRevit.Multiselect = true;
 if (theDialogRevit.ShowDialog() == DialogResult.OK)

     {
 /* string mpath = "";
         string mpathOnlyFilename = "";
         FolderBrowserDialog folderBrowserDialog1 = new FolderBrowserDialog();
         folderBrowserDialog1.Description = "Select Folder Where Revit Projects to be Saved in Local";
         folderBrowserDialog1.RootFolder = Environment.SpecialFolder.MyComputer;
         if (folderBrowserDialog1.ShowDialog() == DialogResult.OK)
         {
          mpath = folderBrowserDialog1.SelectedPath;*/
                 foreach (String projectPath in theDialogRevit.FileNames)
                 {
                  FileInfo filePath = new FileInfo(projectPath);
                         ModelPath mp = ModelPathUtils.ConvertUserVisiblePathToModelPath(filePath.FullName);
                         OpenOptions opt = new OpenOptions();
 /*                        opt.DetachFromCentralOption = DetachFromCentralOption.DetachAndDiscardWorksets;*/
                          WorksetConfiguration openConfig = new WorksetConfiguration(WorksetConfigurationOption.CloseAllWorksets);
                         // Set list of worksets for opening
 /*                        openConfig.Open(worksetIds);
                         opt.SetOpenWorksetsConfiguration(openConfig);
                         mpathOnlyFilename = filePath.Name;*/
                         Document openedDoc = Application.OpenDocumentFile(mp, opt);
 /*                        SaveAsOptions options = new SaveAsOptions();*/
                          TransactWithCentralOptions twcOpts = new TransactWithCentralOptions();
                         SynchronizeWithCentralOptions syncopt = new SynchronizeWithCentralOptions();
                         RelinquishOptions rOptions = new RelinquishOptions(true);
                         rOptions.UserWorksets = true;
                         syncopt.SetRelinquishOptions(rOptions);
                         syncopt.SaveLocalBefore = false;
                         syncopt.SaveLocalAfter = false;
 /*                        options.OverwriteExistingFile = true;
                         ModelPath modelPathout = ModelPathUtils.ConvertUserVisiblePathToModelPath(mpath + "\\" + mpathOnlyFilename);
                         openedDoc.SaveAs(modelPathout, options);*/
                         openedDoc.SynchronizeWithCentral(twcOpts, syncopt);
                         openedDoc.Close(false);
                }
         }
 }}}
Then,
Add the System.Windows.Form reference and
Build the Solution
Note: I built and tested this on Revit 2018.2.
How to Use It?
Set your Revit User Name to the user that you want to Relinquish the Worksets for…
You may have to logout of your own SSO first
Go to Revit Options
Input the exact user name (including @ if an email address)
Start a new blank project in Revit
Start the Macro Manager
Select the RelinquishMineFromFiles macro that you built
Click Run
Select the files you want to fix
Click Ok
Wait for the result. The macro will step through them, Relinquish, Sync and Close the files.
Note:
Please use at your own risk, this has the potential to be pretty risky in a real project environment. Only use it if you understand what is going on 🙂
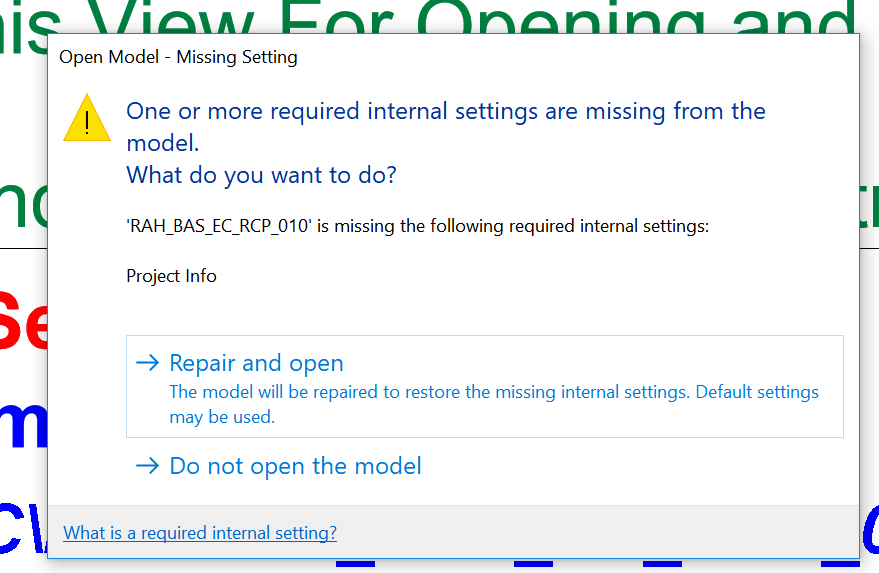
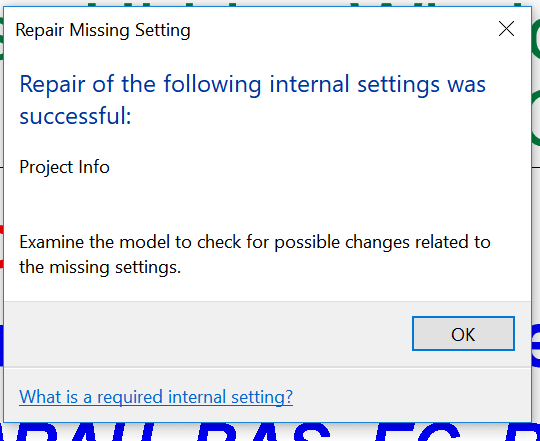
You may have experienced this error when upgrading a file to Revit 2018:
One or more required internal settings are missing from the model. What do you want to do?
Autodesk Support has stated that “In R 2018 we added a “feature” that catches issues like this and repair the model for you, instead of causing problem down the line.”
This particular dialog may not be handled by automatic upgrading tools. The resolution of the problem is to open the file manually, and simply press “Repair and open”. You should get a success message like below:
I assume there are other things that this Revit 2018 feature looks for and tries to fix. As Project Info includes a few different things in Revit, my guess for the above error is that it appears that it will set project Location to Default? Or perhaps it reinstates a deleted Project Base Point or Survey Point.
Either way, data and model validation is a good thing. Thanks Revit 2018 🙂
Update: RTV Xporter Pro can define rules for dismissing dialog boxes, in the Task Dialog Settings. See below:
I once built an auto-sizing Fire Pipe Fitting using a Formulaic method (where the various fitting sizes were driven by the Revit intersection variable), so I was interested to read about a similar strategy in a very good article in AUGIWorld January 2018 by Todd Shackelford. It is really good to evaluate these different options before going ahead on a detailed Family development and creation task.
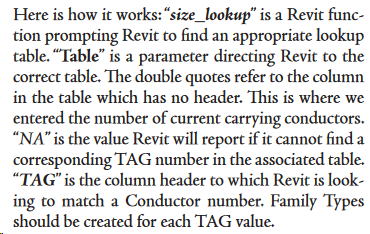
Among other things, Todd describes how to create a Type Catalog, including a list of the various data types:
He also describes how to use multiple Lookup Tables in a single Revit Family:
Overall, it is a very informative article for advanced Revit family creators.
Revit gets a new version every year, and every year we theoretically have to upgrade our Revit files. If you are a pro-active BIM Manager, you also have to upgrade a bunch of families and other files. If you are working on certain large projects, maybe the updates are deferred for a year or two, and then you find that you have to upgrade about 800 Revit files from Revit 2015 to 2018. Obviously, they all have to upgraded at once to maintain the integrity of the data and the workflows. What is the best way to do it?
I investigated a few different options and my notes and links are list below. In my case, I decided to go with RTV Xporter Pro and its File Upgrader option. It is an extremely affordable addin (currently $49USD), considering the amount of batch processing functionality that it provides.
The very first thing to do is ensure you have a backup. In my case, I had a complete offline mirror of the Revit files, and I ran the upgrade against that mirror. Then, I could just overwrite the live network location once I confirm that everything works as expected.
I would say that another thing to do is to create some form of data snapshot of your Revit models prior to upgrade. I have a method of doing this which is pretty powerful, but its a secret (for now).
Here are the steps to upgrade a Revit dataset using RTV Xporter Pro 2018:
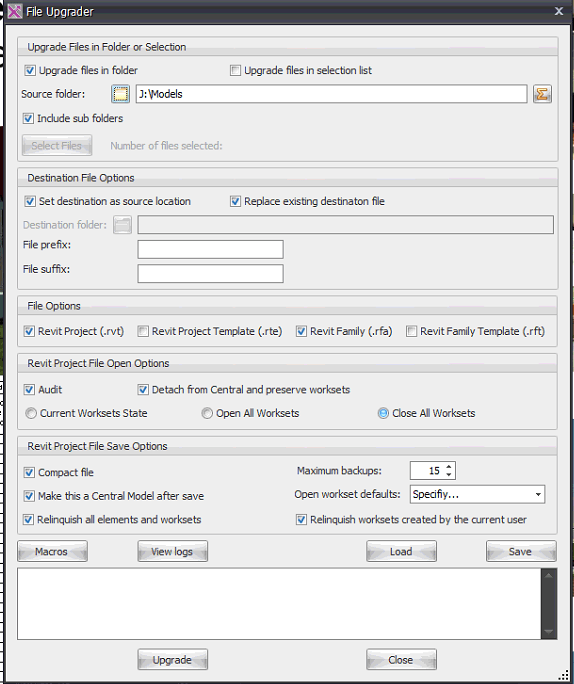
Set up a File Upgrader XML file (my settings shown below). As you can see, I chose to Detach and Audit and then Save the file over the top of the current file in the same location. This way, all of the Revit links should be maintained once the whole dataset is upgraded to the new version.
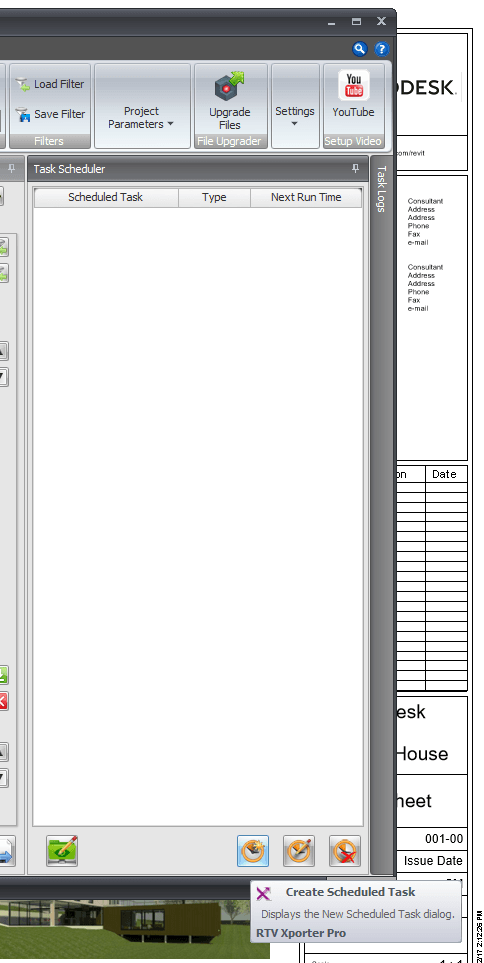
Open Xporter Pro link from Revit
Create Task Schedule
Import the Upgrade XML as a Batch Process
Set the Revit EXE location for the target version
After saving the task, open in Windows Task Scheduler and you can run it immediately.
The screenshots below show the important stuff from the above steps.
1) My RTV Xporter Pro Settings:
3) Creating the Scheduled Task:
4 and 5) Load Batch Process XML and Set Revit Application, like for 2018:
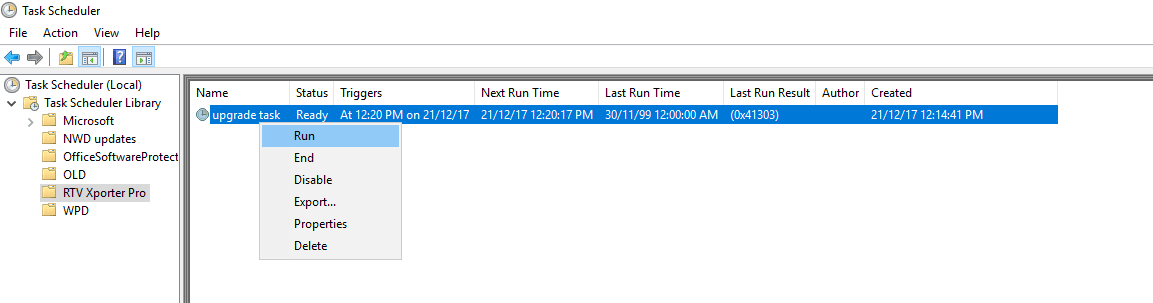
6) Running the Scheduled Task:
Tip: During a typical file upgrade, Revit will often come up with warnings. If you run the RTV File Upgrader task in Interactive mode, you will get the dialog box which requires user interaction (export warnings and proceed past the Revit warnings). However, if you run the upgrade from the Task Scheduler, it will automatically dismiss the warnings for you as it upgrades. Some examples are warning dialog including errors like ‘could not cut instance out of wall’. In the Scheduled Mode, this process will all happen unattended.
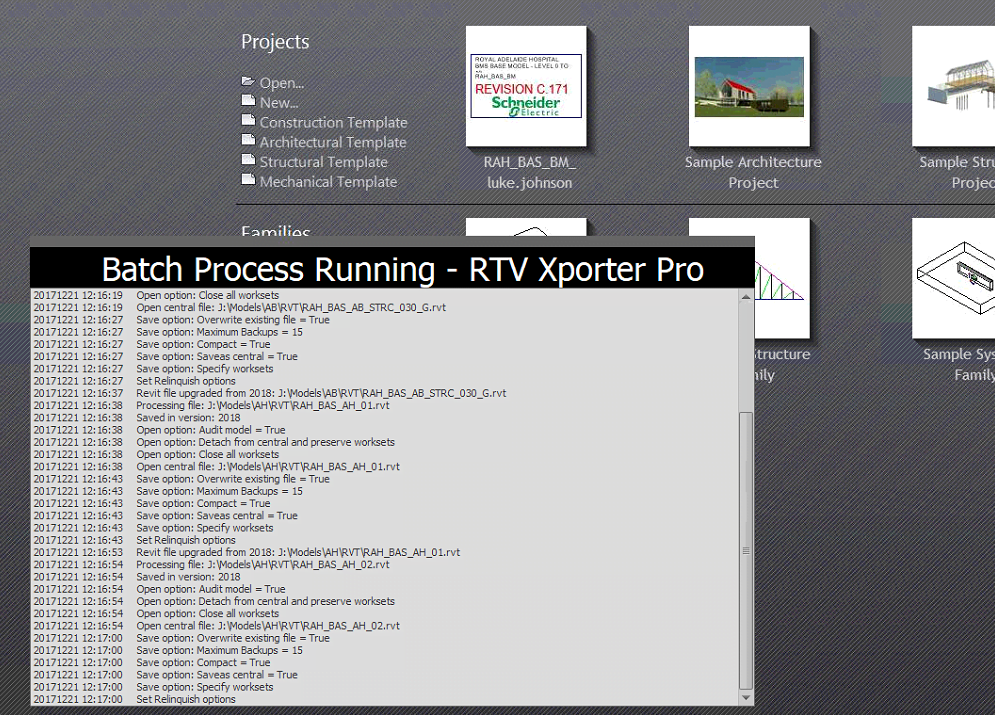
This is what it looks like as it upgrades (scheduled mode):
This is what it looks like as it upgrades (interactive mode):
Update 10/1/18: RTV Xporter Pro can define rules for dismissing dialog boxes, in the Task Dialog Settings. See below:
There are other addins and ways to upgrade. Here is a pretty comprehensive list:
Paid Revit Addins:
Harry Mattison has built a powerful Bulk File Upgrader addin that has a lot of good reviews on the App Store. You can find it here.
Current price: $99USD
BIMWERX Batch File Upgrader. Very simple UI and good reviews. You can get it here.
Current price: $10USD
NTI Tools have a File Upgrader. You can get a trial at this link. You have to register and then get an email with the download.
Previous posts:
These previous posts show some other pretty useful methods to keep in mind…