What’s New in Revit 2018 – Official blog:
Google Cache

whats2bnew-5840718

Coordination Model Link:
coordination model linking lets you use a Navisworks file as an underlay in Revit, making it easier to coordinate with outside teams that might not be working in Revit

Railings:
with Revit 2018 you can also attach railings to topography to model fencing, road barriers, or outdoor handrails

New Structural Features:
https://www.youtube.com/watch?v=HFL-YH4sFK8

Webinar on new features:
https://pages.autodesk.com/WhatsNewinRevit2018_RegistrationPage.html

Revit 2018 New API Features:
https://adn.autodesk.io/uploads/file/revit_2018_api_news/index.html

Download using the links at:
https://wrw.is/2017/03/autodesk-2018-direct-download-links.html

We all know Revit is the best, right?

But … there are a handful of people using other platforms 🙂 And I guess even the most dedicated Revit user has to use other content creation tools from time to time. That is why UNIFI has decided to develop and release multiformat support, initially for these platforms:

multiformat_support-1-9274348

Also, UNIFI are offering a free copy of their “How To Create and Maintain BIM Standards” guide to everyone who registers for their upcoming webinar. Here are the details:

  • full title is:  “Accelerating ROI from Your Firm’s BIM Investment By Leveraging Analytics To Effectively Implement and Maintain Your BIM Standards
  • date and time:  May 3rd at 11amPT

Find out more and register here

You ever face a problem and you just can’t stop until you solve it? I came across a model recently that was like that… it was an Revit 2015 MEP file that had a serious problem:
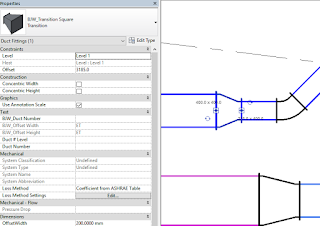
Whenever you created a Duct or Pipe Fitting, it would always be created with System Classification and System Type “Undefined”.

problem-3359078

No matter I did, I could not fix this. I tried all of the usual steps. Then, I took this pretty severe one: deleting all warning elements with dynamo:

And it kinda sorta worked, but not every time. I must have been doing something else as well. Was it Audit? Was it Purge?

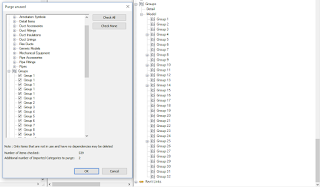
Turns out it was Purge. And that was all this model actually needed – a good purge. But what element specifically was causing the problem? Well, does this look right to you?!?

purge2bgroups-5248372

Somehow there are multiple copies of Group 1. But purging Group 1s only didn’t fix it…

To fix this model all that was needed was to

  1. Purge
  2. select all Groups, using Shift to multi-select
  3. press Ok
Immediately, Duct and Pipe fittings were created properly.

To fix any that were in a broken state, all you have to do is momentarily drag to disconnect one element, and drag it back into position. The system will heal itself, and all Duct and Pipe Fittings will adopt the system they are connected to (as they should).

When troubleshooting, try to always test one thing at a time. In that way, you can more quickly isolate the problem… and the solution 🙂

Links:
https://www.revitforum.org/mep-general/28759-pipe-duct-fittings-all-undefined-no-system.html

https://forums.autodesk.com/t5/revit-mep-forum/systems-not-working/m-p/6653133/highlight/false#M35799

Systems not working | Revit Products | Autodesk Knowledge Network

For years I have been an avid Firefox supporter, and to some extent I still am. However, Edge is getting much better (so fresh and so clean), and Chrome is really this ‘reference’ browser where most things just work. What I’m trying to say is that we can’t really be bound to just one browser anymore. But…

We have hundreds of passwords floating around. And for me, these were living in the Firefox Sync password system, and I couldn’t really get them out! I waited patiently for Edge to support importing data from other browsers, but sadly it doesn’t work for Firefox passwords. Chrome also currently has a bug importing Firefox passwords. Its almost like these browsers just want you to choose only one and stick to it 🙂

What is the answer?

Well, finally, Edge does support a few extensions. One of these extensions is LastPass. It allows you to import and sync passwords from basically all browsers, and even imports things like Windows Wifi passwords, and then syncs them across devices for you. Great!

lastpass-5872864

Using LastPass, I imported all my Firefox passwords. Then, I installed the Windows app to grab other passwords like my Wifi profiles. Finally, I can now freely switch between browsers and my passwords are all in sync!

A good starting point is to install the LastPass Universal Windows Installer. You can get other extensions from the download page. You can get the Edge extension here:
https://www.microsoft.com/store/apps/9nblggh4v7x0

If you feel so inclined, LastPass can also store you standard form details and pre-fill web forms for you. Just depends how much you want to put in the cloud really…

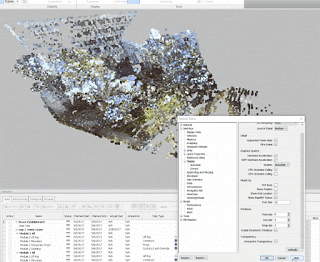
Navisworks works really well with Point Clouds, particularly in association with Recap. It will usually create ‘voxels’ – groups of points that you can hide or change colour or use in other Navisworks workflows.

However, sometimes the ‘point size’ seems too fine. To modify this, just open up Navisworks Options to Interface – Display, and change the Primitive size for Points to something that looks better. You can choose any size from 1-9.

pass2b252842529-6795967

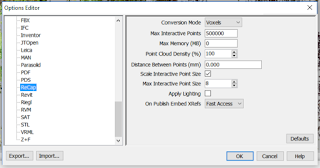
Also, there are additional settings under File Readers – ReCap:

recap-2618422

You can set an ‘interactive point size’ here, which is going to override the point display when you are zooming around or navigating the model.

Parts allow some extremely powerful workflows in Revit. Did you know that you can take an in-place family, and when you Divide Parts, Revit will make an individual Part for each geometric element?

For example, let’s say you have a big sweep that represents a large part of a Building, and that Sweep is inside an in-place Generic Model family in the project.

Firstly, use some Voids to cut the sweep into the sections or pieces that you want…

void-ext-7106677

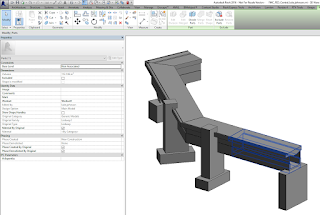
and then select that Generic Model Family and click Create Parts. You will get a Part for each geometric piece, like this:

part-8430234

Then, if you edit the underlying Family and divide it with more Voids, Revit will automatically create and update the Part elements as needed. Very cool.

From here, you can export those Parts to Navisworks for animation or sequencing, if you so desire.

A few revealing hints from a recent BIM and Beam post:

  • the forthcoming Advance Steel 2018 release next month will now offer seamless consumption of LOD 350* Revit models
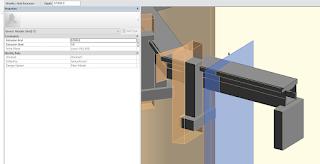
  • Autodesk’s Steel Connections for Revit 2018 release will include several major updates including over 130 parametric steel connections
  • Autodesk Steel Connections for Revit 2018 is expected to be available starting April 14, 2017

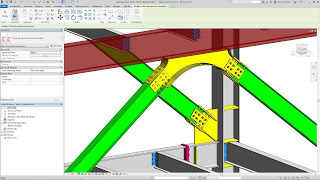
revit-2018-new-steel-connections-7361046

via this post:
http://blogs.autodesk.com/bim-and-beam/2017/03/21/advance-steel-and-steel-connections-for-revit-at-nascc-2017/

at
BIM and Beam

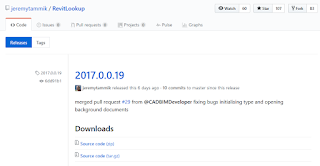
Updated source code for RevitLookup available at:
https://github.com/jeremytammik/RevitLookup/releases/tag/2017.0.0.19

Notes from The Building Coder:
In the last few weeks, it was significantly restructured to use Reflection and reduce code duplication:

revitlookup-4463299

via
http://thebuildingcoder.typepad.com/blog/2017/03/q4r4-tbc-import-and-revitlookup.html

Bye, bye Showcase! Here are a few notes on Autodesk 2018 product discontinuations. I will add to these as more information becomes available..

Autodesk® Advance Concrete software has been discontinued.
Now is the time transition to Autodesk® Revit® software 🙂 … it hopefully now includes the robust reinforcement detailing and shop drawing tools of Advance Concrete. For more information, review FAQs.
(source about Advance Concrete discontinuation)

AutoCAD® Utility Design (AUD) software has been discontinued.
You will no longer be able to download a newer version of AUD. See FAQs for more information.
(source about Utility Design discontinuation)

Mental ray® Standalone 3D rendering software is no longer available to download from the Autodesk Education Community site. Your existing installed software can still be used.
(source about Maya and Mental Ray plugin)

Effective ​March 21​, 2017​, Autodesk will discontinue Autodesk® Showcase® software. We will no longer sell new or additional subscriptions of Showcase. We recommend that our customers transition to Autodesk® 3ds Max® software for their visualization solution. For more information, review FAQs.
(source)

artcam_discontinuations-1748668

ArtCAM Discontinuations (actually occurred 2017)
ArtCAM Express is not part of the ArtCAM 2017 product range; ArtCAM Express 2015 R2 (Boxed) and ArtCAM Express 2015 R2 (Download Only) are discontinued.
No. ArtCAM Insignia is not part of the ArtCAM 2017 product range; ArtCAM Insignia 2015 R2 (Boxed) and ArtCAM Insignia 2015 R2 (Download Only) are discontinued.
ArtCAM Pro is not part of the ArtCAM 2017 product range; ArtCAM Pro 2015 R2 is discontinued.
(source)

Now that is a very Revit blog title, for sure 🙂

So I had a nice old Curtain Wall Panel Door family, which had a nested ‘container’ Generic Model family…

old2bversion-7701979

… in which I arrayed a shared, nested Door Panel Generic Model Family. Basically, it allowed for automatic stacking and sliding doors of varying numbers of panels living inside a Curtain Wall Panel Door, all working automatically. You could tag and edit the Comments and Mark of the nested Panel, but couldn’t change its visibility.

This means that things like slide direction arrows were a problem. I previously had some messy approach to arrows and offsets, but there were tied to the array so they were not flexible enough. As the only parameters that I could access for the shared, doubly-nested panel were Comments and Mark and Image, I couldn’t really use these in visibility parameters or formulas. I wanted to be able to turn off and on arrow annotation (for slide direction), and also set a Keynote or taggable text parameter for ‘FG’ (fixed glass)  or ‘SL’ (sliding) and so forth.

What’s the answer?

For one thing, I’m sorry but you probably have to ditch the array. It is simply too difficult to link through parameters to the elements inside an array, plus you probably really don’t want to.

So, save a backup of your ‘array’ family and rebuild it to use individually placed family instances with visibility parameters based on the ‘Array number’ you had before. You will have 2 panels that have their visibility set to a parameter with a formula like “Array number = 2”. You will have to duplicate all of your elements for each set, and constrain them all individually. This is a pain, but if you want to get the sub-element visibility control, you may think it is worth it. You will have to do this for as many array conditions as you want to cover (like 2, 3, 4 etc).

With this new ‘non array’ family, how do we set up the parameters?

We are going to drive all of it with a single integer value instance parameter in the shared panel family. Then we will tie that to element visibility parameters.

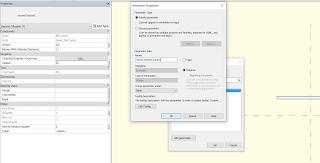
We will link that integer instance parameter through each level like so:

instance2bparam2blinking-9187315

… until we get to our ‘container’ that used to hold an array, but now holds individual family instances that we turn on and off with the array number. From here, we make a new instance parameter for each placed family instance, so we can drive the nested family. So for a three panel sliding family, we might have 3 instance parameters in the ‘container’, like:

  • Left Panel vis type (used for 2 and 3 panels)
  • Centre Panel vis type (used in the 3 panel type only)
  • Right Panel vis type (used for 2 and 3 panels)

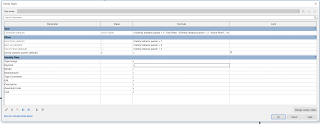
Link these three parameters through to the Curtain Wall Door family (they can be instance or type here at the parent family). They are now accessible in the project. Essentially, we can select our Curtain Wall Door family, modify the 3 integers, which drives through all the way to our most deeply nested Panel family.

In the deeply nested Panel family, we use the integer to drive other things, like:

  • turn Plan and Elevation arrows on and off, 
  • set a Shared text parameter to a certain value (with a nested IF statement). Note: Add the Shared text parameter to a Generic Model tag and you can tag and schedule it in the project. 
  •  show / hide model geometry

Note: You can’t use Keynote here because we are not allowed to drive a Type Parameter with our instance parameter.

param_linked-6748504

Unfortunately, we can’t drive a Material parameter directly with the integer value. But, we can have multiple copies of geometry with different materials, and drive the Material visibility with the above process.

Finally, you can do this structure as many times as you like, but obviously the amount of integers you have to keep track of is going to get more and more difficult. You will also need some way of explaining to users what each integer actually does – like if I set the Left Panel to integer 1, what will show up and what will the tag value be? You will probably need some kind of explanatory schedule or document for this…

But there you have it, a framework for driving deeply nested shared family visibility. Congratulations if you made it to the end of the post 🙂