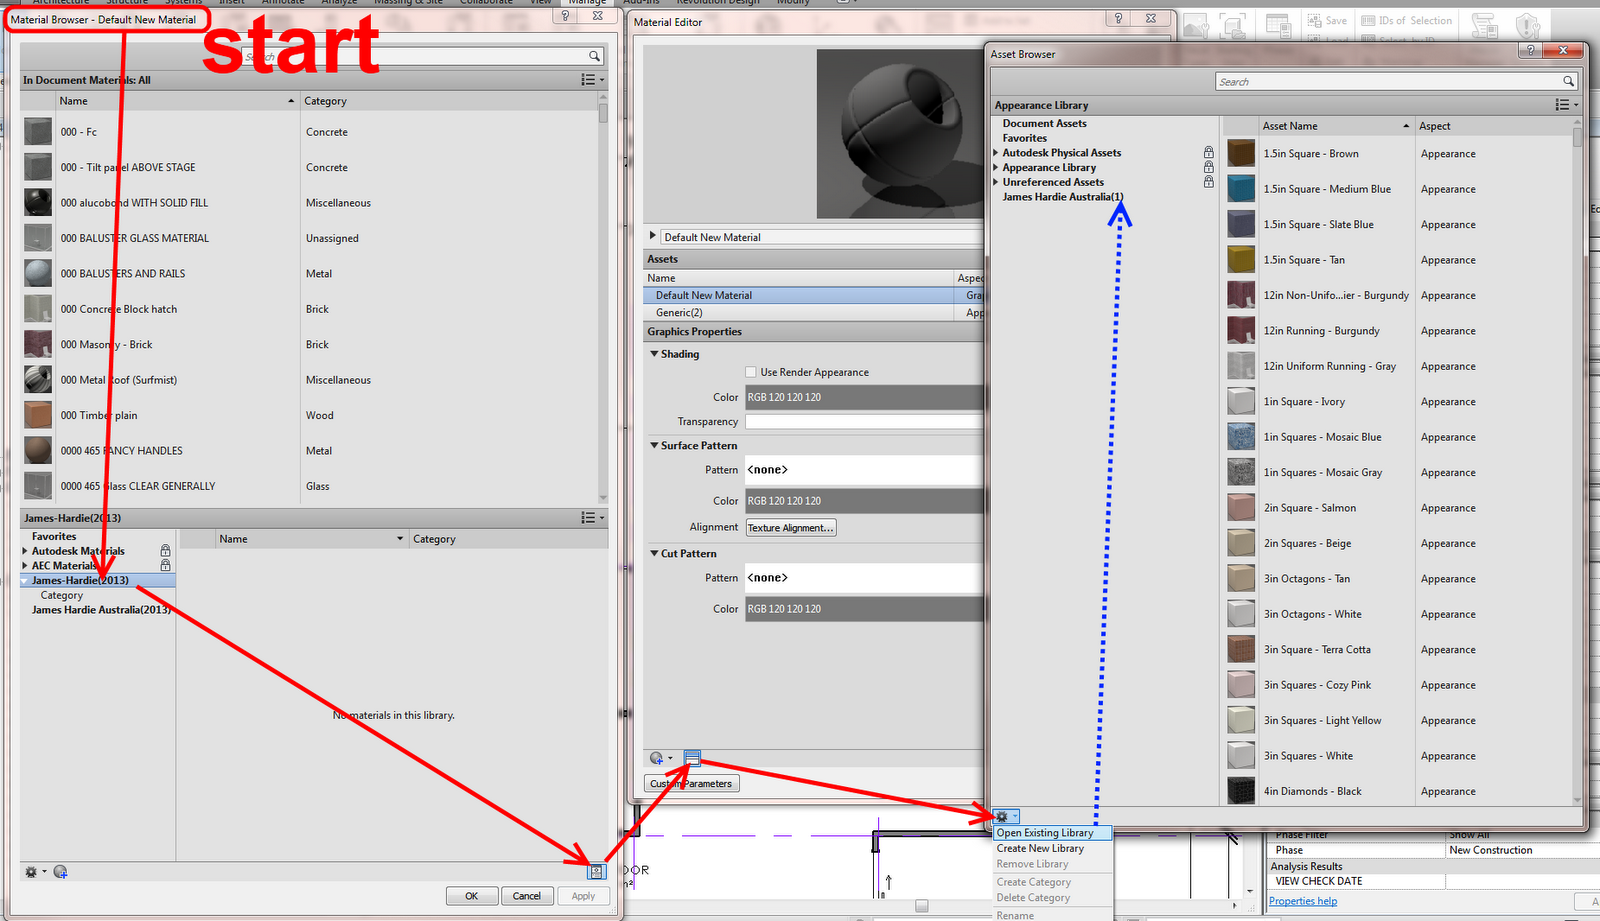
If you Open a 2012 adsklib file in the Material Browser in Revit 2013, chances are you won’t see any materials (even though Revit claims to be ‘upgrading’ the library).  You need to open the .adsklib in the Asset Browser to expose the 2012 Appearance Properties for use in Revit 2013.

To quickly get at your 2012 Appearance Properties, go:

  1. Manage
  2. Additional Settings
  3. Material Assets
  4. Click the ‘lines’ icon
  5. Click the ‘gears’ icon
  6. Open the Library (it will upgrade and add (1) to the file name)
  7. You can see your 2012 Appearance Properties.

To actually get this into a Material, the process from the Material Browser starts something like this:

To apply these appearance properties to Materials, watch the 43 second video:

Needless to say, the whole Materials UI concept and process in Revit 2013 is kinda scary?

Some info from Wikihelp:
In Revit 2012, libraries contain property sets and do not contain any materials. If you use the Material Browser to load a Revit 2012 .adsklib or .adstlib file, materials will not display and therefore a warning symbol will display next to the library name. The data in Revit 2012 property sets will be migrated as assets in Revit 2013. In order to access Revit 2012 property sets as Revit 2013 assets, you must use the Asset Browser to load the Revit 2012 libraries. 
via
Upgrading Revit 2012 Libraries – WikiHelp

Is the Internet going to break today?


I’ve taken ownership of the support requests that you both generated and will be working with the appropriate team on adding access to your accounts. Please use the following 72hr timed direct download links (I will also be sending them out shortly via email) as a workaround until the issue has been resolved.

Autodesk Product Design Suite Premium 2013 32BIT – LINK 1
Autodesk Product Design Suite Premium 2013 32BIT – LINK 2
Autodesk Product Design Suite Premium 2013 32BIT – LINK 3
Autodesk Product Design Suite Premium 2013 32BIT – LINK 4

Autodesk Product Design Suite Premium 2013 64BIT – LINK 1

Autodesk Product Design Suite Premium 2013 64BIT – LINK 2
Autodesk Product Design Suite Premium 2013 64BIT – LINK 3
Autodesk Product Design Suite Premium 2013 64BIT – LINK 4

Autodesk Product Design Suite Standard 2013 32BIT – LINK 1
Autodesk Product Design Suite Standard 2013 32BIT – LINK 2
Autodesk Product Design Suite Standard 2013 32BIT – LINK 3

Autodesk Product Design Suite Standard 2013 64BIT – LINK 1
Autodesk Product Design Suite Standard 2013 64BIT – LINK 2
Autodesk Product Design Suite Standard 2013 64BIT – LINK 3

Autodesk Product Design Suite Ultimate 2013 32BIT – LINK 1
Autodesk Product Design Suite Ultimate 2013 32BIT – LINK 2
Autodesk Product Design Suite Ultimate 2013 32BIT – LINK 3
Autodesk Product Design Suite Ultimate 2013 32BIT – LINK 4

Autodesk Product Design Suite Ultimate 2013 64BIT – LINK 1
Autodesk Product Design Suite Ultimate 2013 64BIT – LINK 2
Autodesk Product Design Suite Ultimate 2013 64BIT – LINK 3
Autodesk Product Design Suite Ultimate 2013 64BIT – LINK 4

Philip Schmelzer
AutodeskCare | Community Manager

Autodesk, Inc. 

via AutodeskCare
http://forums.autodesk.com/t5/Installation-Licensing/Error-when-downloading-2013-Suite/m-p/3411273
 

In Revit 2012, right-click Override Category in View put you into the VG dialog, and you had to scroll to find what you were after – annoying!  Revit 2013 is heaps better – it simply provides a dialog similar to that used for Override Element in View.  This allows for a much improved workflow.  See the 25 second video below:

You need to use this method.

http://trial.autodesk.com/SWDLDDLM/2013/BDSADV/ESD/Autodesk_Building_Design_Suite_Ultimate_2013_English_Win_32-64bit.part01.exe
http://trial.autodesk.com/SWDLDDLM/2013/BDSADV/ESD/Autodesk_Building_Design_Suite_Ultimate_2013_English_Win_32-64bit.part02.rar
http://trial.autodesk.com/SWDLDDLM/2013/BDSADV/ESD/Autodesk_Building_Design_Suite_Ultimate_2013_English_Win_32-64bit.part03.rar
http://trial.autodesk.com/SWDLDDLM/2013/BDSADV/ESD/Autodesk_Building_Design_Suite_Ultimate_2013_English_Win_32-64bit.part04.rar
http://trial.autodesk.com/SWDLDDLM/2013/BDSADV/ESD/Autodesk_Building_Design_Suite_Ultimate_2013_English_Win_32-64bit.part05.rar
http://trial.autodesk.com/SWDLDDLM/2013/BDSADV/ESD/Autodesk_Building_Design_Suite_Ultimate_2013_English_Win_32-64bit.part06.rar
http://trial.autodesk.com/SWDLDDLM/2013/BDSADV/ESD/Autodesk_Building_Design_Suite_Ultimate_2013_English_Win_32-64bit.part07.rar

You just need to use this method.  The important part is setting your referrer (Referring Page) to http://trial.autodesk.com/

http://trial.autodesk.com/SWDLDDLM/2013/BDSPRM/ESD/Autodesk_Building_Design_Suite_Premium_2013_English_Win_32-64bit.part01.exe
http://trial.autodesk.com/SWDLDDLM/2013/BDSPRM/ESD/Autodesk_Building_Design_Suite_Premium_2013_English_Win_32-64bit.part02.rar
http://trial.autodesk.com/SWDLDDLM/2013/BDSPRM/ESD/Autodesk_Building_Design_Suite_Premium_2013_English_Win_32-64bit.part03.rar
http://trial.autodesk.com/SWDLDDLM/2013/BDSPRM/ESD/Autodesk_Building_Design_Suite_Premium_2013_English_Win_32-64bit.part04.rar
http://trial.autodesk.com/SWDLDDLM/2013/BDSPRM/ESD/Autodesk_Building_Design_Suite_Premium_2013_English_Win_32-64bit.part05.rar
http://trial.autodesk.com/SWDLDDLM/2013/BDSPRM/ESD/Autodesk_Building_Design_Suite_Premium_2013_English_Win_32-64bit.part06.rar

This is about 21 gig in total…

From AutodeskCare:
We are experiencing a systems issue preventing some downloads from showing up in the Subscription Center. If this is affecting you, please use the following 72hr timed direct download links as a workaround until the problem has been resolved.

Autodesk Entertainment Creation Suite Ultimate 32BIT – LINK 1
Autodesk Entertainment Creation Suite Ultimate 32BIT – LINK 2

Autodesk Entertainment Creation Suite Ultimate 64BIT – LINK 1
Autodesk Entertainment Creation Suite Ultimate 64BIT – LINK 2

Autodesk 3ds Max Entertainment Creation Suite Standard 32BIT – LINK 1
Autodesk 3ds Max Entertainment Creation Suite Standard 32BIT – LINK 2

Autodesk 3ds Max Entertainment Creation Suite Standard 64BIT – LINK 1
Autodesk 3ds Max Entertainment Creation Suite Standard 64BIT – LINK 2

Autodesk 3ds Max Entertainment Creation Suite Premium 32BIT – LINK 1
Autodesk 3ds Max Entertainment Creation Suite Premium 32BIT – LINK 2

Autodesk 3ds Max Entertainment Creation Suite Premium 64BIT – LINK 1
Autodesk 3ds Max Entertainment Creation Suite Premium 64BIT – LINK 2

Autodesk Maya Entertainment Creation Suite Standard 32BIT – LINK

Autodesk Maya Entertainment Creation Suite Standard 64BIT – LINK

Autodesk Maya Entertainment Creation Suite Premium 32BIT – LINK

Autodesk Maya Entertainment Creation Suite Premium 64BIT – LINK

Philip Schmelzer
AutodeskCare | Community Manager

Autodesk, Inc.
via
Missing 2013 Entertainment Creation Suite Download… – Autodesk Discussion Groups

Worksharing Monitor for Autodesk Revit 2013 Extension 2012-04-11
Batch Print for Autodesk Revit 2013 Extension 2012-04-11
Autodesk Revit DB Link 2013 Extension 2012-04-11
Globe Link for Autodesk Revit 2013 Extension 2012-04-11
Autodesk Revit Model Review 2013 Extension 2012-04-11
Space Naming Utility for Autodesk Revit MEP 2013 Extension 2012-04-11

Revit Extensions for Autodesk Revit 2013 Extension 2012-03-29

via
Product Enhancements

This is kinda weird.  I opened this 2012 family in 2013 – and now when I turn things on and off in the Family Editor, they completely disappear (they don’t just gray out as you would expect). 

It is a scary little line based Casework family that I made a while back.  It has heaps of instance parameter dimensions and is a generally a bit of a nightmare – but still, why is this strange issue occurring?  Any ideas?

Watch the video below, and download the family here.

Autodesk have published an add-in for Revit 2013 that automates the upgrading of RFA, template and RVT files.Go here.

File Upgrader will batch upgrade previous versions of Revit files to the Revit 2013 format. The tool is intended to help upgrade family contents, template files as well as project files. Every time users open a Revit file which was saved in a previous version of Revit, a standard dialog is displayed in the Revit user interface stating that the file is being upgraded. During the display of this dialog, Revit tries to upgrade the document to the current version. This slows down the process of opening a file. To save time opening older file versions during each of the subsequent attempts to open the file, users can manually open each of the Revit files and save it to the current version. This can be time consuming if there is a large set of files to upgrade across various folders and sub-folders. The File Upgrader tool saves time and manual labor by automating this process. This plug-in was first published as an ADN Plugin of the Month: http://labs.autodesk.com/utilities/ADN_plugins. The plug-in has been provided with the complete source code needed to build the application, with the intention of encouraging users of Autodesk software to use programming to tailor the products they use to their specific business needs.

via
Autodesk File Upgrader on Exchange

Let us know if this tool does the job for you…

*Note – this is version 1.0 of the application…

Additional info from the documentation provided below:

Usage
Inside your Revit-based application, go to “Add-ins” tab ⇒ “Upgrader” panel ⇒ “File Upgrader” to start the command. Clicking this button starts the command and launches the “Revit File Upgrader” dialog.

Under the “Source” text box, specify the location of the folder where previous versions of Revit files resides. Similarly, in the “Destination” box, specify the folder where the upgraded filers will be saved.

Check the file types you would like to upgrade; you can upgrade .rvt, .rfa, and .rte files. By default, .rvt and .rfa are checked.

Press the “Upgrade” button to start the upgrade.

Once upgrade starts, Revit will open a file one by one, and save in the destination folder. The progress can be monitored in the list box at the lower part of the dialog.

After the upgrade process is completed, a dialog box is displayed with the total count of succeeded files over total number of files confirming the completion of upgrade. The status messages are also save as a log file, UpgraderLog.txt, in the destination folder.

For some reason, if the files fail the automatic upgrade process, the users can check the log file, and manually open the files and save them to the current version after resolving the conflicts/errors using the Revit user interface.

The tool handles nested folders. It also handles catalog files (.txt files) if it exists, copying them to the destination folder.

While using this tool, please ensure that the target folder is not nested inside the source folder.

Known Issues
This plug-in only works when there is an active document in Revit.

After running the plug-in, the last document remains open in the Revit’s User Interface. The file is saved, but the user will have to manually close it.

These are due to the current limitation of API. We hope to address it in future.

How to do it:

  1. Open a view in which the sun could ‘possibly be seen (ie. 3D View, Elevation view)
  2. Graphic Display Options – Lighting – Single Day
  3. Graphic Display Options – Background – Sky
  4. Your view needs to actually be able to see the sun (see steps below) … and it should be there.

You can even do this in a Hidden Line or Wireframe view.

Shadows do not need to be turned on.

If you want to quickly move the sun around WITHOUT having to use the graphic sun path:

  1. Follow steps 1 to 3 above
  2. Graphic Display Options – Lighting,  Tick the ‘sunrise to sunset’ button
  3. Turn Shadows On
  4. Click the Sun icon, then Preview Solar Study should be available
  5. This will reveal a little ‘player’ in the Options bar
  6. Click the Next Frame, Previous Frame buttons until you see the sun