Update
Method 1: after seeing my post, Troy Wright kindly shared his take on this. It uses only one custom node – Eraser by Julien – and it also works for Revisions that have been ‘ticked’ as issued, so this is probably the more powerful method.

Here is a download link to his DYN. Thanks Troy!

I will also add his email as a comment to this post.
Method 2
Steps:

  1. Install Dynamo
  2. Install Bakery package 
  3. Open a Revit project where you want to delete Revision Schedule rows
  4. Open this definition
  5. Run it
  6. Close Dynamo window
  7. Manage – Select by ID
  8. Paste
  9. Delete
  10. Done!

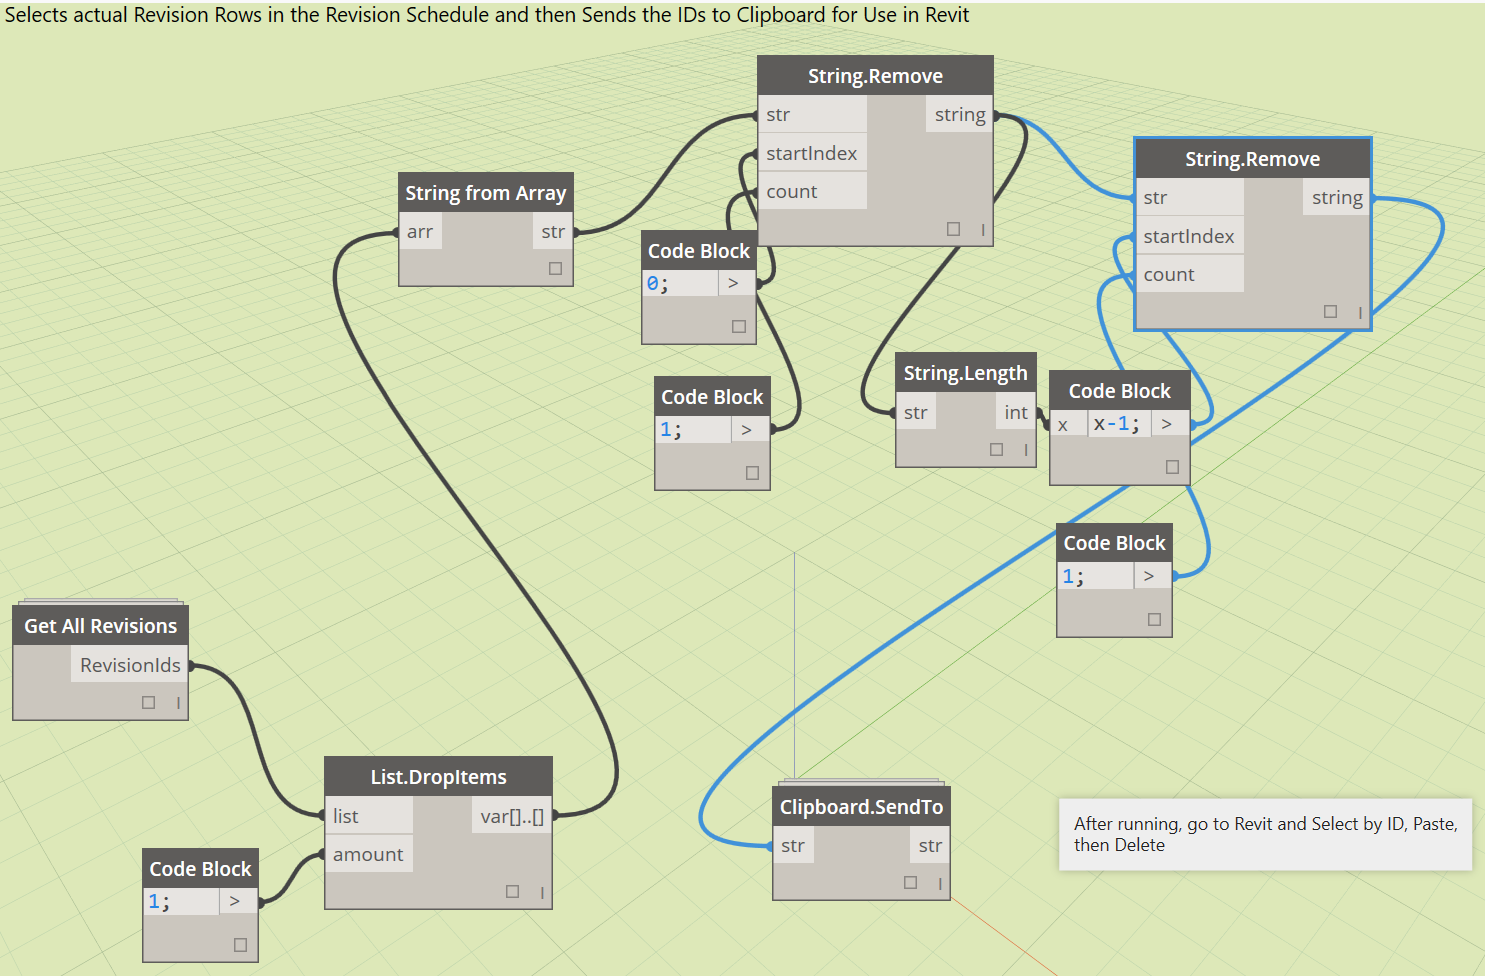
As always in Revit, it leaves behind the first row in the Revision Schedule… However, this method is more robust than deleting Revision Clouds as it also removes items appearing based on the “Revisions on Sheet” schedule. It is also much faster than laboriously using the Merge Up command one by one in the Revision Schedule.

As always, use with care 🙂

Video:

Check out the solution suggested by Andreas Dieckmann:

“I ended up using one of Python’s abilities to handle lists which is called groupby() because I did not want my head to hurt thinking about how to go about this in Dynamo… 😉
Here’s how:
  1. Sort list by X values using the method Steve explains above
  2. Sort list by Z values 
    (Notice that within each group of equal Z values, the X values retain their order from the previous sort operation)
  3. Create a list of lists with XYZ values (sublist 0) and just Z values (sublist 1)
  4. Group that list of lists by the Z values (using a custom node with some Python code inside)
  5. Extract only the list of lists of XYZs by combining two map nodes
You will need the package Group List of Lists By Key for this to work.
(For what it’s worth, I also uploaded another package called Sort List Of Lists this week which was related to that project but isn’t needed here. But it might be worth checking out, too.)”

Heads-up:
https://twitter.com/Jbenoit44/status/420673580838293504

I don’t think the API programmers should get scared just yet, but is there a day coming when visual programming will completely replace custom code?  Julien seems to think so:

“I firmly believe Dynamo could be used for many many purposes, and addin-like behavior is one…
Definitions are easy to share and update. Users can tune them with only some basic Dynamo skill. It is not the same with addins. It is a lot of work to manage and deploy. And users will not be able to tune things. Same thing for macros.”

Read more:
API or not API: addins vs Dynamo in Revit | AEC, you and me.

Heads-up: https://twitter.com/Jbenoit44/status/414322858823659520

Sometimes you just need to hear an idea and you innately know “this is going to be useful…”

Quick Select command for Autodesk® Revit® to select by element type and its properties. Expand the element or family type and select the properties that you wish to filter by. Click OK and all those elements will be selected. 

  • When in “Or” mode, the command will select all elements that match any of the properties. 
  • When in “And” mode, the command will only select elements that match all the selected properties. 

Example of potential uses:

  • select all Casework on a particular Level – done
  • select all Filled Regions with a given area – done
  • select all Walls whose Top is Attached – done

As with most addins I post about – its free.  Download on Exchange at:
this link

Heads-up via:

If you didn’t like my Random Trees in Revit post (which actually exposes the opportunity for randomizing and scaling any form or import in Revit), then maybe you will enjoy some of these other random landscape generation methods.  Read on below:

Landscaping from Dynamo (Julien Benoit):
Revit landscape: My first function in Dynamo 0.5 – Autodesk Vasari
via
Twitter / Jbenoit44: @BenPMalone @GeorgeMokhtar …

Paid plugin for 3dsMax:
TREE STORM – plugin for 3ds Max – animates tree on the wind
via
Twitter / GeorgeMokhtar: @BenPMalone @Jbenoit44 …

Ever wanted to get a Tag to pick up the hardcoded Elevation value given to a nested Family?  Then check out this great little thread and cool answer by Julien!

Answer:
You need to set a SP in the nested family.
Make the plate geometry attached to ref planes that are not the 2 from the template. Assign a SP to the distance between the RP at center of geometry and the RP that defines origin. SP will be by instance. Beware of directions for correct behavior when loaded in the host.
In the host family, add the same SP, select the plate, and in properties palette, look for the tiny button on the left. Click and choose the SP you’ve added. The insert point of the plate must be set to the ref level of the host.
Now you have the elevation of the plate driven by a SP in the host. Create a tag for this SP. You’re done. 

By Julien Benoit at
How can I get this parameter into a tag?

Remember Julien Benoit’s adaptive component tutorial from a year ago (link here)?  Well, Julien has made something pretty cool and posted it on RFO.  It is basically a 4 point adaptive component that calculates the area of the resulting surface using Bretschneider’s formula.

Julien’s solution (using an intense formula):
File Type: rfa AreaTool#2013_AC_CP_4P.rfa 208.0 KB

This is the formula, if you are interested (!)
sqrt((P – A) * (P – B) * (P – C) * (P – D) – ((A * B * C * D) * cos((BB + CC) / 2) ^ 2))

Alfredo’s more volumetric solution:
File Type: rvt Project_panel_areas.rvt 960.0 KB

Note: you will have to login to RFO to download from these links.

Read the whole thread:
AC curtain panel as measurement tool