BIM documents and files are often linked into each other, such as consultant links in a contractor Revit model, or plain NWCs appended to a master NWF Federated coordination file. In each case, the BIM application will try to find and open the linked files when opening the host model.

However, this only works if the pathing is predictable (ie. ‘the file is on C drive in folder MODELS’), and the typical situation is that you are running a corporate LAN that gives secure access to one or more mapped network drives (J drive or H drive or L drive). The problem is that your corporate LAN isn’t typically accessible via the cloud. A number of products exist to try and solve that problem, such as Citrix ShareFile.

But what about Box? It has a reliable, proven infrastructure and apps for all of your main devices. Its scalable and essentially secure. But… What about the mapped drive problem?

As part of our work at Virtual Built, we come across problems and provide solutions for this kind of issue all the time.

Here is how you can share BIM via the Box cloud and retain file pathing:

The first thing you will need is a common drive letter that can be applied to all of your computers and workstations. Sometimes, you may already have a secondary drive installed, perhaps with a drive letter of E. What we are going to do is point the Box Sync app at a subfolder of E drive, and then all the members of the team will use E:\BOX\Box Sync\ as the ‘root’ for all shared documents and models.

First problem: what if we don’t have an E drive (secondary hard drive or partition)? Well you can trick your system into thinking that you do…

  1. On C drive, make a root folder called C:\E_DRIVE
  2. Right click this folder in Windows Explorer and enable Sharing
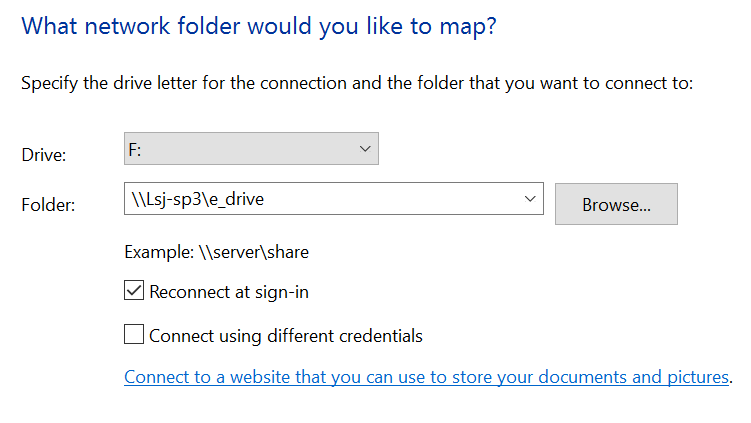
  3. After sharing is enabled, you can ‘map’ the local folder as a drive. When mapping, use the local computer name with two backslashes, followed by the folder name.

Shared


Mapped drive to local folder

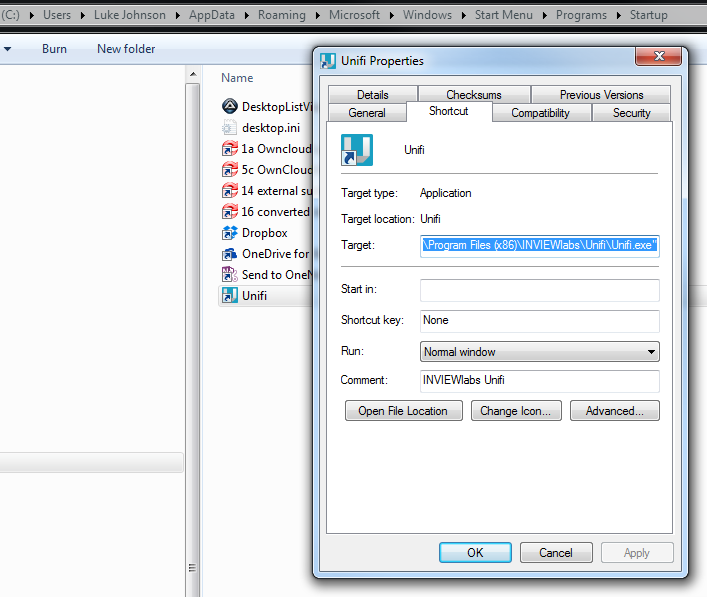
Now, we install Box Sync 4. After install, you will have one opportunity at first run to set the storage location. We choose to use E:\BOX as the folder…

That is basically it! Now, Box Sync will sync your models and projects from the cloud. When you set up your models inside that root folder (E:\BOX\Box Sync\), then the Revit links and Navisworks NWCs will all be able to ‘resolve’ properly on each system that you set up in this way. Then, when you save changes in that location they will then be synced back up to the cloud and down to your team, all automatically.

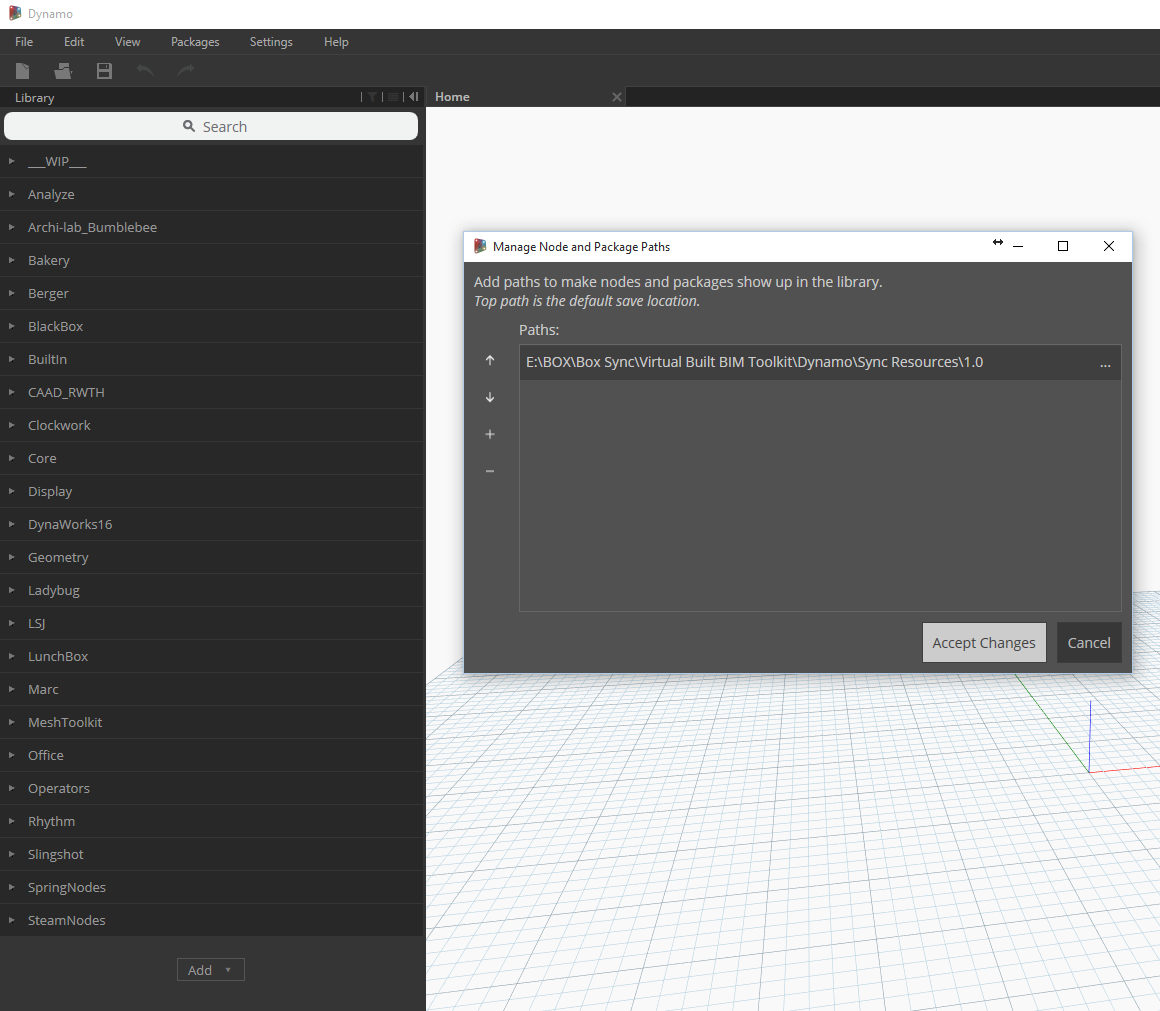
This structure can also be used to share Dynamo Packages among your team:

Important Note! There are a few big things to consider:

  • This does not give simultaneous modification access, such as for a Revit central file. If you and someone else modify the same file, Box will probably save two versions with your username appended.
  • You may be essentially opening up Local PC Access to the data in your Box folder (because it is no longer in a Windows-controlled appdata location). So be aware of the implications of this…

Box tip: You may also want to check your Logs folder for some big files:

boxsynclogs.png
Originally publish Mar 02, 2016 at 19:37 by Luke Johnson

As we move more and more information and services to the cloud, 100% uptime becomes more and more necessary. In our BIM world, if you are running a project on C4R (Collaboration for Revit), and that cloud service goes down, the project could be severely affected.

If uptime is important, so is monitoring and reporting. You can now view the latest “health” status and history of Autodesk Cloud products using the Autodesk Health Dashboard.

https://wrw.is/wp-content/uploads/2017/02/status.png

Check it out here:
https://health.autodesk.com/

Unifi 1.6 is out today, with support for Revit 2016. If you want to automatically update Unifi before you open Revit, simply add a Unifi shortcut to Windows Startup, like this:

Note: depending on your currently installed version, it may be more appropriate to launch from:
“C:UsersUSERNAMEAppDataLocalINVIEWlabsUnifiLauncherUnifi.exe”

The next time you open Revit, Unifi will already be nice and updated and ready to go.

If you are wondering “What is Unifi anyway?”, check out my review at this link.

“EcoDomus is offering a free version of its EcoDomus PM online software application called EcoDomus COBie Basic, which will help qualified design and construction teams simplify the COBie deliverable process. To qualify for using COBie Basic please submit the form on the right.
The EcoDomus COBie Basic software functionality enables:
• Data export from Autodesk Revit to a secure online database (more BIM authoring apps support is on the way)
• Online data entry and editing for all COBie entities (“worksheets”)
• Uploading and attaching documents to BIM objects
• Import and export of COBie Excel files”

Check it out at:
http://www.ecodomus.com/index.php/cobie-basic/

Heads-up:
https://draftsman.wordpress.com/2015/02/28/cobie-basic/

If you are interested in issue tracking, BCF, and multidisciplinary coordination, then the new “BIMcollab” offering from Kubus may be worth a look:
http://www.bimcollab.com/en/BIMcollab/BIMcollab

It looks essentially like a cloud manager for BCF issues. From the marketing spiel:

  • issues directly linked to objects in your BIM together with the correct viewpoint for quick visualisation
  • all the information needed at hand to lookup, create and solve issues within your BIM tool,
  • to save all your issues in the cloud and be able to access them from anywhere at anytime.


BIMcollab centralizes issue management in the cloud, simplifies this process and offers a structured way of storing, sharing and managing issues. But more important: you have the information right where it’s needed most: directly within your BIM model checker and BIM authoring tools. 

If you are already using it, feel free to comment and let us know what you think.
UPDATE some links from the press release:

Kubus BIMcollab® release 
KUBUS announces the release of a new ground breaking product: BIMcollab®. This BCF based issue management system for BIM in the cloud operates across applications. It helps bridging the differences between BIM tools, and targets the multidisciplinary cooperation between companies working on construction projects.
 
 
Join BIMcollab® Join BIMcollab®

We are happy to invite you to try BIMcollab for free. Upload BCF files or connect to BIM applications and invite team members to view your issues. Improving communication in BIM projects starts today. Join us >


BCF Managers for free BCF Managers for free

With the introduction of BIMcollab® we now offer our BCF Managers for free. These add-ons for Revit, simplebim and ArchiCAD have a direct link to BIMcollab® from the before mentioned BIM authoring tools. Download >


BIMcollab®
Why BIMcollab?
Features
Developer

Who owns and can potentially access your project data in the cloud? What are the legal implications? Many potential users of BIM360 and other products are concerned about this. Here is Scott Reese (Vice President, Cloud Platforms & Operations at Autodesk) speaking about this during a Q and A session at the Autodesk University 2014 Extension in Sydney, Australia on 10 November 2014.

You probably won’t find Autodesk 360 Desktop sync install package for download online, but you can install it “standalone”.

  1. Find some Autodesk install media
  2. Look for a subfolder named Cloudsync (make sure it is beneath x64 or x86 as appropriate for your system)
  3. Copy this folder to USB or a network location
  4. Run the file AdSync.msi on the PC you want to install Autodesk 360 on
  5. After install, you will need to restart
  6. After restarting, you may need to sign in using your Autodesk ID

I have previously described how to use Autodesk 360 as a cloud storage location for Revit (and any application) here:
Access Autodesk 360 files in any application, including Revit

Some paths that may assist – these were from BDSU2015:
Building_Design_Suite_Ultimate_2015_English_Win_64-32bit_dlmx64ComponentsCloudsync

Building_Design_Suite_Ultimate_2015_English_Win_64-32bit_dlmx64ComponentsCloudsyncAdSync.msi

Download at:
http://www.autodesk.com/revitsundial

Autodesk tweeted across their Twitter ecosystem that you can “See what we are working on…” with this Sundial Release. I don’t think it is a leap of logic to assume that you are actually seeing a preview of features that will be included in Revit 2016. The final feature set will not be set in stone yet, but it gives you a fair idea on where most of the big improvements will be.

Additionally, I’ve been thinking about this equation:

Revit Sundial (cloud hosted, latest release) + Revit Skyscraper (Revit Server for distributed teams)
=
The answer to cloud collaboration on Revit for distributed geographic teams?

A few things that Revit Sundial has that Revit 2015 doesn’t (shortlist):

  • Reveal Constraints mode
  • Load into Project and Close button in Family Editor (see video below)
  • Search the Type Selector 
  • Select Background Colour
  • Linking Revit model or a CAD file, the default positioning is now Auto – Origin to Origin (via this)
  • PDF Export enhancements, Hyperlinks will work in printed PDF sets (via this tweet)
  • Disallow multiple wall joins at once
  • more things… comment if you find them

Here is the long list of Revit Sundial New Features (lets call it Revit 2016 open beta in the cloud?):
Architectural Enhancements

  • Solon Integration: Personalize the building performance analysis experience in Revit by defining a dashboard with charts and results that are important to you. The central web-based Solon management environment allows you to create charts and configure dashboards for all of your company Revit users from a central collaboration environment in Green Building Studio.
  • Energy analysis: To better support the analysis of large models, several methods have been implemented to reduce memory usage.
  • Wall joins: To simplify the control of wall joins in a plan view, you can now select multiple intersected wall joins with a single click, and choose to allow or disallow joins on all the selected walls with a single click. If you choose to allow joins, you can then specify a Display option (Clean Join, Don’t Clean Join, Use View Setting). See Specify Wall Join Cleanup Options.
  • IFC references and phases: Use existing geometry in a linked IFC model as references for dimensions, alignment, snapping, and hosting of some face-based families in the Revit model. When you link an IFC file, its elements are assigned to a default phase. Before using IFC Import, Link, or Export, go to Autodesk Exchange Apps for Autodesk Revit and download the latest edition of IFC for Autodesk® Revit® to take advantage of up-to-date improvements.
  • Shaft openings: To streamline the creation of a shaft opening, the Base Constraint value now defaults to the level of the current activated plan view. (See Cut a Shaft Opening.) The instance properties have also been reordered to be consistent with families with similar properties: Base Constraint, Base Offset, Top Constraint, Unconnected Height, and Top Offset.
  • Adaptive point orientation: To improve clarity, the adaptive point instance parameter Orientation is now Orients to, and the selectable orientations have been renamed. No functionality has changed, only the names. See Adaptive Point Orientation.
  • Site design: Performance enhancements result in improved edit and regeneration times for complex toposurfaces, subregions, and building pads.
  • Perspective views: Certain modeling capabilities are now available in perspective views: (See Work in a Perspective View.)
    • Editing tools: Move, Align, Pin, Unpin.
    • Reset Target tool: Restores the position of the camera target to the center of the field of view.
    • Toggle between the perspective and parallel representations of the 3D view.
  • Reference other view: To search the list of available views for reference, enter keywords to locate the desired view. This feature is available when you are creating views for callouts, sections, elevations, and details, and you select the Reference Other View option (or modify a reference view). Also note that the Reference Other View option now displays on the Reference panel of the ribbon instead of the Options Bar. See Reference a Drafting View and Search.
  • Reveal constraints: To see all dimension constraints and alignment constraints in a view, use the Reveal Constraints mode, available on the View Control Bar. See Reveal Constraints.
  • View updates: Performance enhancements result in faster updates to views that contain multiple instances of families.
  • Revit links: Further enhancements result in improved performance for cases where Revit link instances are loaded but not visible in the view (such as when they are outside the crop region).
  • PDF Export enhancements:
    • Share your designs as electronic PDF files with automatically linked views and sheets. Each view tag in the PDF file is a hyperlink. Click a hyperlink to jump to that view or sheet in the PDF file. See About Printing to PDF.
    • Avoid lengthy or unintended print jobs. If you choose to print multiple views and sheets to individual PDF files, you cannot cancel the print job once it starts. A new message warns you of this issue and allows you to cancel the print job before it starts. Instead, consider printing the views and sheets to a single PDF file. See Troubleshooting: Printing Views and Sheets.
  • Schedules: To easily add a data row to a schedule, use the Insert Data Row tool, which is available directly on the Rows panel instead of within the Insert drop-down. The new position of this tool makes it easier to add a data row to a room schedule, area schedule, key schedule, space schedule, or sheet list. See About Modifying Schedules.
  • Select host for tags: To specify the host element for a tag, select the tag and use the Select Host tool. See Select the Host for a Tag.
  • Annotate stair treads and risers: To streamline the process of adding number annotations to treads or risers in a component stair run, specify default properties before placing the annotation. These default property values persist for tread/riser annotations added to the model. See Number Stair Treads and Risers.
  • Thin lines: To improve consistency between Revit sessions, when you use the Thin Lines tool, the setting is stored in the Revit.ini file. When you launch Revit, the stored Thin Lines setting is used as the default. See Graphics Settings in Revit.ini.
  • Export Models with Lines that Coincide: When exporting a Revit model to a CAD format, you can decide whether to maintain model lines that coincide with other lines in the same space. See About Exporting Models with Lines that Coincide.

Structural Enhancements

MEP Enhancements
  • Sequence for power circuits: To specify the sequence in which power circuits are created, use the Electrical Settings dialog. See Electrical Settings.
  • Most recently used panel circuiting: When you create a circuit, Autodesk® Revit® automatically connects to the most recently used panel for the current session. In addition, you can now search the Panel drop-down list. See Select a Panel or Transformer for the Power Circuit.
  • Move circuits: To move a circuit directly to a target slot without disrupting other circuits, use the Move To tool. See Move circuits on panel schedules.
  • ASHRAE table information: To identify the table that is applicable for the current condition, the ASHRAE Table Settings dialog displays the graphical representations associated with the duct fitting tables. This enhancement is helpful when you specify Coefficient from ASHRAE Table as the loss method for duct fittings. See Specify a Pressure Loss Method for Fittings and Accessories for Duct and Pipe.

Multi-Disciplinary Enhancements
  • Search: To quickly find the content you need, use the new search feature in the Type Selector or in drop-down lists. Click the Type Selector or a value field in the Properties palette or a dialog table, and enter keywords to search for. See Search.
  • File upgrades: To help you understand the consequences of file upgrades, new dialogs indicate the release of a file and the release to which it will be upgraded. In many cases, you have the opportunity to cancel the upgrade before it completes. See About Opening Models that Require an Upgrade.
  • Edit/load a family: To close the family automatically after it is loaded into a project, use the Load into Project and Close tool in the Family Editor. See Load the Current Family into a Project.
  • Properties palette: Keep your context in the Properties palette when you scroll, select a property, and then click outside the palette. This behavior can be helpful, for example, if you are selecting different family instances in the model to compare their properties.
  • Pin/Unpin icons: To determine whether an element has a relationship with a host system, select the element to see its Pin/Unpin tool icon. A different set of pin/unpin images (
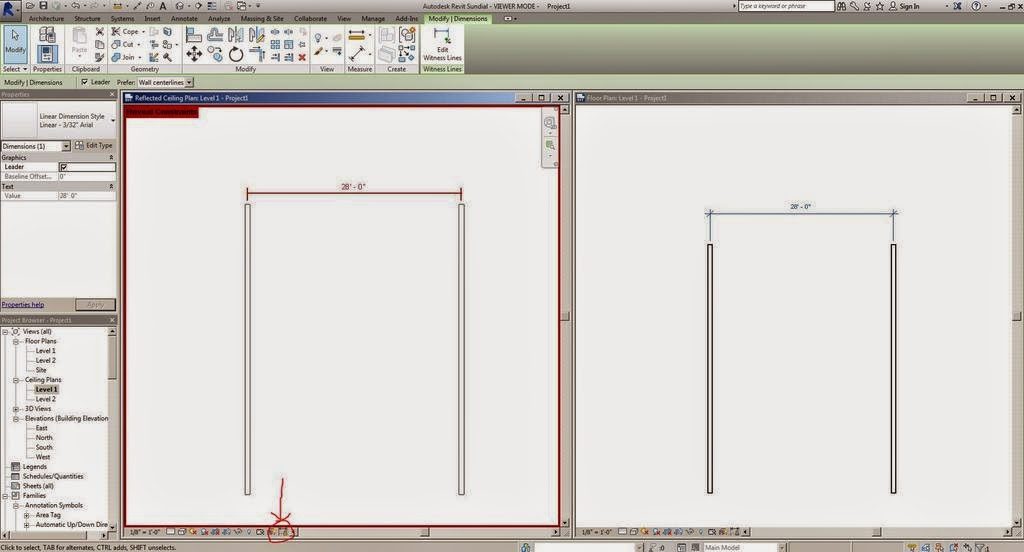
) is used in the drawing area to indicate a relationship with a host, such as a curtain wall panel or a beam in a beam system. The behavior of the pin has not changed (clicking it still allows you to override the properties for the element), but the subtle difference (small link in the image) adds a visual indicator that this pin is different than the standard pin that locks an element in position. The Pin/Unpin tool icons on the ribbon have not changed. See Unpin Elements.
  • Import/link position: To streamline the process of inserting a Revit model or a CAD file, the default positioning is now Auto – Origin to Origin. If you change the default, the option you select for Positioning becomes the default for the current Revit session. The software remembers one default option for Revit models and another default option for CAD files. See Import and Link Options.
  • Revit link in a closed workset: To understand why a Revit link is not visible in model views, check its status in the Manage Links dialog. The status In Closed Workset now displays for a Revit link that is in a closed workset. See Manage Links Dialog.

Configuration Changes

In the Revit.ini file, the following settings are new or changed in this release:

  • Colors section: The new BackgroundColor setting replaces the InvertBackground setting in the Graphics section.
  • Graphics section: The ThinLinesEnabled setting is now supported. The InvertBackground setting has been deprecated and is no longer supported.

via
New in Revit 2015 Subscription Advantage

Reveal constraints mode:

Search the Type Selector (via this tweet):

Select background colour (via this tweet):

Disallow multiple wall joins at once (via this tweet):

NDA?

Loading screen:

Video showing the Reveal Constraints mode and general use of Revit Sundial:

Read more:
http://insidethefactory.typepad.com/my_weblog/2014/08/revitalizing-inside-the-factory.html

Heads-up:
@Steve_Stafford and
https://twitter.com/kirklyncox/status/497111614705762304

We all want a better BIM Cloud, with smoother, faster, better team Collaboration. I know the guys behind this project – they are experienced BIM professionals who are keen to innovate, especially when it comes to using the latest technology to make the AEC world communicate more effectively.

The whole concept of moving forward together as teams, not individual silos, is one that is very enticing.

Its all a bit mysterious at the moment, but its definitely worth signing up:

http://bit.ly/Rfv4fb