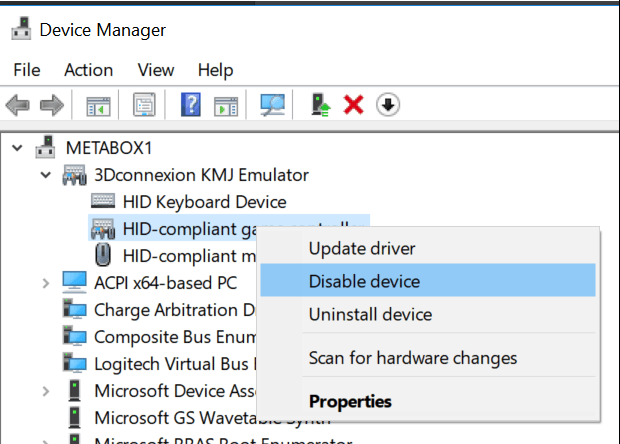
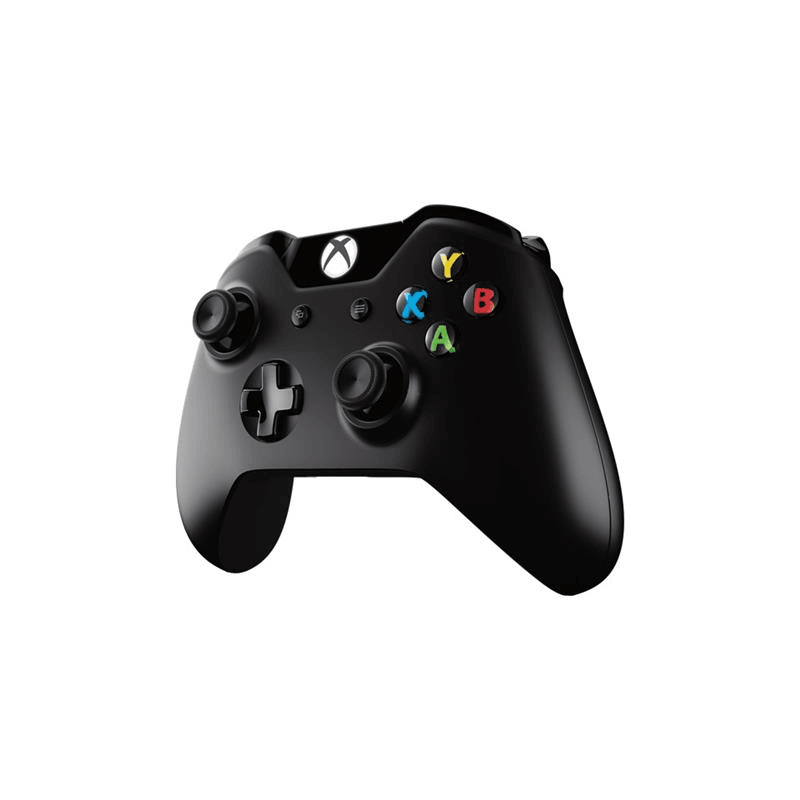
Recently I had an issue where an Xbox One Wireless controller, connected via Bluetooth, was not working properly in Revizto. When I went to the USB Game Controllers control panel, it showed a 3Dconnexion KMJ Emulator device. This is related to my 3Dconnexion SpacePilot Pro. In order to solve the conflict, I disabled the ‘game controller’ component of the 3Dconnexion KMJ Emulator, using these steps:
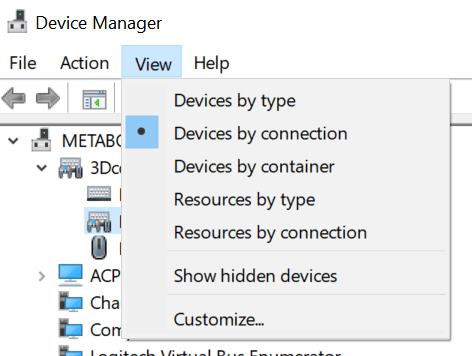
Open Device Manager
View Devices by Connection
Right-click the game controller sub-item and Disable device
Restart the PC
After this, the issue was fixed and the Xbox controller worked perfectly in Revizto.
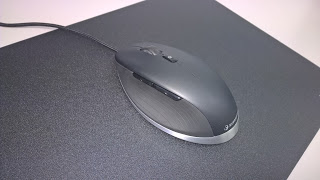
Many months ago I was sitting down having a coffee with one of the top sales reps for 3Dconnexion. He had a strictly confidential release to share with me… ‘a 3 button mouse!’ I was a little skeptical at first, but having received and tested a CadMouse, I can honestly say it is an incredibly high quality device that is smooth, powerful, and very pleasing to use.
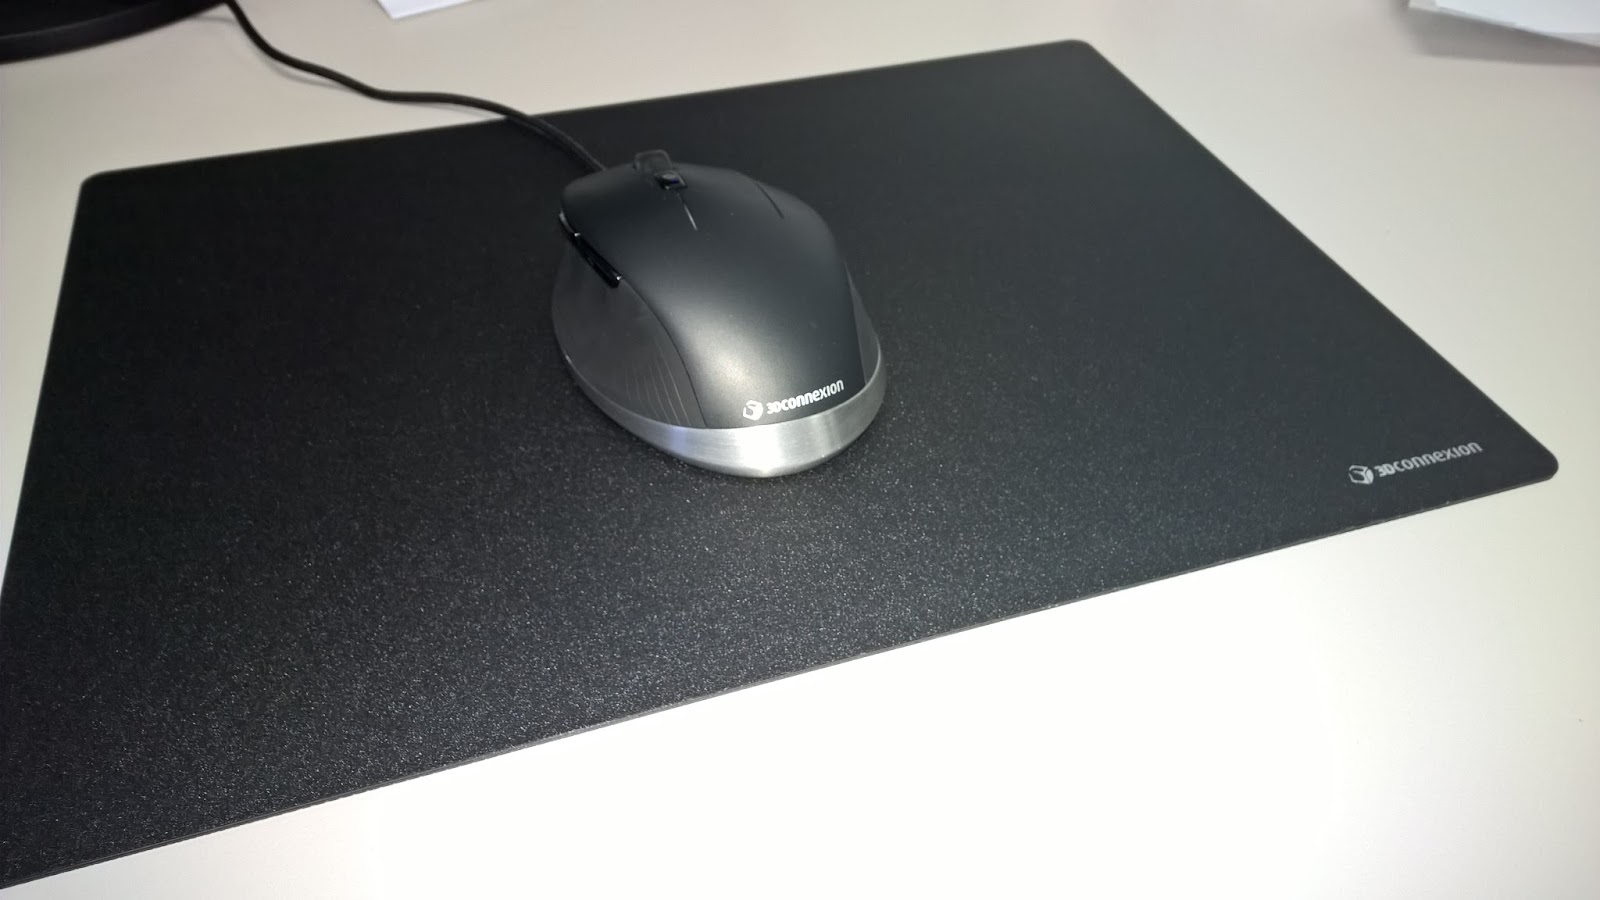
Unboxing and Setup My initial impression on unboxing and viewing the device was that it looked amazing: smooth brushed aluminium base and generously sized.
When you pick up the CadMouse, it feels both sufficiently weighted and yet not overly heavy. I received mine with the CadMouse Pad: a very generously sized and high quality mouse pad that pairs perfectly with the CadMouse for precision work.
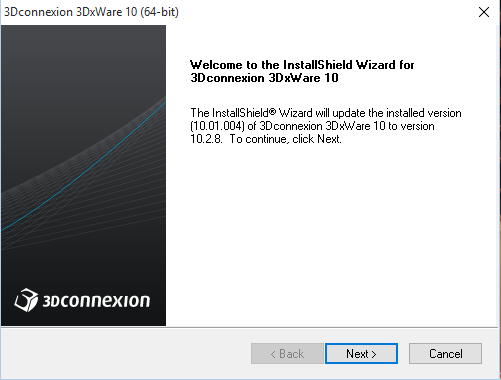
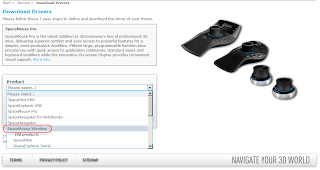
I expected that setup would be easy, and as it is a USB device it was simply plug-and-play to get started. As I was already a SpacePilot Pro user, I had 3dxWare installed, but I went ahead and downloaded 3dxWare 10 for Windows, version 10.2.8 from this page.**
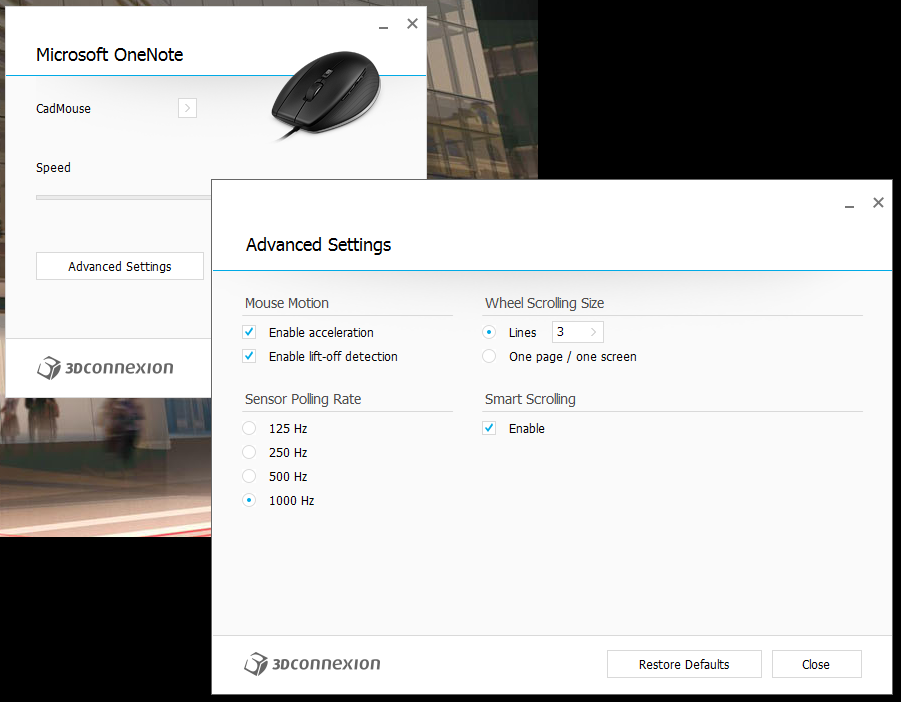
Then I checked out a few of the settings. The Advanced Settings allow a polling rate of 1000hz!
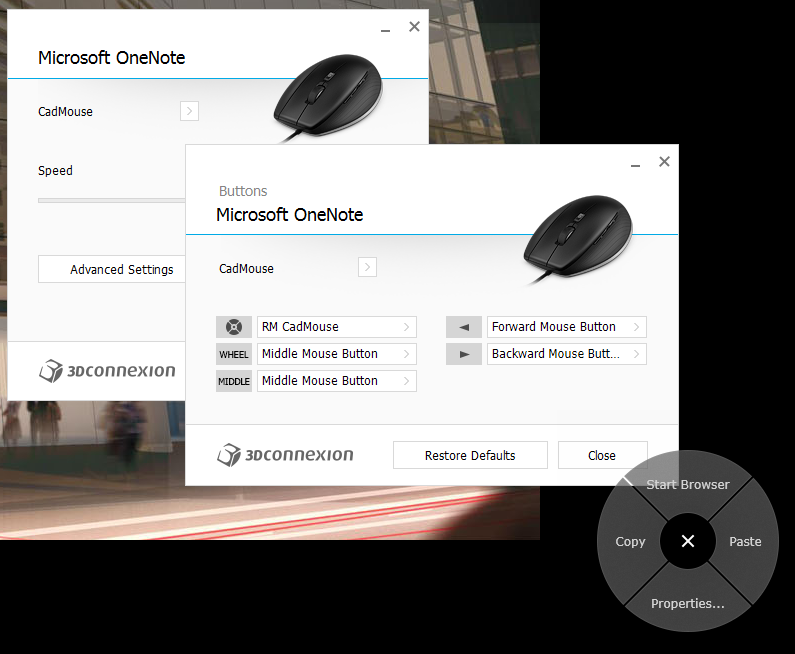
And the Buttons page reminds you just how many buttons and features the CadMouse has available:
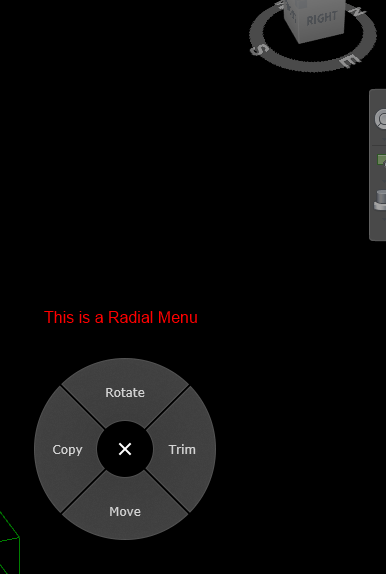
A few things to note here: the dedicated middle mouse button, and the wheel ‘click’, are actually separate buttons on the CadMouse, meaning you can apply different commands to these. Also, the small black circle is yet another button that (by default) calls up a Radial Menu: see bottom right of image above. I have written about Radial menus before, and I absolutely love them. Now, I can have Radial Menus on my left hand with the SpacePilot Pro, and on my right hand with the CadMouse. Custom BIM control scheme happiness!
A realisation… How do you hold your mouse currently? I was a ‘fingertip user’, and I would use my middle finger to scroll the mouse wheel. However, I found it much more comfortable to do a palm-hold on the CadMouse, and rest my hand over the mouse. This allowed immediate access to the middle button and the right mouse button. My index finger would then use either the wheel or the left mouse button. It was definitely a significant ‘ergonomic shift’ for me, but in the end it is more comfortable, and ultimately I can click any feature on the mouse at any moment…
Also, this results in more movement being handled by your entire forearm, which puts less strain on your wrist. And it also starts to make sense why that mouse pad is so big 🙂
However, after speaking to a 3Dconnexion global rep, I decided to turn my mouse speed “UP” in the 3dxWare properties (but keep Windows mouse speed at the neutral position). This really helped me get on board with the ‘whole mouse in the hand’ idea.
Also, if you hold the whole mouse in your hand, you have easy access to the 3 main mouse buttons (left, middle and right). And, to use the Radial Menu button, just lift the tip of your middle finger and then the base of your middle finger can click that button. It sounds a little weird, but it does work.
Daily Use The mouse is light and comfortable to use, and being wired it means that you never have to worry about running out of battery. There are plenty of buttons to customize, so you can really tweak the settings (including the Radial menu button) to maximize your productivity. Below I focus on BIM programs, but you can customize individual settings in Excel, your internet browser, Windows Explorer, whatever program you like. These settings are stored in an xml file that can be backed up, shared, and even directly edited if necessary.
In Revit Using the CadMouse in Revit is a real pleasure. The high resolution makes navigation smooth (provided your system can keep up). However, the real benefit is that we can take Keyboard Shortcuts off the keyboard and put them into your hand.
Many of us are probably zooming around in our mouse on the right hand, and possibly smashing Revit keyboard shortcuts with the left. But with Radial Menus, you can map any keyboard command in Revit directly to the mouse. As we know, Revit has a pretty powerful shortcut mapping dialog, so we can map almost any Revit command to the CadMouse with this workflow 🙂
With the Radial Menu and Gestures, it simply takes one click to allow access to 4 different commands, and you just swipe in the direction that you want to trigger that command.
Some other Revit-related possibilities include mapping your basic UI toggle commands like the Properties Palette and Project Browser to the CadMouse. Then you can basically trigger a ‘clean screen’ mode in Revit that hides these panes, all thanks to the customization potential of the CadMouse.
In Navisworks There are two main features that give the 3Dconnexion CadMouse a real edge in Navisworks:
The Quick Zoom buttons If you have set up Navisworks with a pretty fast frame rate, and Guarantee Frame Set in your Display options, the CadMouse Quick Zoom buttons are a really nice way to get in close on a feature in your model, and then step back out quickly. You literally just need to point your mouse at something, and then press Quick Zoom In once or twice to get in real close. Then click the Quick Zoom Out to step back to see the model in context.
This Screencast is a quick demo of the feature:
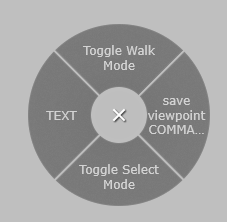
The Radial Menu button/s There are certain things in Navisworks that are not immediately easy to map to a single keyboard shortcut. However, you can record a multiple key press macro in the powerful 3dxWare software, and then map these macros straight onto your Radial Menu button on top of your mouse.
Added to this is the fact that you can map multiple radial menus to various buttons on the CadMouse. For example, you can have one Radial Menu on the top button, one on the middle mouse button, and more if you want. I set up these two custom menus with custom commands for Navisworks:
For markups
For navigation
And here is a Screencast. Notice how I have enabled gestures and I don’t even need to click, I can just move the mouse in one of the cardinal directions and that command is activated:
Summary 3Dconnexion already had a powerful suite of 3D modelling hardware products. By adding the CadMouse to their lineup, and integrating all of these devices with the 3dxWare software suite, you can have absolute control over your navigation and mouse control schemes, and it is individually customizable to each program you work with!
The 3Dconnexion CadMouse itself is a high quality device, and it is a real pleasure to use. It reminds us why mice used to have 3 buttons, but it adds so much more. If you are someone who loves customizing your working environment to maximize your productivity, the CadMouse will enable a level of control you may not have had before. Overall, the CadMouse would make a great addition to anyone’s BIM hardware kit.
**Note: If you have any problems installing LCD software on Windows 10, you may need to uninstall Logitech Gaming Software to get the 3dxWare LCD driver to install (at least I did). You can also try Microsoft Fixit.
Some general notes and tips are included below: The SpacePilot Pro and CadMouse in Revit Invert your top 3 axis, and drag the CadMouse to drop the orbit point when navigating with the SPP.
Troubleshooting steps To clean up and refresh your profile, you can: …stop the driver (START>>3Dconnexion>>DRIVER>>STOP DRIVER), then browse to: C:Users%username%AppDataLocal3Dconnexion3DxSmartUI.exe_**** This folder contains folder(s) which in turn contain files named: USER.CONFIG …delete these folders while the driver is stopped, start the driver again, and then reconfigure your preferences.
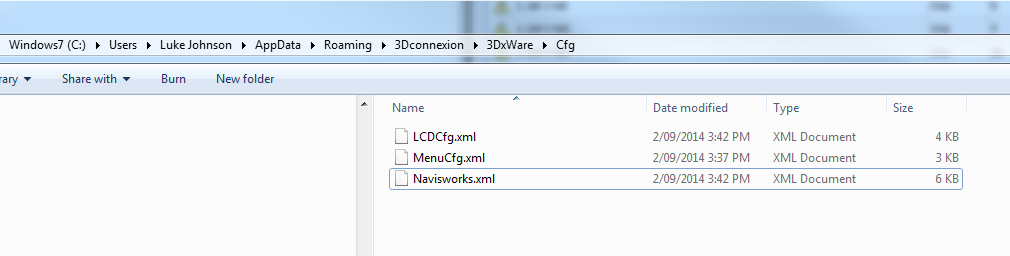
Reinstall Steps If you have any issues with the 3dxWare software, like if it doesn’t remember changes you make to specific profiles, you can reinstall using the steps in the FAQ here. I backed up my xml files first from: C:UsersLuke JohnsonAppDataRoaming3Dconnexion3DxWareCfg to a backup folder.
Profile Sharing While we are talking about 3Dconnexion, I’d like to refer you to the forum where you can share custom XML mapping files for various programs, such as my Navisworks profile for the SpacePilot Pro here: http://www.3dconnexion.com/forum/viewtopic.php?f=37&t=12120
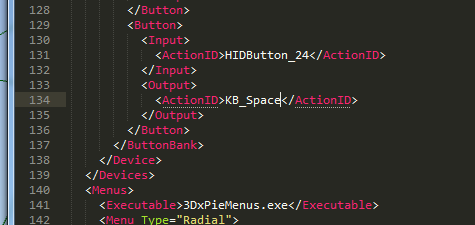
If you use a 3Dconnexion mouse with Navisworks, and you have installed the latest drivers (which I highly recommend), you may struggle to find out how to map a Spacebar to a button on your Spacemouse. Obviously, in Navis it is important to be able to hold down the Space key for selection purposes. If you try to record a macro for Spacebar in the 3Dconnexion management menu, you will find that it has both a ‘press’ and ‘release’ action.
You need to use the Keyboard list to map a key press correctly. However, Spacebar does not appear in the default menu… Happily, you can directly modify your profile XML to map the KB_Space action to a button on your 3d mouse. The images below show where to find this file, and how to edit it:
This method will fix the ‘press and release’ nature of macros, meaning you can “hold” the 3d mouse button for a Spacebar or Shift+Spacebar multiselection in Navisworks.
P { margin-bottom: 0.21cm; }A:link { }It is my pleasure to announce the winners of the 3Dconnexion SpaceMouse Pro Wireless competition that I launched a month back. After hundreds of entries, the following two names were selected at random, and they will each receive a SpaceMouse Pro Wireless prize pack, thanks to 3Dconnexion:
Barrie Sharp
Justin Harwell
Here are their competition entries… (it is quite interesting to hear both sides of the 3D mouse debate):
P { margin-bottom: 0.21cm; }A:link { }
Why I like my 3D Mouse
Barrie Sharp, from Tully De’Ath (Engineering Consultancy) in the UK (Twitter @barriesharp, Blog http://revitbuzz.blogspot.co.uk), who said:
“I work with dual screens in Revit and tile a 3D view with 2D views. My 3D mouse allows me to intuitively manipulate my design to craft my model. I also use a pen tablet and don’t have use of a mouse wheel. My 3D mouse seamlessly puts those controls back into my other hand but with enhanced functionality. Pan and zoom feels as natural as driving my car. Just love it!”
“I currently do not have a spacemouse for only one reason, I simply do not have the funds, yet. The company is a rapidly growing company with new hires coming in every week, and national contracts that keep the coming constantly growing. Since the company started using cad software we have re-engineered the way outdoor marketing is built, products which use to not be profitable to make but were apart of a package are now a very profitable item. Problems are now seen before built, and the various features of layout and design in CAD reduce large labor hours in construction. With a SpaceMouse I would be able to cut time designing and as the company grows it would be very easy with a SpaceMouse to prove why we would be needing to purchase another for the additional CAD users, after the team finds the value in the design. In the long term view it would end up benefiting both my company and yours.”
Barrie adds:
“I am very excited to have won and will be able to give my old space explorer to my brother. I am trying to convince my whole office it’s the way to go. I perhaps forgot to add, I love being able to pan and zoom in Revit whilst the error dialog is up!”
Finally, I would like to thank you all for supporting What Revit Wants and for entering this competition. I’m sure your valuable feedback will assist 3Dconnexion in making these products even more useful for the AEC community.
I have been a vocal supporter of 3D mice for some time now. I believe they make the experience of working with 3D models much more tactile and engaging. Personally, I use a SpacePilot Pro all day (the wired version), and it is brilliant for smoothly coordinating models in Navisworks. Newer versions of Revit (with improved display performance) have also made the 3D mouse proposition much more Revit-friendly.
I suggested the folks at 3Dconnexion run a competition through What Revit Wants, but I didn’t want to run a plain ‘ole “Why I want a 3D mouse” thing. Instead, I think its important for the designers and providers of these devices to understand why there is some resistance coming from the AEC community. Is it cost? Organizational restrictions? Have you tried them in the past and found them hard to use? I’m not giving you any more ideas – its a competition!
And if you are using one, why do you love it? Honest responses will be more highly valued.
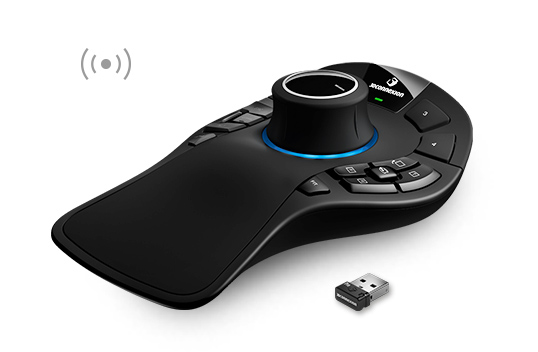
Up for grabs are twoSpaceMouse Pro Wireless devices – a cutting edge model, released just a few weeks ago. Here are the links to the competition entry pages:
As a SpacePilot Pro user, I was tempted to download and try these new drivers (despite the fact that the Release Notes indicated the SPP was unsupported). Guess what? The drivers work with the SPP, and now I have Radial Menus.
These things are amazing. Just click a button on the SPP, and a customizable menu appears, centred over the cursor of my standard mouse.
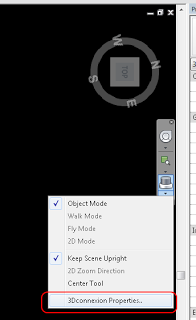
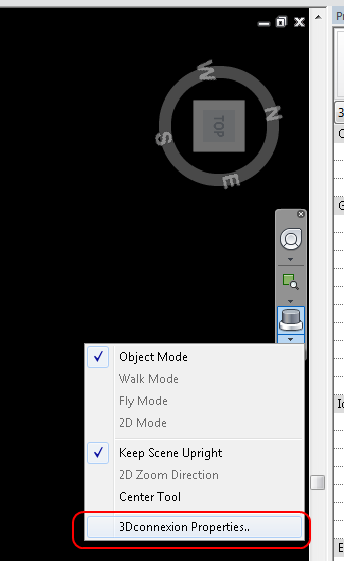
After installing the new drivers, open Revit, and do this:
Go to 3Dconnexion Properties.. (see image below) (you can also rightclick the black icon in the taskbar, while Revit is active)
Click Buttons
Click the arrow next to one of the buttons
Expand Radial Menus, and click new Radial Menu
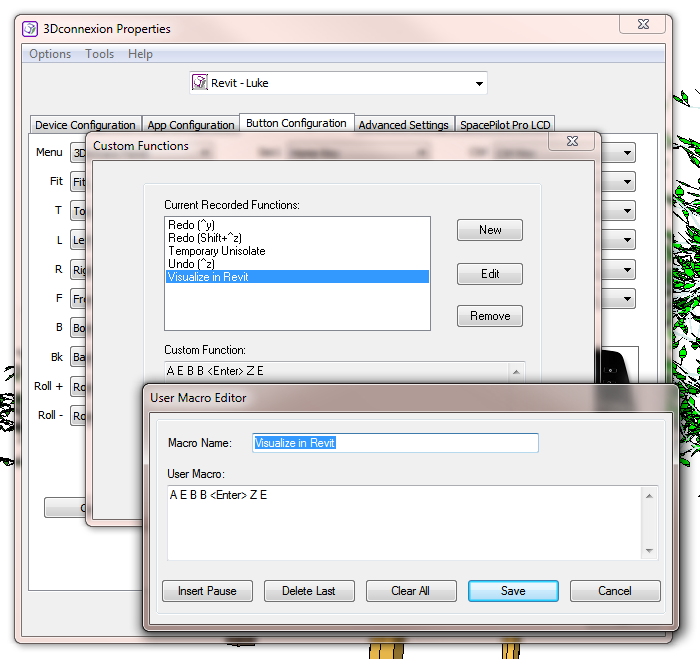
Type the Radial Menu name, and then add 4 commands using keyboard shortcuts to the 4 entries (click in the box and type)
To change the command alias, click the arrow next to the keyboard shortcut, then click the pencil. When you change the Macro Name, this is what will appear on the screen on the Radial Menu. (You can also add a series of keypresses using this dialog, to set up T-R- for trim etc).
There are at least three reasons why this is a great product:
the new driver package, which provides an onscreen display for the quick selection of shortcuts using the SpaceMouse Wireless. They call it the “Radial Menu”. You can customize the Radial Menu to take the place of traditional keyboard shortcuts (but there is a still definitely a place for the higher end pro devices, as you cannot use “multi-selecting” keyboard modifiers like Ctrl or Shift (which you can find on SMP / SPP) via the radial menus as you can’t “hold” them on the radial menu while navigating with the cap)
wireless tech combined with 6 degrees of freedom for 3D editing
the competitive price point (more accessible to many users than the SpacePilot Pro)
According to the release notes, 3DxWare64: includes all x64 (64-bit) Windows driver and plug-in software for all currently supported 3D except SpacePilot Pro.
Note: if the above underlining was too subtle, you can download and use this new driver package and get the “Radial Menu” with your current 3Dconnexion device!
Just had a great meeting with Andy Parnell-Hopkinson of 3Dconnexion GmbH.
In the course of our discussion, Andy solved a problem that had bothered me with the SPP – how to use Fly mode in a 3D orthographic view (the option is greyed out). The solution is so easy, just reverse a few axis:
By reversing these axis, the Fly mode is basically simulated – instead of moving the objects toward you when pulling back on the SPP, it pushes them away etc.
As you know, 3D orthographic views are probably the most useful view for modelling in Revit, so this tip should make some of you very happy 🙂
If you want to transfer your 3Dconnexion SpacePilot Pro custom settings:
via email: The button customisations are stored in your Users folder. On my Windows 7 laptop it’s C:UsersUserAppDataRoaming3Dconnexion3DxWareprofiles
In here you will find a bunch of SCG files which you can read with Wordpad and near the top of the file is the application that the file relates to. You can then copy and paste this file onto anyone else’s workstation. With a bit of tweaking you can also make this the default configuration for every workstation on a network …
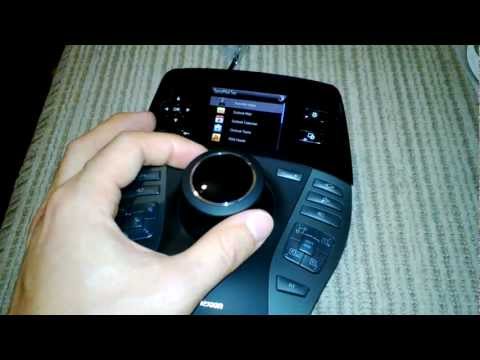
After receiving and using my SpacePilot Pro, I can honestly start with a simple:
Wow.
Have you ever wondered:
Is the SPP difficult to setup and start using?
Is the SPP compatible with my modelling software of choice?
Revit and the SPP – is it worth it?
Should I buy one?
If you have, then read on…
The SpacePilot Pro is the top-of-the-range 3D navigation peripheral offered by 3Dconnexion (formed in 2001 by Logitech). Other products include the SpaceMouse Pro, SpaceExplorer, SpaceNavigator for Notebooks and the SpaceNavigator.
There are three main parts to this review – you can find them by scrolling to the big underlined headings:
The Revit Part
The Other Part
The Summary
Unboxing and First Impressions
I was quite excited to unbox and start using it. I really wanted to put it through its paces properly, in multiple 3D tools and in Windows 7 in general, before passing judgement. So, I took my time… I wanted to make sure that I didn’t just fall in love with the ‘idea’ – I wanted to try it in a number of different practical scenarios.
I opened the box and had a little play with the joystick. 3Dconnexion calls it “6DoF” – it means it has six degrees of movement. X and Y panning, X and Y roll, pull Up and push Down, and Twist anticlockwise and clockwise. Here’s a short vid:
The general feel and build quality is very good. It is a heavy, solid, well built unit.
At this point, I also read the Feature Guide. The image below shows the primary functions of the device:
Connection and Setup
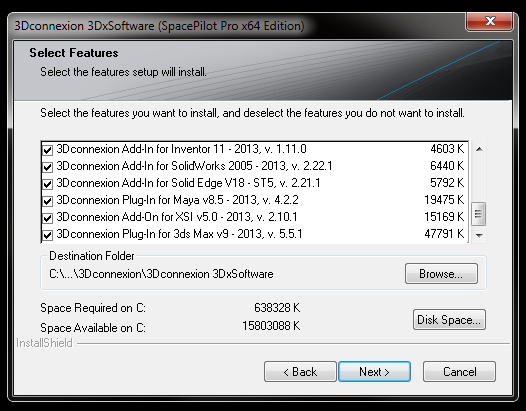
After connecting the device Windows 7 64-bit tried to find drivers on Windows Update, but, as expected, it couldn’t. So I popped in the installation CD. The Setup program prompted me to check for updates on the 3dconnexion website. The /checkupdates link that Setup opened appeared to be broken (or perhaps some incompatibility with Firefox), so I installed drivers using this page. These were the files I downloaded – drivers (3DxSoftware64SPP_v3-16-2_r1356 at 154mb) and a release notes PDF.
Once drivers were downloaded, I ran the exe. Choosing Custom allowed me to see all of the software plugins that were going to be installed, such as AutoCAD, Inventor and 3dsMax. The setup program then prompted me to install the Autodesk 3dconnexion hotfix for AutoCAD 2013. I downloaded the hotfix while the setup program continued to run. After setup was completed, I opened AutoCAD to check if I had installed SP1 already (as this was a requirement for the hotfix). SP1 was installed, so I installed the hotfix by replacing the acvmtools.crx in my AutoCAD 2013 folder.
Finally, I allowed setup to launch the proprietary 3DxWare program. Oh, and I took the plastic cover off my SPP LCD screen 🙂
First tasks
I ran the Trainer software and it was certainly an eye opener. While I could immediately see the potential and I could grasp how the device worked, I wouldn’t say that I was especially confident with it upon first use. In fact, I played the placement game and I was informed that it “wasn’t the fastest time” the game master had seen 🙂
Next, I ran the Viewer and tried the 4 different control modes using the Menu button – Object, Camera, Target Camera and Helicopter mode. I wonder which will be most useful in Revit?
I tried using Design Review at this early stage, and I struggled a little bit, but I thought “give it some time”. I have a feeling this is to do with Design Review forcing the placement of the cameras to be outside the building envelope.
Now (drumroll please), on to … The Revit Part
The device worked straight away (no configuration necessary). I was pleased to see it Pan and Zoom in 2D views (Plans, Sections, Elevations etc) very easily and intuitively. Switching to 3D, I couldn’t figure out how to Zoom. I tested the shortcuts to Top/Bottom, Front/Back, Right/Left and they all worked nicely. Sometimes I had to press Top and then Left or Right to show proper respect for gravity. I could get Iso1 to work, but Iso2 did not.
It turns out that the Zoom problem was me… I found that you had to put one finger on the side of the dial nearest the LCD, and your thumb on the other side, to effectively use the push/pull motion to zoom. It will take some practice – don’t expect to wow your colleagues if you have just bought it and plugged it in! In fact, controlling the push/pull zoom on the device may be your biggest challenge – move slowly, and feel the resistance in the device. Skip down to “Having Problems with the SPP and Revit?” to learn more.
The default shortcuts for Revit are not too bad, mainly to do with view styles (but I will talk more about customization and shortcuts later). Interestingly, a VirtualNumPad is provided, so you can enter numbers using the mouse without taking your hands off either your standard mouse or your 3D mouse.
Of the Navigation Setting Keys, the Pan and Zoom key and the Rotation key essentially toggle (you always have to have one of them on, or both). In Revit, you will commonly turn the Rotation key on and off (because you can’t really ‘Tilt’ a view in Revit anyway).
The overall Revit Experience
Using the SPP with Revit is very enjoyable. It gives you a new, tactile way to experience and visualise your building. You can really get inside the model, look around, and check things out. However, to truly increase your productivity, you are going to have to take some time: time to get used to the controls, time to set up shortcuts to your liking, time to see how the SPP reacts under different conditions.
One of the biggest limiting factors is your general computer and display hardware. If it is poor, then your experience will likely be choppy (check out the Supporting Hardware section below).
Specific Revit Tasks
I tested the SPP in the following Revit tasks:
Family creation
Conceptual massing / modelling
Building modelling
Building navigation and visualisation
Revit Tips
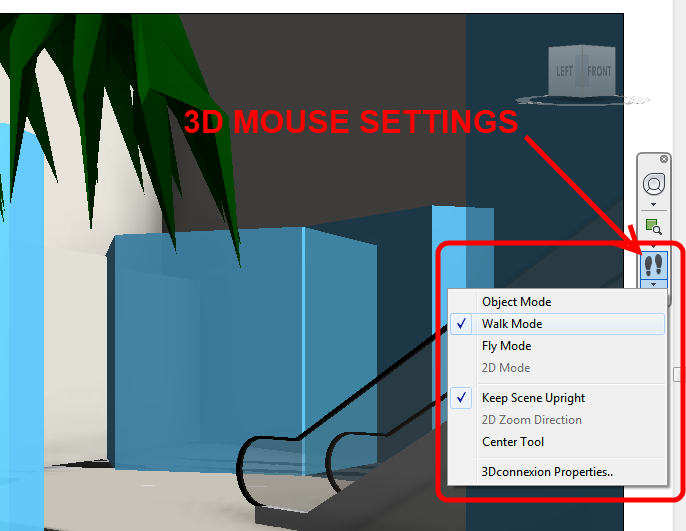
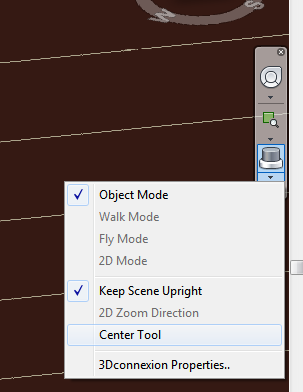
The single biggest tip is this – in Revit 2013 you can only switch between Object, Walk and Fly modes in a Perspective 3D view. And only in 3D views will you see the little 3Dconnexion gizmo in the Navigation bar, which allows you to set the mode (between Object, Walk and Fly):
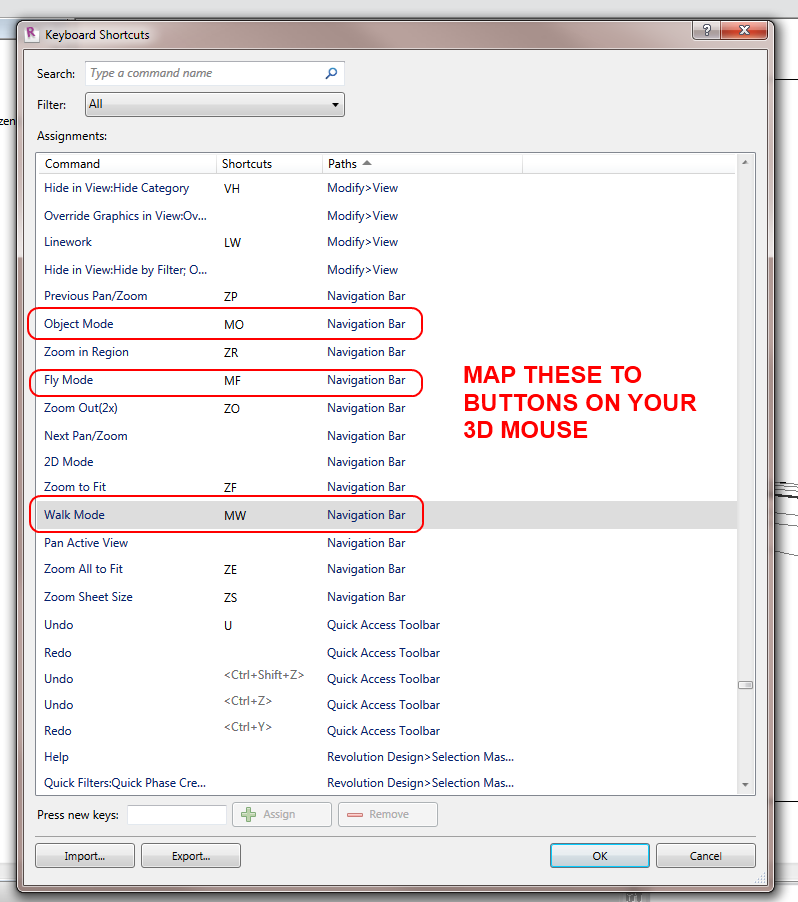
You can also set shortcuts (in Revit) to these modes and map them to buttons (in the SPP utility):
When using Walk mode, I recommend that you turn Dominant Axis off (top right hand button on the SPP).
In a 3D ortho view, it will help to use a Section Box if you are working with a large site or sparse 3D objects – it can be difficult to control if the extents of the model objects are geographically distant from one another, but a Section Box mitigates this problem.
Other tips:
Use your normal mouse to select objects as you visualize your building. This will set the Pivot (centre of rotation) that the SPP will use. Otherwise, you may find your building flying off over your shoulder. Interestingly, the “pivot” in Revit get set to the selected object – but then that Pivot setting will persist even after objects are de-selected.
You can also use the Center Tool option to place the pivot / orbit point with a left-click of your “normal” mouse:
You should probably turn the Dominant Axis switch on, at least to start with. Its a bit more forgiving.
You can use the Esc key on the SPP to stop commands or unselect objects in Revit as you navigate the model. You can (obviously) also use Ctrl button on the SPP to select multiple objects.
Having Problems with the SPP and Revit?
If you run into trouble, there are a few steps to take:
Don’t panic!
Click the Fit button
Try the Top / Left / Right buttons
Map a button to Rezero. If things go a little wacky, hit Rezero then close and re-open the 3D view.
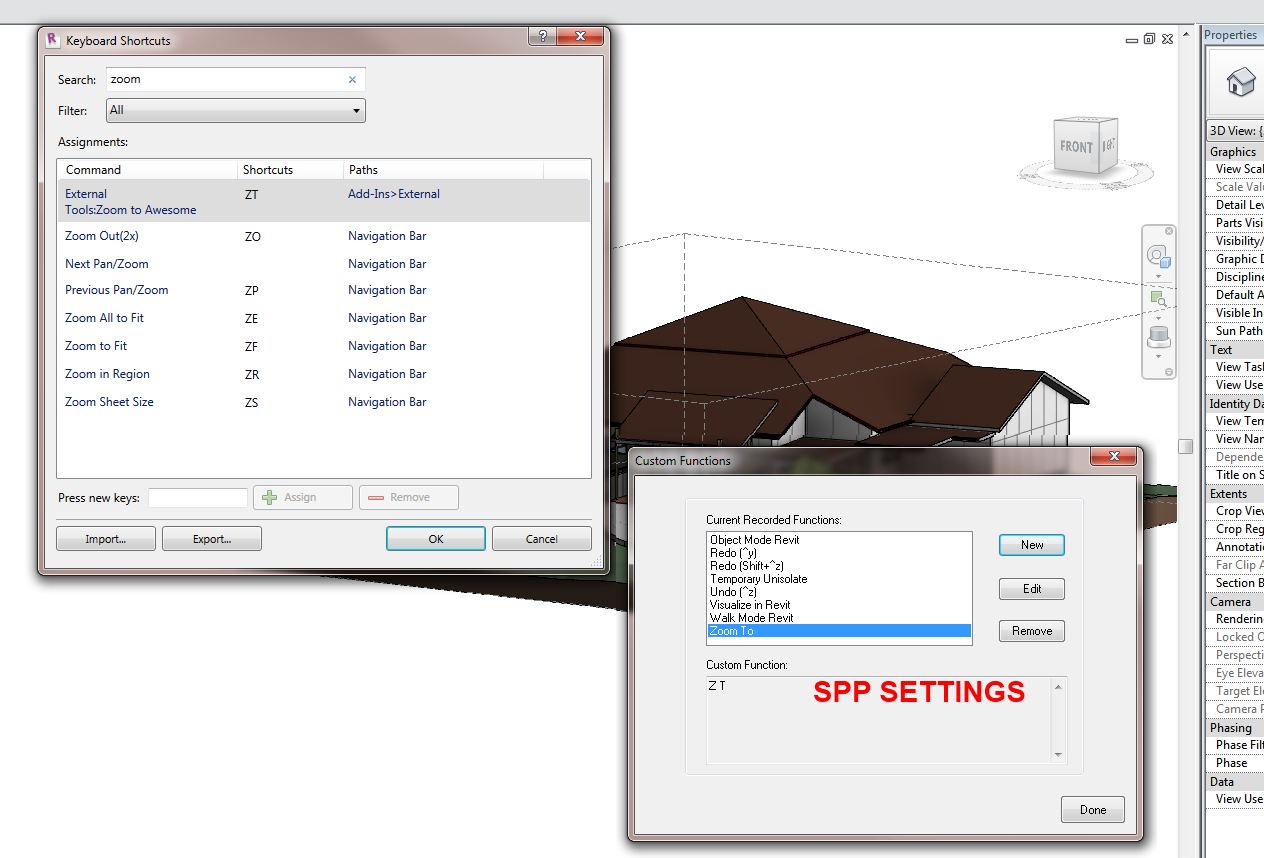
Use the ZoomToAwesome shortcut described below to quickly zoom the selected object
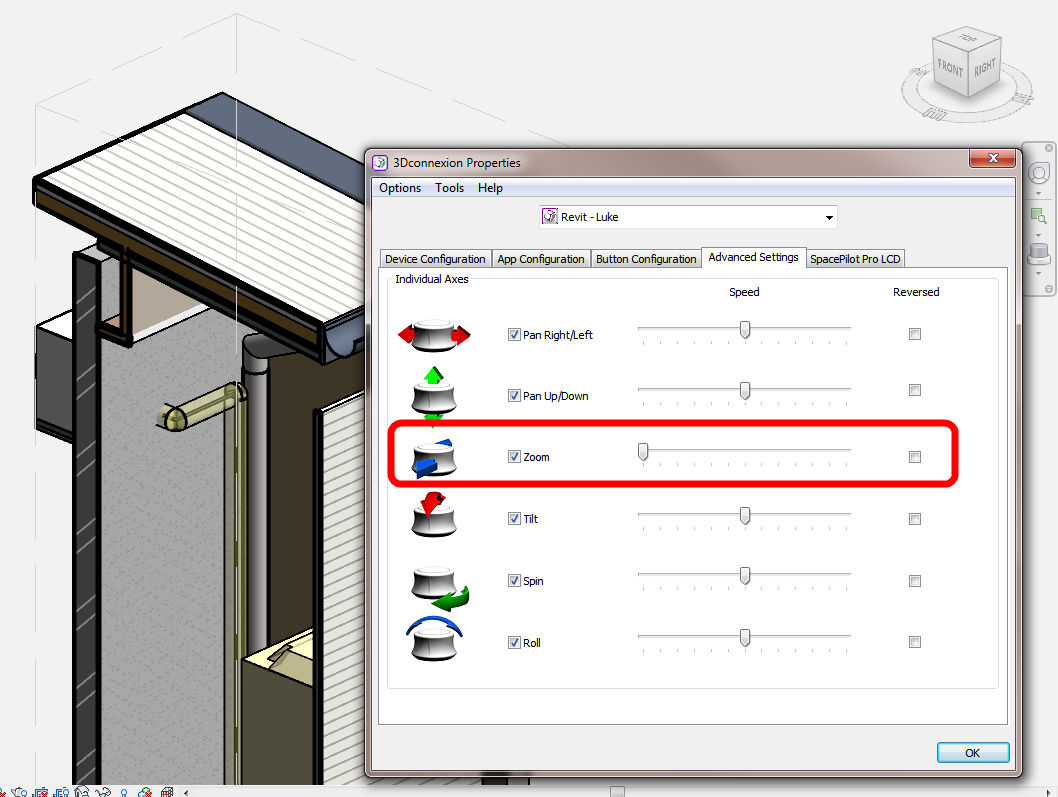
If you are struggling with the Zoom speed (like things are moving too close or too far away), then go into the SPP settings in Revit (by clicking the Menu button on the SPP), and turn the Zoom Speed all the way down, like this:
You may need to play with this setting to get it just right.
Revit Shortcuts and Customization
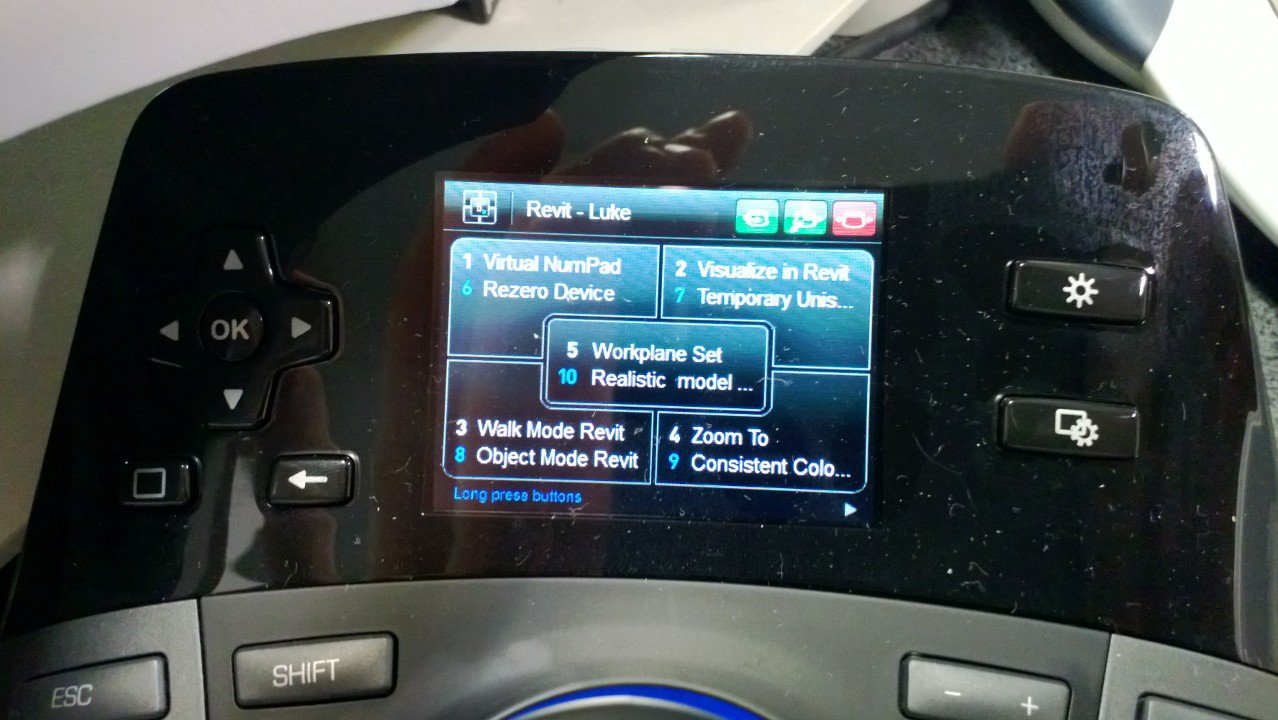
If you want to make the most of the SPP, you should use the plethora of buttons on the device to speed up common tasks. I made a few awesome shortcuts. One of these does three things with one click = Temporary Isolate – AutoSectionBox – Zoom to Fit. Simply select an object, then press one button, and all this happens! On my system, it looks like:
I also set a shortcut to remove the section box and Reset the Temporary Isolate. (Note – autosectionbox only works in 3d ortho views).
I followed the lead on Wikihelp help video and made a custom shortcut that does two things – Show Workplane, and then Set Workplane. I mapped this to the centre shortcut (number 5) on the SPP.
Do you remember Zoom to Awesome? Well, we can make a shortcut to Zoom To the selected object with the SPP:
I set the Alt button on the SPP to be used as a Tab press – its very close to the main dial on the SPP… and in Revit, we are always tabbing.
For prolific Revit keyboard shortcut users (like me):
Don’t forget that you can right-click your normal mouse to access a list of Recent Commands – that way you can keep your two hands on their respective mice
I had already mapped most of my keyboard shortcuts (in Revit) to be under my left hand (near the ASDF keys) on a standard keyboard. This way, its only a short ‘jump’ from the SPP to the LH side of the keyboard…(if you are right handed, that is).
My main Revit shortcuts look like this:
Revit Wishlist
My main item on the Revit wishlist would be the ability to use Walk mode in a 3D orthographic view. As most of our actual modelling work gets done in an orthographic view (primarily because Revit doesn’t let us do things in a perspective camera view), then it just makes sense for the SPP to allow the more intuitive Walk mode in ortho / isometric 3D views.
I corresponded with 3Dconnexion’s Director of Global Marketing on this issue, and he notified me that “the 3D mouse integration (in Revit) is handled by Autodesk. We can make requests but in the past it’s proven more effective for Autodesk’s actual customers to make them”. So, in some ways it is back on us (as users) to notify the Factory of what we want, perhaps by using this form and asking for Walk Mode in 3D orthographic views.
Supporting Hardware
I tested this on a PC running a Core i7 975 XE at 3.4ghz, with 12 gb of RAM – not a bad system. Initially, I tested using a Nvidia Quadro FX 580. This video card is getting a bit old now, and it showed (in fact, I generally ran it with Graphics Acceleration and Antialiasing turned off in Revit, for stability reasons). The SPP causes you to want to smoothly rotate and zoom your model in a natural, gestural fashion – but if your graphics hardware can’t keep up, the experience is a bit choppy and laggy.
Thankfully, I upgraded to a Gigabyte GTX 660Ti WF2 Edition, and it completely changed my experience with the SPP and Revit. Even with this high end card, however, I had to steer clear of Ambient Shadows and Realistic shading if I wanted to keep things smooth. Anti-aliasing was no problem…
Note on Revit 2014 and the SPP
I anticipate that day-to-day use of the SPP with Revit 2014 will be more pleasing, due to the Graphics hardware performance tweaks that are present in the new version. Things should be a bit more ‘fluid’ than in 2013…
The Other Part AutoCAD Tips
You will probably want to disable rotation when using AutoCAD for architectural purposes (plans / sections etc).
Design Review Tips
You can’t really use Walk mode in ADR 2013, but you can approximate it by using a mixture of the Full Navigation or Tour Building Wheels and your ‘standard’ mouse, and turning off Rotation on the SPP. You can now look with one mouse, and pan and zoom with the SPP. A true Walk mode would be better, however.
3ds Max Design 2013 x64
There is nice integration between the SPP and 3ds Max. Pressing the Menu button allows you to switch viewing modes easily.
Device Specifics – LCD
The LCD was initially very handy for viewing and opening emails. Just press the home button (little rectangle with gears) then use arrow keys and OK.
Weird things
I found that my PC’s keyboard or numpad would occasionally seem not to respond – it wasn’t really a big issue.
After switching between a few apps, the controller got ‘lost’. It would not function in any programs (though the LCD screen would still work). To fix this, I forcibly closed the 3dxsrv.exe process and then opened 3DxWare from the Start menu. I then had to close the 3DxWare tray application (!) and close and reopen Revit. This seems like a driver issue. This only happened once.
On another occasion, everything seemed to be ok, but nothing was happening when I moved the SPP. In this case, I closed 3DxWare from the tray, then restarted it from the Start menu, and finally closed and reopened a Revit document.
If your controller doesn’t show a blue ring, it won’t work. Unless you have turned off the LED in the settings, but why would you 🙂
Sometimes the view would ‘flip upside down’ in Revit and it was difficult to find the Top again (it seemed that even the ViewCube was flipped somehow). It looked a bit like this:
Inverted view – press FIT to fix
On one occasion, I was running in a big etransmit in another instance of Revit, and it kept stealing focus. This did not play well with the SPP.
Tested Software and Operating Systems (this list will be progressively updated)
Software that I used with the SPP: Win7 64-bit
Design Review 2013 — works ok
Revit 2013 (update 2) — see above
VEO (version 1.5.1) — did not work
meshmixer 08 — did not work
Google Earth 7.0.3.8542 — did not work
AutoCAD 2012 — works nicely
Inventor Fusion 2012 — works nicely (Object, Walk, Fly and 2D modes all available)
Hosted Revit 2014 (Citrix Receiver) — did not work (possibly a Citrix config issue)
Adobe Reader X — worked intermittently
Adobe Acrobat XI — did not work
Autodesk 3ds Max Design 2013 64-bit — works nicely
Win8 64-bit
AutoCAD Mechanical
AutoCAD Electrical
Autodesk Alias Design 2014 — works nicely
Sketchbook Designer 2014 — did not work
Most of the above results can be verified on the Supported Software page.
Note: where software is marked as did not work above, this likely means that 3Dconnexion has not yet added a plugin for that piece of software to the SPP drivers.
The Summary
In the competitive AEC, CAD and BIM fields, each individual and company needs to establish a point of difference in order to establish their reputation and prove their inherent worth. For most of us, our point of difference is our unique experience and breadth of knowledge. However, experience needs to be paired with suitable tools – in technical terms, this means good quality PC hardware, and reliable input devices.
The SpacePilot Pro can give you an edge, a competitive advantage that differentiates you from your colleagues.
What about our questions from the start of the review? Here are the answers:
Is the SPP difficult to setup and start using? No, it’s easy.
Is the SPP compatible with my modelling software of choice? Most likely, but you can check to make sure.
Revit and the SPP – is it worth it? I think so – once you have set shortcuts and become used to the device, it is an enjoyable and productive way to interact with Revit.
Should I buy one? Depends… do you want to have an edge that differentiates you from your colleagues? 🙂
Further reading 3Dconnexion 3D Mouse – WikiHelp
“Walk and Fly modes can only be used in a perspective projection (a camera view). Use Object mode to navigate an orthographic view, such as the default 3D view.”
…
In Fly mode “The orientation and height of the current view is not maintained.”
3D Mouse Navigation: A Better Way to Design So What’s It Like When You Don’t Use a 3D Mouse?
We meet some pretty passionate 3D mouse users. Sometimes, they’re even more passionate about what it’s like working without one.
“It’s like driving a stick-shift transmission for the first time,” says Jonathan Landeros. “I have to remember which keys are used for navigation, and I have to make sure to move my hand to that icon or hotkey. Without my 3D mouse, navigation isn’t quite as clean and smooth.”
So, how are you finding it?
I have a Space Navigator and find it a little sluggish with Revit projects, but Revit Family creation is pretty cool. It works really well with Inventor too. Basically, anything which is small component size.


