A brief look at what went on behind the scenes to create the visualisation of the Bridge Anti-throw screens. Checkout Revizto at https://revizto.com/en/
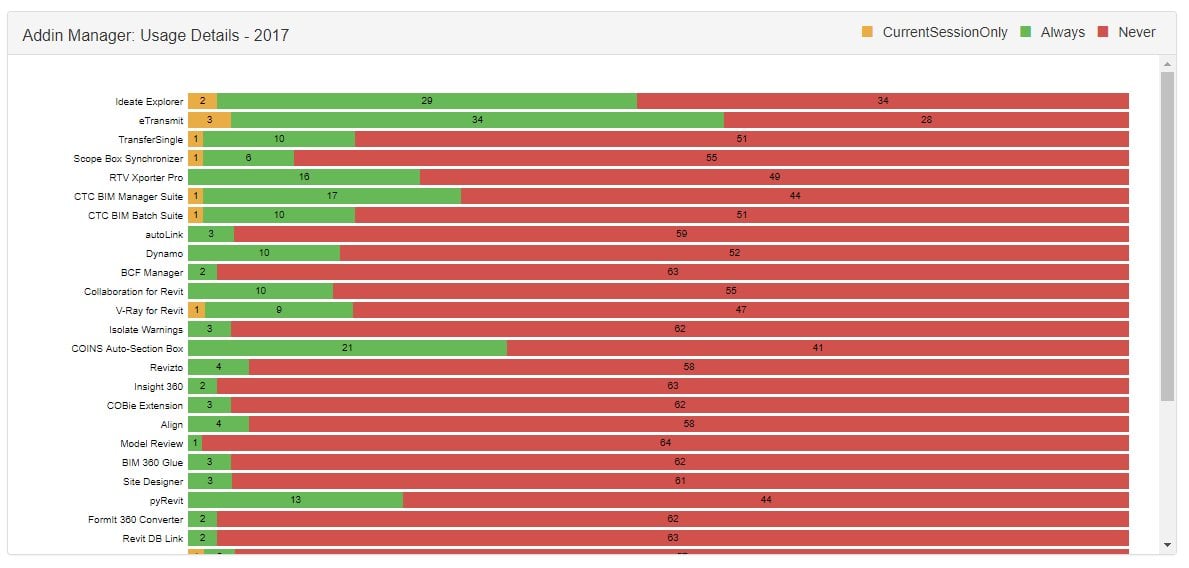
Starting at this tweet, Konrad Sobon triggered quite a discussion around Revit addins and how to manage users, deploy addins, and track their usage. He has worked on coding a tool called Mission Control for HOK that has a MongoDB backend and evidently harvests data from Revit sessions across the company. This is just one of many tools we are seeing recently related to project data, project intelligence, and similar analytics.
Based on this little exchange with @gschleusner , @arch_laboratory is hard at work making sure we will all have access to this soon 🙂
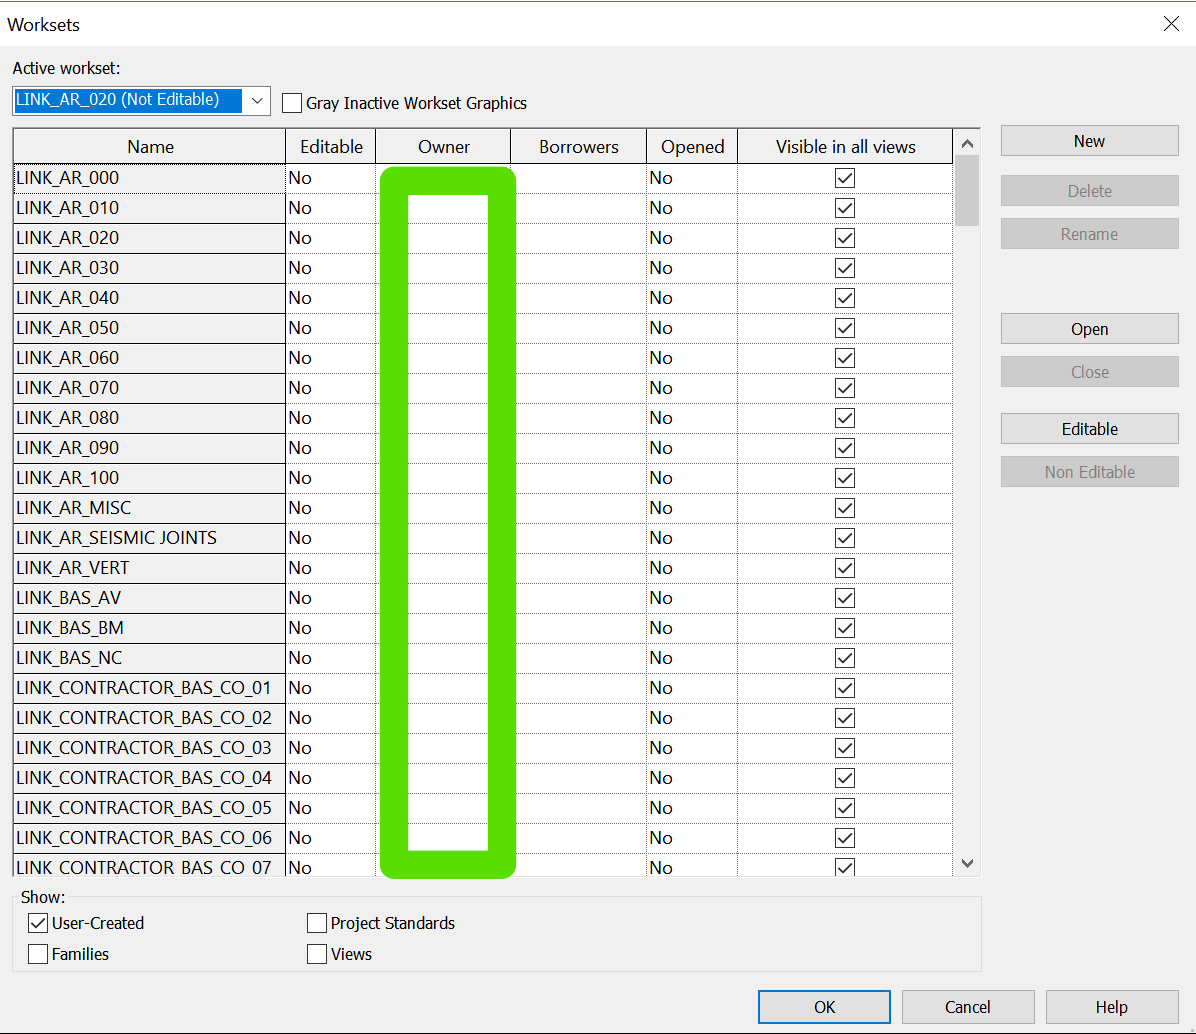
If you have gone through a process of saving Central models, and you have forgotten to ‘Synchronize with Central’ before closing them for the first time, you may find that your user has all User Created Worksets checked out in those files. A quick recap:
Workshared Revit files use a persons Revit user name (sometimes linked to an Autodesk SSO login) to determine if things are checked out
If someone has a User Workset checked out, you won’t be able to edit it until they Relinquish. (Note: you can Detach and recreate the file but that is dangerous if you have multiple people working on something)
Basically I had a bunch of Revit files that had all User Worksets from certain usernames checked out. They were upgraded and they were Central files. All that was needed was a simple Open and Relinquish. As I didn’t want to do this manually, I sourced some macro code from here and adapted it for my situation.
What does it do?
This Application level macro starts with a dialog box where you can select files. After you select them, it then loops over each file and Opens it, then does a Relinquish All Mine on User Created Worksets, and then it Syncs with Central and Closes the file. The key part of the code is here:
How to set it up?
First, get the code below. Copy and paste it into a new Application Macro in Revit.
/*
* Created by SharpDevelop.
* User: lukes
* Date: 1/10/2018
* Time: 2:54 PM
*
* To change this template use Tools | Options | Coding | Edit Standard Headers.
*/
using System;
using Autodesk.Revit.UI;
using Autodesk.Revit.DB;
using Autodesk.Revit.UI.Selection;
using System.Collections.Generic;
using System.Linq;
using Autodesk.Revit.ApplicationServices;
using System.IO;
using System.Windows.Forms;
namespace relinquish
{
[Autodesk.Revit.Attributes.Transaction(Autodesk.Revit.Attributes.TransactionMode.Manual)]
[Autodesk.Revit.DB.Macros.AddInId("30EBC375-5A4C-4917-AB07-D7212C9ED3FA")]
public partial class ThisApplication
{
private void Module_Startup(object sender, EventArgs e)
{
}
private void Module_Shutdown(object sender, EventArgs e)
{
}
#region Revit Macros generated code
private void InternalStartup()
{
this.Startup += new System.EventHandler(Module_Startup);
this.Shutdown += new System.EventHandler(Module_Shutdown);
}
#endregion
public void RelinquishMineFromFiles()
{
OpenFileDialog theDialogRevit = new OpenFileDialog();
theDialogRevit.Title = "Select Revit Project Files";
theDialogRevit.Filter = "RVT files|*.rvt";
theDialogRevit.FilterIndex = 1;
theDialogRevit.InitialDirectory = @"C:\";
theDialogRevit.Multiselect = true;
if (theDialogRevit.ShowDialog() == DialogResult.OK)
{
/* string mpath = "";
string mpathOnlyFilename = "";
FolderBrowserDialog folderBrowserDialog1 = new FolderBrowserDialog();
folderBrowserDialog1.Description = "Select Folder Where Revit Projects to be Saved in Local";
folderBrowserDialog1.RootFolder = Environment.SpecialFolder.MyComputer;
if (folderBrowserDialog1.ShowDialog() == DialogResult.OK)
{
mpath = folderBrowserDialog1.SelectedPath;*/
foreach (String projectPath in theDialogRevit.FileNames)
{
FileInfo filePath = new FileInfo(projectPath);
ModelPath mp = ModelPathUtils.ConvertUserVisiblePathToModelPath(filePath.FullName);
OpenOptions opt = new OpenOptions();
/* opt.DetachFromCentralOption = DetachFromCentralOption.DetachAndDiscardWorksets;*/
WorksetConfiguration openConfig = new WorksetConfiguration(WorksetConfigurationOption.CloseAllWorksets);
// Set list of worksets for opening
/* openConfig.Open(worksetIds);
opt.SetOpenWorksetsConfiguration(openConfig);
mpathOnlyFilename = filePath.Name;*/
Document openedDoc = Application.OpenDocumentFile(mp, opt);
/* SaveAsOptions options = new SaveAsOptions();*/
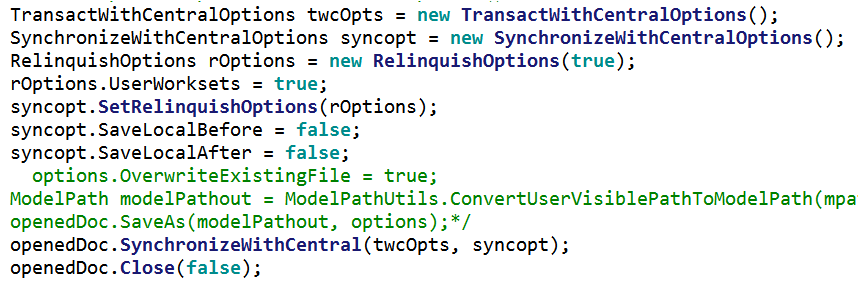
TransactWithCentralOptions twcOpts = new TransactWithCentralOptions();
SynchronizeWithCentralOptions syncopt = new SynchronizeWithCentralOptions();
RelinquishOptions rOptions = new RelinquishOptions(true);
rOptions.UserWorksets = true;
syncopt.SetRelinquishOptions(rOptions);
syncopt.SaveLocalBefore = false;
syncopt.SaveLocalAfter = false;
/* options.OverwriteExistingFile = true;
ModelPath modelPathout = ModelPathUtils.ConvertUserVisiblePathToModelPath(mpath + "\\" + mpathOnlyFilename);
openedDoc.SaveAs(modelPathout, options);*/
openedDoc.SynchronizeWithCentral(twcOpts, syncopt);
openedDoc.Close(false);
}
}
}}}
Then,
Add the System.Windows.Form reference and
Build the Solution
Note: I built and tested this on Revit 2018.2.
How to Use It?
Set your Revit User Name to the user that you want to Relinquish the Worksets for…
You may have to logout of your own SSO first
Go to Revit Options
Input the exact user name (including @ if an email address)
Start a new blank project in Revit
Start the Macro Manager
Select the RelinquishMineFromFiles macro that you built
Click Run
Select the files you want to fix
Click Ok
Wait for the result. The macro will step through them, Relinquish, Sync and Close the files.
Note:
Please use at your own risk, this has the potential to be pretty risky in a real project environment. Only use it if you understand what is going on 🙂
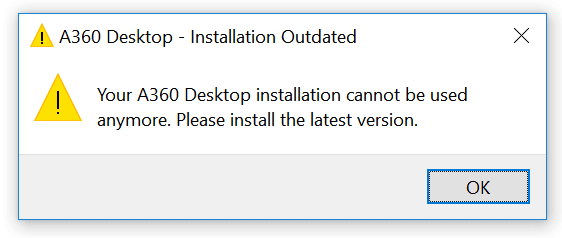
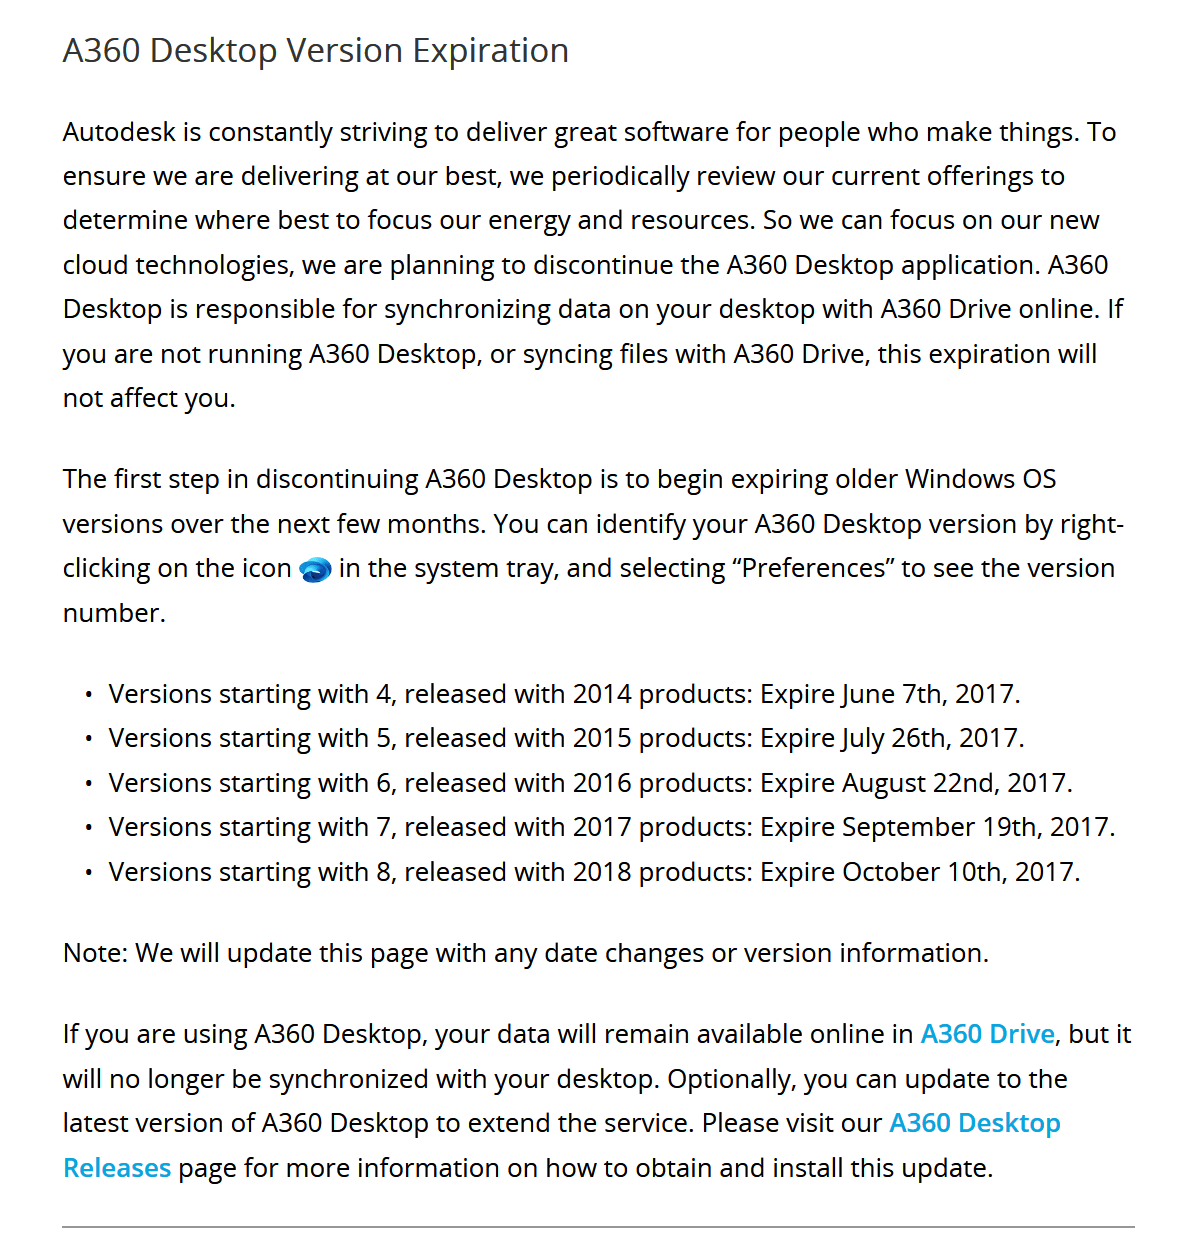
Over the years, Autodesk has provided various means for us to access, sync, backup and share files. Most recently we used “A360 Desktop” (see end of this post) and more recently “A360 Drive“. Autodesk recently released the Autodesk Desktop Connector, which allows you to:
Manage remote files from your desktop
Connect to Team Hubs
Work offline or online
Desktop Connector gives you access to your production A360 data. Using Desktop Connector to modify files that reside in production A360 will automatically sync changes, updating your production file in A360.
You will see a link on your BIM 360 Team hub like this:
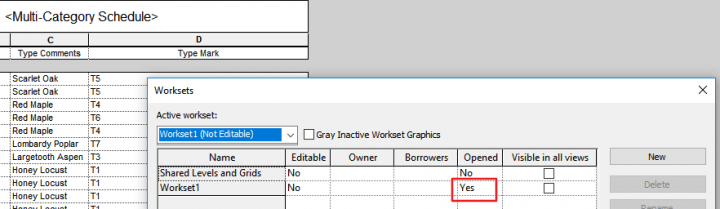
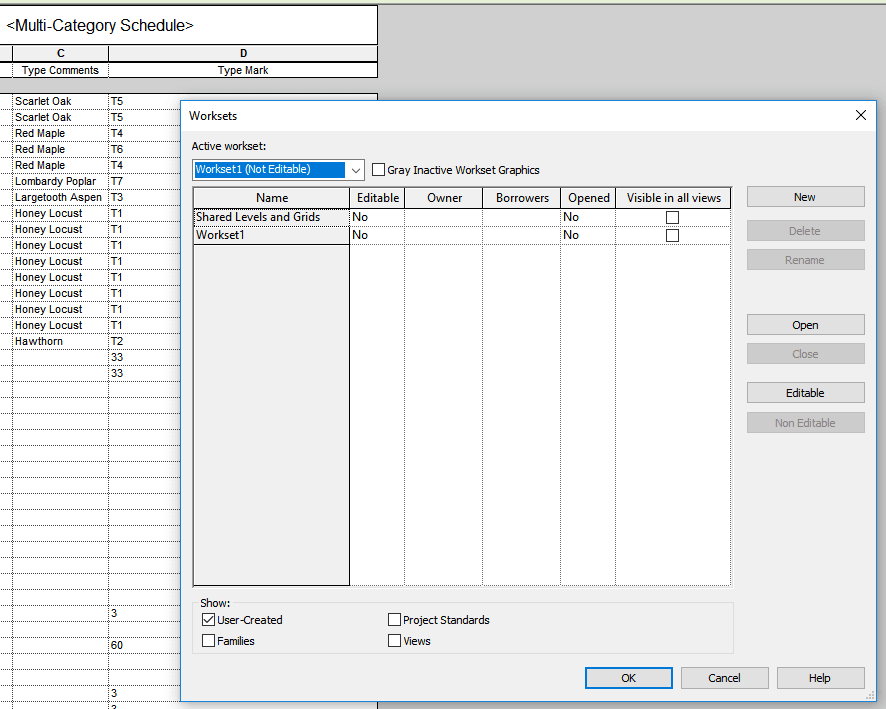
When working with a large project, you may often close all or most Worksets for performance reasons.
Secret #1
Did you know that objects still show in Schedules when the Workset is closed? And even if the Visible in all views checkbox is unticked?
Additionally, the Schedules dialog does not give us an easy method to filter by Workset. Sometimes this results in some weird workarounds like using Dynamo to copy the Workset name to a parameter in each element (yes, I have seen this on real projects).
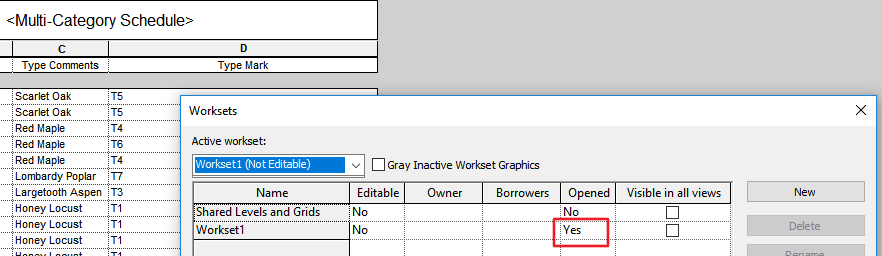
But what happens if we try Highlight in Model now, with these elements on closed worksets?
Secret #2
Interestingly, Revit will immediately and transparently open the Workset that the object resides on. This happens even if Revit can’t find the object in a view (such as because the Workset is set to be invisible in all views). You will not be warned or asked about this ‘open Workset’ action.
This automatic action does not create an entry in the Undo list, and therefore you must manually open the Worksets dialog and close the Workset yourself.
I’ll leave it up to you to decide if this is desired functionality or not? But it is definitely something to be aware of when working with Revit Schedules, Closed Worksets, and the Highlight in Model button.
There have been some similar attempts in the past. It is a bit of a challenge, because there will often be these ‘custom’ shared parameters that one company needs that are just very unique. But I’m interested to see how OpenRFA continues to grow. No doubt its success will depend on the number of contributors and their engagement.