You want to be able to network and directly reference material libraries and resources.  You can do this using symbolic links in Windows 7 / 8, where the OS and applications think they are dealing with a local resource, when in fact it can be on the network.

Disclaimer:  I’m sure that there will still be some quirks and issues with this method – I doubt that it is the perfect solution.

This is the essential command:
To create a symbolic link type into the Command Prompt box
mklink /D
: This need to be exactly as per the location of the local machine path
e.g. “c:Program FilesCommon FilesAutodesk SharedMaterialsTexturesbluescope Lysaght”
*Don’t forget to use the double quotes, if it is not identical the library wont work.
: This is the location of your network files
e.g. “s:bluescope Lysaght
*blueScope lysaght is the folder name

Check out this PDF for a more detailed description:
http://www.steelselect.com/download_centre/file.php?id=5039
(accessible via SteelSelect page here)

This method is also discussed at:
http://www.revitforum.org/third-party-add-ins-api-r-d/2883-colorbond%AE-steel-texture-library-revit-lysaght-content-beta-version-6.html#post87933
(but guess what, XP can’t handle these symbolic links)

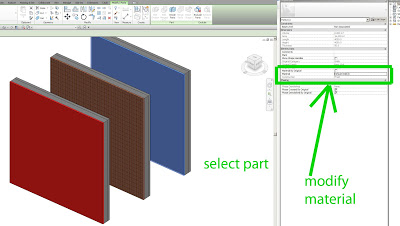
In the past, having multiple instances of a Linked RVT was quite problematic if you wanted to apply different materials to each instance.  Parts have mostly solved that problem (thanks to Steve for reminding us).

Here is a quick how-to:

  1. Place a Wall with multiple layers into one RVT file
  2. Link that into another RVT (the host)
  3. Make 3 copies of the linked RVT in the host project
  4. Tab select a Wall that resides in one of the links while working in the host file
  5. Click Divide Parts
  6. Select one layer of the wall (the Part)
  7. In Properties Palette, untick Material by Original
  8. Set Material as desired using Properties
  9. Rinse and repeat steps 4 to 9 for each layer / material option you want to explore

2013:

IFC Exporter for Revit 2013 (v2.12):
http://apps.exchange.autodesk.com/RVT/Detail/Index?id=appstore.exchange.autodesk.com%3aifcexporterforrevit%3aen

IFC Export Alternate UI for Revit 2013 (v1.12):
http://apps.exchange.autodesk.com/RVT/Detail/Index?id=appstore.exchange.autodesk.com%3arevitifcexportalternateui%3aen

2014:

IFC Exporter for Revit 2014 (v3.4):
http://apps.exchange.autodesk.com/RVT/Detail/Index?id=appstore.exchange.autodesk.com%3aifcexporterforrevit2014%3aen

IFC Export Alternate UI for Revit 2014 (v2.4):
http://apps.exchange.autodesk.com/RVT/Detail/Index?id=appstore.exchange.autodesk.com%3arevitifcexportalternateui2014%3aen

What’s new for IFC Exporter for Revit v2.12/v3.4:
General (Revit 2014 UR1 Only):
– Added basic support for IFC4 export, corresponding to the Coordination View 2.0 MVD. Please see the Wiki for more details. This requires Revit 2014 Update Release 1 to be installed. Note that currently the ifcXML format for IFC4 is not supported.

Its an interesting read, as it provides a basic overview of Autodesk’s Vasari / Dynamo + DesignScript combo (including some of the history of its development), as well as considering the offerings of competitors (Bentley / Generative Components and Rhino / Grasshopper, and even formZ).  It closes with a decidedly Mac-centric prediction of where Revit may be headed in the future (you can be the judge of how realistic this prediction may be).

Here’s a juicy quote:
We think Autodesk is working on Revit for the Cloud. Indeed, we think it will run entirely through a Web browser. You may be thinking “no way, can’t be done.” Well, we think that is not far off. Today we have WebGL (Web Graphics Library) which derives from OpenGL ES 2.0.

At AIA Denver we saw a new “labs oriented” beta application by Gehry Technology that was doing modeling through a browser using WebGL. And while the shapes were basic it was fast. It ran on Chrome on a MacBook Pro. WebGL and what is possible today and in the future is a topic we need to conquerer here at Architosh because we believe it is going to change the landscape of CAD and 3D in the next few years.
Read the whole article:
AIA: Autodesk introduces computational modeling tool Dynamo for its BIM workflow | Architosh

There is apparently over “20000 pages of documentation” that will be released, along with videos and 3D asset files.

It could be interesting to see how this release intersects with the development of Revit standards and Revit content globally…

The Autodesk Creative Commons “Area”:
AREA | creativecommons

“The group adopted the Creative Commons licensing which means 20,000 pages of documentation, 70 videos and 140 downloadable 3D asset files are now ready to be modified, remixed and shared globally.”

via / heads-up:
Autodesk makes huge trove of docs, training materials and 3D asset files available under Creative Commons – Boing Boing

As per the above Autodesk page, “More content to come soon…”

Pretty simple really – I want to be able to select an element in Revit, and then trigger the “Select in Project Browser” command, which will scroll the Browser, select the appropriate entry and expand any plus signs as necessary.

I’m thinking:
Sections / Elevations / Callouts – selects the View in the Browser (if it is not hidden by Browser org.)
Component Families – selects family type
Links – selects the link
Groups – selects the group

I’m sure there is more granularity that could be added to the above list…

Anyone out there think this is possible?  Want to take it on?

Dave Light gives the very concise version:
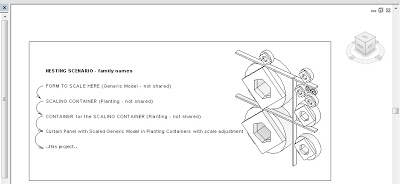
So as others have shown, I have various nested generic model families, dropped them into a plant family template. This family is then nested into another plant family. This is then placed into a project. Using the height parameter in the family, changing this, scales the family.
via
Revit : Scaling families – #empirebim

In brilliant form, he then describes how you can use an instance reporting parameter in a Curtain Wall Panel family to drive the Height value in a nested Planting family, making a Curtain Panel that can scale its nested geometry to any panel size.

To save you some time and trouble, I have created a template for this scenario.  Basically, it is a Revit project file that contains the Curtain Wall Panel family with the fully nested setup already in place.  I also added a Scale Override type parameter in the Curtain Panel family that allows you to globally adjust the scale of the resident geometry.

Download the project and family files here
(the project RVT is Family Scaling Template – GM to Planting to Planting to Curtain Wall Panel.rvt)

Note:  using a shared Generic Model family will not work (it breaks the automatic scaling ability of Planting families)

EDIT:
Looks like original credit actually goes to Kelvin Tam.

Original credit for this general idea goes to Marcello (I think), and partly to Dave.  It is definitely one of those hacks that is getting re-interpreted and expanded upon as it gets blogged and reblogged…

If you want to transfer your 3Dconnexion SpacePilot Pro custom settings:

via email:
The button customisations are stored in your Users folder. On my Windows 7 laptop it’s 
C:UsersUserAppDataRoaming3Dconnexion3DxWareprofiles

In here you will find a bunch of SCG files which you can read with Wordpad and near the top of the file is the application that the file relates to. You can then copy and paste this file onto anyone else’s workstation. With a bit of tweaking you can also make this the default configuration for every workstation on a network …

Some of the old-school Revit users may already be familiar with this process, but here it is…

… you want to make your own RPC, perhaps to signify an existing tree to be retained, and you would like it to show in a render.

These are actually very useful in Realistic views too, because (as you probably already know) Revit shows the RPC image when a view is set to Realistic.

In simple terms:

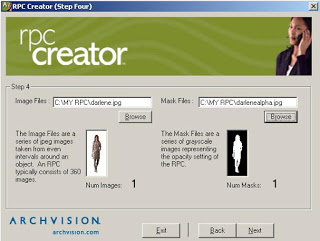
  1. Use the free RPC Creator utility, a photo of the tree, and an image mask (a black and white image created in Photoshop or a similar tool, where white is the part of the image to be rendered)
  2. After you have created the RPC file, you need to put it into the appropriate location, probably:
    somepathCommon FilesAutodesk SharedMaterials2013assetlibrary_base.fbmRPCs
  3. Restart Revit
  4. Your RPC will now be available in the RPC library, and accessible when creating or modifying a Family based on the RPC template.

I used an old version of the RPC Creator installer that I had, but you can download the ‘current’ free version at:
http://acm.archvision.com/support/downloads/RPC_Creator_1610.exe

One key thing – you need to enter size units in cm when using the RPC Creator.  For a full tutorial, check out:
Creator Pro Tutorials

Also, to help size the ‘width’ of your tree, you might want to measure the aerial image on Google Earth (using the Google Earth measure tool).  At least then you know that the image will be in the right ballpark for size.  The size can be easily modified in the Family Type Properties once you have the RPC installed in the right folder.

Notes:
RPC location for XP 64 bit:
C:Program Files (x86)Common FilesAutodesk SharedMaterials2013assetlibrary_base.fbmRPCs

You need to exit and restart the Revit program each time you add or modify an RPC file in that folder

If you want to activate RPC creator (this should be free), use the ID number submit tool at:
http://archvision.com/products/plugin#rpc-creator-pro

I actually posted about RPC Creator way back in 2009.

Enjoy 🙂