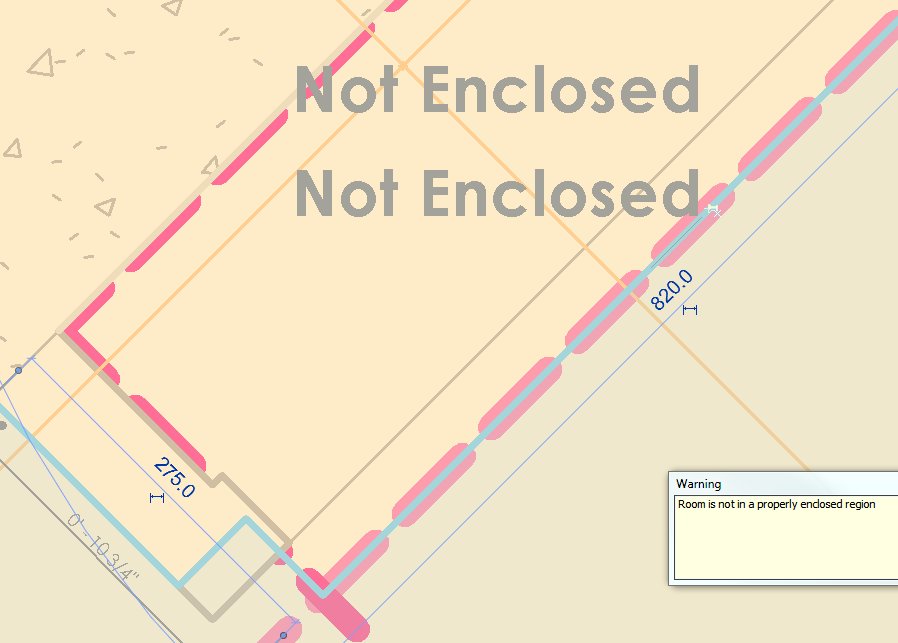
Revit does not allow rooms to become smaller than certain dimensions – it simply switches to Not Enclosed when one dimension goes below about 276 mm (when using room separation lines on a rectangular room).  However, this dimension may be slightly different depending on the surrounding wall thicknesses.

The following videos demonstrate the limitation:

There is a forum thread at
2011 Minimum room size? – AUGI

On the forum, Dimitri Harvalias makes the following observations.
When using room separation lines the minimum size seems to be limited to about 1sf. When using walls it appears to have some relationship to the wall thickness used.
See the attached image.
If walls are 150 wide then the minimum dimension of the room is 150. If some of the walls are 300 and some are 150 then it bottoms out about 85mm. If all the surrounding walls are 300 then I can get it down to virtually nothing.


An interesting packaged arrived on my desk on the 5 September 2011.  It contained a copy of the book Introducing Revit Architecture 2012.  Right from the outset, it can be seen that this book is targeted at new or beginner Revit users:
This book is for the new user who is looking to understand the fundamentals of Revit Architecture…

However, most advanced users would still agree that they learn something new every day.  This book does cover some advanced topics as well.

In the Introduction (page xviii) it is stated that the book assumes you know little or nothing about Revit Architecture.

It is nicely set out, with step-by-step guides and lots of screenshots.  It also has a nice glossy color insert, with some example projects.  At 682+ pages, it is a good size for a reference or even for some lunch-room reading.  It might be a good idea to obtain one for your practice, particularly if you have some staff who are just beginning to delve into Revit.

Starting on page 642, there is a Tips and Tricks section that includes some very useful information, including how to prepare CAD files for import in an intelligent and controlled manner.

To find out more, or to purchase, go to:
Main Sybex page : Introducing Autodesk Revit Architecture 2012 – Book Information – Sybex

As mentioned before, the download resources for this book are located at this link.

Quote:
This book does a nice job of providing lots of good information for the architectural designer in a practical method.
From
http://aectechtalk.wordpress.com/2011/09/10/revit-architecture-2012-book-review/

If you are interested in a book for more advanced users, check out this link.
Become a True Master of Revit
(Mastering Revit Architecture now comes in a 2012 version)

Pink lines
Pink lines
Whatcha gunna do
Whatcha gunna do
When they won’t form a closed loop?

Con-straints
Con-straints
Whatcha gunna do
Whatcha gunna do
When they ask to be removed?

Pro-jects
Pro-jects
Whatcha gunna do
Whatcha gunna do
When they become really huge?

Ren-drings
Ren-drings
Whatcha gunna do
Whatcha gunna do
When they take a week to do?
 
Up-grade
Up-grade
Whatcha gunna do
Whatcha gunna do
When your project has 50 RVT links?
 
Im-ports
Im-ports
Whatcha gunna do
Whatcha gunna do
When zooming in makes them jump around on you?

Rev-it
Rev-it

Whatcha gunna do
Whatcha gunna do
When you’ve just read a silly blog post without useful content?

Here’s what – post your own verses as comments, for everyone to enjoy.

A well known limitation of current Revit versions is that you cannot easily transfer a Legend View between projects.

However, you can do the following with Legend Views:

  1. Save to Project as Image (just right-click on the Legend View in the Project Browser – you will probably have to open or activate the view before this command will ungray itself)
  2. Export the View as an Image
  3. Export the View as a DWG

If you are going to export the view as an Image, I recommend a minimum DPI setting of 150.  You can then import this image to another file.  If you Save to Project as Image, you can just copy-paste the image between open projects, or use the Save to New File command on the actual Rendering view itself.  Obviously, you need to manually update this image whenever the Legend changes.

If you Export as a DWG, you could then Link that DWG into other projects.  When you want to globally update the Legend View, you could re-export the Legend from the original RVT project and over-write the Legend DWG you exported and linked earlier.  You would probably have to tweak the visibility settings a bit to make this Legend-export-link method to work effectively.

Hope some of these ideas are useful to you!

In Revit, we often have to input RGB values for various color properties, such as shaded view colors for a particular material, or if you want a specific Paint color for a rendered material.  To do this, you can use Paint.NET and the Color Picker tool – the resultant properties include the RGB values you need.

However, you may obtain a sample image of a material, but the color is irregular.  For example, you scan in a paint sample and there is a color variation in the scanned image.  Or perhaps you simply want to take a detailed pattern sample image and find out the average color of a particular part of that image.

Here’s how you do it:

  1. Download Paint.NET
  2. Download Average Color plugin
  3. Copy the DLL file from the extracted Average Color ZIP you downloaded into the ‘Effects’ folder, which is in you Paint.NET installation directory (for example: C:Program FilesPaint.NETEffects)
  4. Open Paint.NET
  5. Open the image you want to find an average color from.
  6. Make a rectangular selection.
  7. Click on the Effects menu – Average Color
  8. Now click on the Color Picker tool (looks like an Eyedropper)
  9. On the ‘Colors’ palette, click the More>> button
  10. The RGB values for your selected color are shown.
  11. In Revit, input those RGB values for the desired color or material

Average Color of Selection forum thread
Plugin to Average Color of Selection – Paint.NET Forum
Primary post
Main post

Locate32 is a free tool that allows you to create custom search database files for a nominated directory (including network resources and USB storage).

You can then manually update these database files when you want to do a fast search.

It is very quick to index the files and the search results pane is very fast and functional.  I have used it in the past to delete or archive Revit backup files.

Check it out at:
Locate32 Web Site – Downloads

Do you have some large format black and white PDF drawings that are taking up excessive space?  Perhaps they contain multi-layered vector information that is clogging them up.  You can easily make them smaller by recompressing into TIFF format with G4 compression.

Option 1 – PDF Tools and Irfanview

  1. Convert PDF to multipage TIFF using PDFill PDF Editor with FREE PDF Writer and FREE PDF Tools
  2. Open TIFF and save as TIF with G4 compression in Irfanview (suggested dpi setting 200 dpi)

Option 2 – PDF-Xchange Viewer

  1. Open PDF in PDF-Xchange Viewer
  2. File – Export – Export to Image
  3. Page Range – All
  4. Use TIFF format, Options – Compression – CCITT Group 4 fax
  5. DPI settings at 300 all round (for other settings also see image below)
  6. Click Export…

If you want to make a TIFF into a PDF again, just open in Irfanview and Print to PDF file using CutePDF or similar.  The resulting PDF will generally be way smaller than the original PDF.

    There is a way to link Excel data into Revit, and retain the ability to ‘update’ that data when it changes.  Essentially, it involves using AutoCAD as a middle-man to get the job done.  In simple terms:

    1. Link Excel into AutoCAD DWG
    2. Link DWG into Revit

    When you want to update the Excel spreadsheet in Revit, you have to:

    1. Save Excel spreadsheet
    2. Open AutoCAD DWG and update Data Link
    3. Save DWG file
    4. Reload DWG link in Revit

    This all works surprisingly well.  Check out the video below as a demonstration:

    Here is a little diagram of the concept:

    Process via
    RevitCity.com | Importing Excel into Revit

    In words:

    1. Save Excel File
    2. In AutoCAD – Insert – Data Link – new Excel Data link
    3. TABLE command
    4. From a data link – select Data Link, Ok
    5. Use 0,0 as insertion
    6. Save DWG file
    7. New Drafting View in Revit, link the DWG in Origin to Origin
    8. Its a two step update process whenever you change Excel.  Save, in AutoCAD / update link, Save DWG, in Revit – reload. Done.
    This hotfix restores the ability to apply material family parameters to faces of family elements using the Paint tool.

    Make sure that Update Release 2 has been applied prior to adding the hotfix. Verify that the build number of Revit 2012 is 20110916_2132.

    The Readme contains the latest information regarding the installation and use of this update. It is strongly recommended that you read the entire document before you apply the update to your product. For your reference, you should save the Readme to your hard drive or print a copy.

    revit_2012_material_hotfix.zip (zip – 4430Kb)
    Readme (htm – 87Kb)

    via
    Autodesk – Autodesk Revit Architecture Services & Support – Hotfix – Autodesk Revit 2012 – Apply material family parameters using the Paint tool