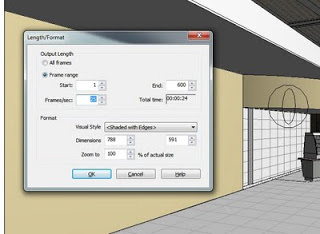
You may have tried installing various codecs so that you don’t have to resort to Microsoft Video 1 when exporting and compressing animations from Revit and Navisworks.  However, many of these will not work, partly due to the complication of 32 bit vs 64 bit environments.

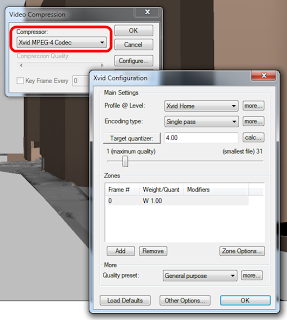
Happily, this Xvid compressor will work when installed on Windows 7 64 bit, even with 2014 version Autodesk products:
Xvid.org: Downloads

The Xvid Home profile works nicely – good compression and still good quality.  The result is far better than having to deal with huge uncompressed AVI files, or the poor looking Microsoft Video 1 versions.

I know that some of you use Cinepak Codec by Radius – I have a feeling that the aforementioned Xvid codec would offer better compression, but perhaps you will need to ensure the “audience” of your animation has the necessary codec installed.  Alternatively, you could open the Xvid-encoded AVI file in Windows Movie Maker and export as a WMV – something that almost every Windows user will be able to view.

Further reading on codecs:
Why does the System Device Enumerator report different list for the Video Compressor Category on a Windows 7 x64 for the 32 and 64 bit versions?

Configuring Session Recording – Thycotic Software

If you are using a 64 bit system, simply loading the DivX/XviD codecs does not seem to work. I suspect they’re not supported but have yet to research this, so above only applies to 32bit installations. If anyone knows more about this please post.

Update: the 64 bit DivX codec works in Navisworks if you install it to the C:Program Files (x86) folder instead of the C:Program Files. (Presenter gives the best quality, but divX give good results much much faster)
via
Animation Resolution
Fixing Walkthrough Corruption for very large AVI files produced from Revit and Navisworks
When exporting very large (like 4gb) uncompressed AVI files as a Walkthrough from Revit, the index for the AVI will likely become corrupted and will appear to split and duplicate itself when you play the file.

It may be possible to salvage some of the file using VirtualDub.  Just open the file in VirtualDub and it will detect the error and try to rebuild the file index.  Then, Save As an AVI file again.

Otherwise, you need to use another compression codec (as shown above), or break the walkthrough up into bits and then join it back together later.

An old thread at RevitCity discusses some of these issues:
RevitCity.com | Rendering Walkthroughs

I previously discussed VirtualDub in this post:
What Revit Wants: How To Create a Revit Walkthrough and then Upload it to Youtube

On a lighter note, this Autodesk help page references a very old piece of software called Autodesk Cleaner.  Heard of it?
Autodesk – Autodesk Revit Architecture Services & Support – Improving AVI video quality of walkthroughs
In order to protect your intellectual property, it may be wise to add a watermark to any animations you upload to Youtube.

One method using VirtualDubMod is described at the link below:
Put a custom watermark on your video

I used Paint.NET to delete the background from our company logo image and save as a TGA file. This was then used in the logo filter of VirtualDubMod.

Here are some animations we have produced here at Dimond Architects:

  1. Download Avisynth and install it.
  2. Download VirtualDub and unzip / install it.
  3. You need to have a set of BMP files with sequential numbering.  Refer to this post for how to do that.
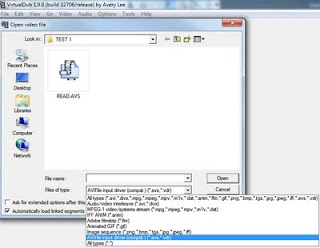
  4. In the folder containing the bitmaps, create a text file.  Call it READ.AVS (it must have AVS extension).
  5. Open it in Notepad and put the following line into the file:
    ImageSource(“%04d.bmp”, start = 1, end = 1800, use_DevIL = true)
  6. The above syntax is for files with 4 digit filenames, starting at 0001.bmp and ending at 1800.bmp (obviously, if you have more or less frames, change the 1800 value accordingly).
  7. Open VirtualDub
  8. Open the READ.AVS file that you created.
  9. Now you should be able to save this file from VirtualDub to an AVI.  Here is some quick settings:
    Video – Direct Stream Copy
    Audio – No audio
  10. Go File – Save as AVI
  11. Put your AVI somewhere with plenty of disk space – it could become huge.

You may also want to refer to the master post entitled Distributed Parallel Rendering in Revit.

Are your renders taking ages?  Trying to output a big rendered walkthrough?  No matter how fast your PC is, these things can take time.  Why not enlist a few of the other computers in your office to help produce that high-resolution animation?

Distributed rendering (or Parallel Rendering) is possible when using high end visualization products, including 3D Studio (now part of the Building Design Suite Premium).

In pure Revit (without using 3D Studio), the solution is a little bit more crude.  However, it does work.

Here are the basic steps:

  1. Set up your walkthrough.
  2. Save the Project or Save to Central.
  3. Get your other computers running and open the same walkthrough on all of these PCs.
  4. On PC#1 in Revit, go to Export – Animation – Walkthrough, and pick a set number of frames for that PC to output.  For example, frames 1 to 600 out of 1800.
  5. Make sure you choose BMP for the output, and when naming the file, just put in 1- (this will make sense later.
  6. On PC#2, export frames 601 to 1200 to BMP.  Name it 601-.
  7. On PC#3, export frames 1201 to 1800 to BMP.  Name it 1201-.
  8. Using Advanced Renamer, rename all the files to suit the appropriate frames. (see associated post)
  9. Put all the BMPs in one folder on the server or on one of the PCs.
  10. Using Avisynth and VirtualDub, join the BMPs into an AVI. (see associated post)
  11. Then, either use some video compression software, or do some post-processing.

There you go, you have successfully done some distributed or parallel rendering in Revit!

Here is a brief how-to on creating a large, high resolution rendered Revit walkthrough (or sun study) and then subsequently compressing and uploading it to Youtube.

  1. Setup your walkthrough view.
  2. In Revit, Export – Walkthrough and divide the total frame count of the animation into parts that have a manageable number of frames (I recommend 100).
  3. Do this for each part of the Walkthrough (ie. create files with frames 1-100.avi, then 101-200.avi, 201-300.avi etc). Use ‘Full Frames (uncompressed)’ when creating these parts.
  4. Use VirtualDub to join the parts together. In VirtualDub, open the first part. Press Ctrl-Right arrow (this takes you to the end of the file), then go File – Append AVI Segment… and choose the next part. Do this however many times is need to append all parts to the original file.
  5. In VirtualDub, go to Video – Compression and I recommend using the ‘Cinepak Codec by Radius’ if you have it. Quality = 100.
  6. In VirtualDub, go to Audio and choose ‘No Audio’
  7. Choose Video – Full Processing Mode
  8. Now go File – Save as AVI and create your combined and partly compressed AVI file.
  9. Open Windows Movie Maker. Import the combined file into the collections.
  10. Drag the file into the storyboard at the bottom.
  11. Go to File – Publish Movie. Choose ‘This computer’ and click Next. Choose a filename and location and click Next.
  12. I recommend choosing ‘Best quality for playback on my computer’. This should reduce the file to a manageable size.
  13. Now, open your browser and login to your Youtube account. Choose ‘Upload’.
  14. Select the compressed video you have created, and upload it. This may take a while, so just wait patiently (or do some other work!)
  15. Once uploaded, you can now share the link code with Clients or others who may like to view the animation.

Below is an example of a 1000 frame rendered animation we recently produced at Dimond Architects. It started out at about 1.2 gb, then VirtualDub compressed it to around 225 mb, then Movie Maker compressed it to about 20 mb.It took about a week for one workstation to produce this:

Feel free to share links to any files you upload to Youtube by commenting on this blog post.