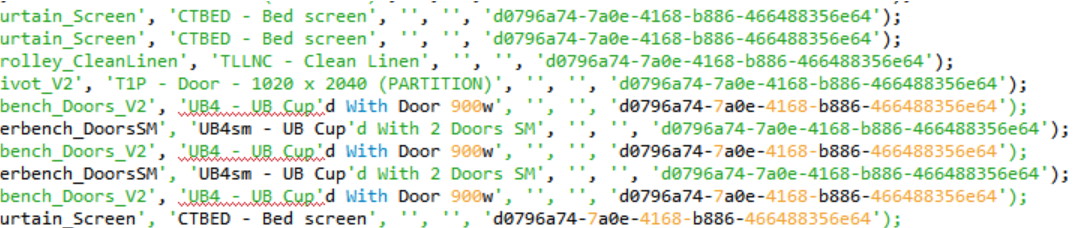
If you try to build a connector to get some Revit data to a database like MySQL, you may hit an issue where some strings that are allowed in Revit will do funny things to your SQL instructions, like this:

What to do? We need to ‘escape’ these characters during our data export or INSERT to create something that the database engine can consume. There are some exotic ways to get around this (like encode your text in base-64), but in my case I just wanted to replace the problem character with the escaped version. Ideally, we would use characters that we know will never be found in Revit Type or Family Names.

Revit does not allow these characters in most type and family names:

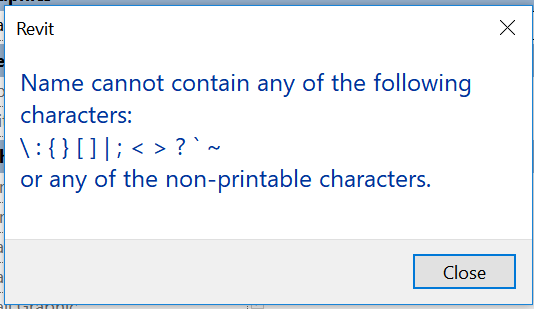
Looks like a backslash could work, as this is an escape character in MySQL, and it is not allowed by Revit as above.

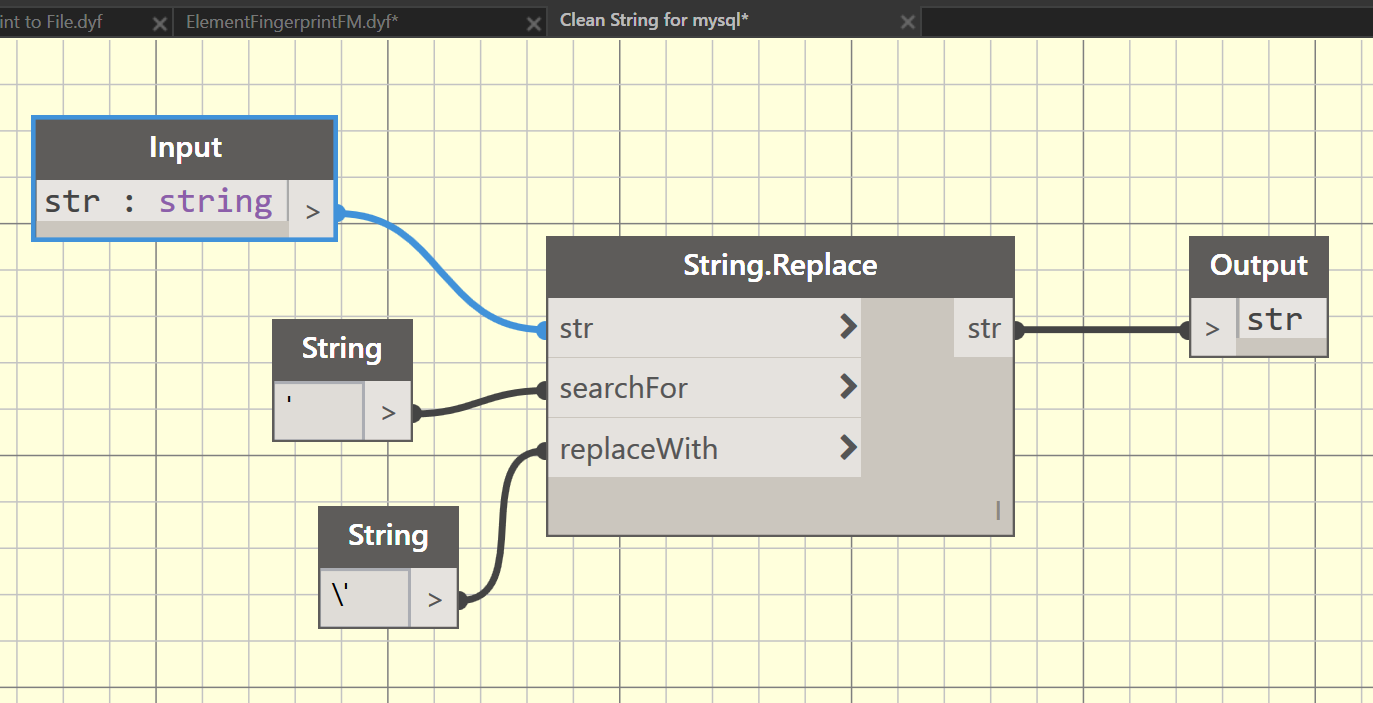
You can do this a lot of ways in various coding languages, but an easy way is with a String Replace in Dynamo, like:

This workaround doesn’t handle every situation – like if you are pulling parameters out of Revit that contain all kind of characters, you may have to look at a more reliable text cleanup or encoding solution. But this helps with the Type and Family names at least 🙂

Check out the following link:
WhiteFeet public downloads

Among other things, you will find documentation that covers the following tools:
Revit Element Tools
Revit Family Tools
Revit Parameter Tools
Revit Database Link
Revit Sheet Manager

The License Agreement can be found at:
http://www.whitefeet.com/License.htm

Here are some summaries of the individual tools (taken from the documentation):
Sheet Manager
Links to an Excel file or (less commonly) an Access database.  Based on this
data, it creates or updates sheets in Revit as a bulk editing process.  The tool
can also be used to export data, renumber sheets, and place views on sheets. 


Revit-Database Link
A relatively complex and highly developed program that can be the basis of a wide range of workflows.  It can connect to either an Access or a SQL Server database and synchronize data in both directions. 


Element Tools
This collection of smaller tools has been grouped together for convenience, but they serve different kinds of purposes.  These include:
Placing unplaced areas and rooms.
Creating views, adding tags, and exporting images.
Managing links.

Family Tools
These tools support working with families and working with Excel:
Exporting detailed information about families to Excel.
Importing parameter values from Excel to control families in support of a computational design
process.

The RDBLink method establishes a bi-directional database which can be edited and updated. Be careful when using this. I would recommend trying it on a test project before actually putting it into use.

The basic steps to set this up and use it are:

  1. Download the RDB Link Tool and install it.
  2. Setup a DSN source in Windows.
  3. Export your Revit file to the appropriate database.
  4. View and edit the database.
  5. Update the project with the edited database.

For example, lets export a Revit project to an Access database:

  1. Setup the DSN. Go into Control Panel – Administrative Tools – Data Sources
  2. Click the System DSN tab.
  3. Click Add…
  4. Select ‘Microsoft Access Driver (*.mdb) and Finish
  5. Put a name in the Data Source Name (revit1 for instance). Put a description.
  6. Under the Database: section, click ‘Create:’
  7. Put the mdb in an appropriate location (C:REVIT-DBrevit1.mdb for instance)
  8. Click OK.
  9. Click OK until you are out of the ODBC Data Source Adminstrator.
  10. Back in Revit, on the Add-Ins tab:
  11. Click External Tools – RDB Link
  12. Click ‘Export into ODBC database…’
  13. Click the appropriate Data Source tab, and locate the Data Source Name you created, which is set up to connect to an existing Access or SQL Server database.
    If you selected an Access database DSN, a Login screen asks for a name and password. Leave it blank if you have not specified a user name and password for your database.
    A progress meter appears while outputting the Revit project data to your database.
    (this point 13 from Labs)
  14. Open the database in Microsoft Access and have a play. Modify a wall height or something and save your changes.
  15. Back in the project, use the RDB Link tool to import the data from the same database you exported to.
  16. Have a look at the change in your model!

Note – if you are running Windows Vista x64, ensure that you run the right version of the Data Sources tool. See this site for the difference. I had success using SQL on Vista x64, but I couldn’t get the RDB Link tool to find my Access source.I used SQL Manager Lite for SQL Server to modify the SQL source on our server. It seemed to be quite good.Feel free to comment on this post and let me know how you go with the RDB Link tool.Below from the Labs site on how to setup the DSN:

  • To create an ODBC connection (DSN, Data Source Name):
    1. Launch the Windows Data Sources (ODBC) screen from the Start menu>Programs>Administrative Tools section.
    2. In the ODBC Data Source Administrator, select either User DSN or System DSN to create a new data source name for your database to use with RDB Link.
    3. Click the Add button to display the Create New Data Source screen, and select one of the following:
  • Microsoft Access Driver (*.mdb) if you want to work with a Microsoft® Access database
  • Specify the Data Source Name of your choosing.
  • Click the Select button to select an existing Access database or the Create button to create a new one.
  • SQL Server or SQL Native Client if you want to work with Microsoft® SQL Serverâ„¢ 2008 (either a full installation or the Express version)
  • Fill out the information appropriate to your version of SQL Server.