The RDBLink method establishes a bi-directional database which can be edited and updated. Be careful when using this. I would recommend trying it on a test project before actually putting it into use.
The basic steps to set this up and use it are:
- Download the RDB Link Tool and install it.
- Setup a DSN source in Windows.
- Export your Revit file to the appropriate database.
- View and edit the database.
- Update the project with the edited database.
For example, lets export a Revit project to an Access database:
- Setup the DSN. Go into Control Panel – Administrative Tools – Data Sources
- Click the System DSN tab.
- Click Add…
- Select ‘Microsoft Access Driver (*.mdb) and Finish
- Put a name in the Data Source Name (revit1 for instance). Put a description.
- Under the Database: section, click ‘Create:’
- Put the mdb in an appropriate location (C:REVIT-DBrevit1.mdb for instance)
- Click OK.
- Click OK until you are out of the ODBC Data Source Adminstrator.
- Back in Revit, on the Add-Ins tab:
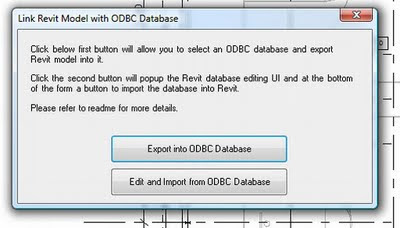
- Click External Tools – RDB Link
- Click ‘Export into ODBC database…’
- Click the appropriate Data Source tab, and locate the Data Source Name you created, which is set up to connect to an existing Access or SQL Server database.
If you selected an Access database DSN, a Login screen asks for a name and password. Leave it blank if you have not specified a user name and password for your database.
A progress meter appears while outputting the Revit project data to your database. (this point 13 from Labs) - Open the database in Microsoft Access and have a play. Modify a wall height or something and save your changes.
- Back in the project, use the RDB Link tool to import the data from the same database you exported to.
- Have a look at the change in your model!
Note – if you are running Windows Vista x64, ensure that you run the right version of the Data Sources tool. See this site for the difference. I had success using SQL on Vista x64, but I couldn’t get the RDB Link tool to find my Access source.I used SQL Manager Lite for SQL Server to modify the SQL source on our server. It seemed to be quite good.Feel free to comment on this post and let me know how you go with the RDB Link tool.Below from the Labs site on how to setup the DSN:
- To create an ODBC connection (DSN, Data Source Name):
1. Launch the Windows Data Sources (ODBC) screen from the Start menu>Programs>Administrative Tools section.
2. In the ODBC Data Source Administrator, select either User DSN or System DSN to create a new data source name for your database to use with RDB Link.
3. Click the Add button to display the Create New Data Source screen, and select one of the following: - Microsoft Access Driver (*.mdb) if you want to work with a Microsoft® Access database
- Specify the Data Source Name of your choosing.
- Click the Select button to select an existing Access database or the Create button to create a new one.
- SQL Server or SQL Native Client if you want to work with Microsoft® SQL Server™ 2008 (either a full installation or the Express version)
- Fill out the information appropriate to your version of SQL Server.
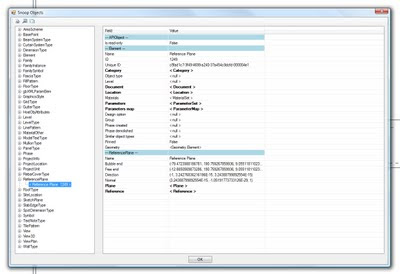
 Both of these methods expose the Revit database, which allows you see how things really go together. The Revit database is really what makes everything else possible: from environmental analysis to the basic parametric nature of elements. It’s exciting stuff!I will do individual posts on how to setup and use both these methods in the near future.