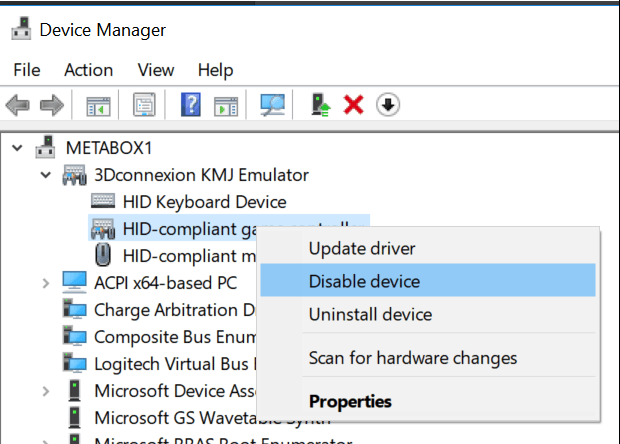
Recently I had an issue where an Xbox One Wireless controller, connected via Bluetooth, was not working properly in Revizto. When I went to the USB Game Controllers control panel, it showed a 3Dconnexion KMJ Emulator device. This is related to my 3Dconnexion SpacePilot Pro. In order to solve the conflict, I disabled the ‘game controller’ component of the 3Dconnexion KMJ Emulator, using these steps:
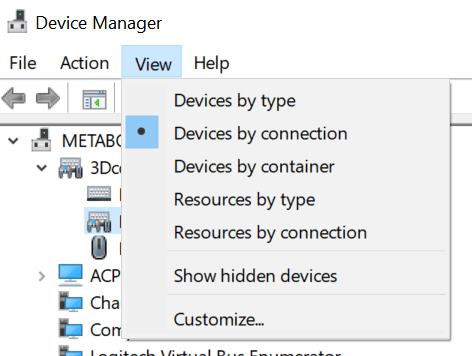
Open Device Manager
View Devices by Connection
Right-click the game controller sub-item and Disable device
Restart the PC
After this, the issue was fixed and the Xbox controller worked perfectly in Revizto.
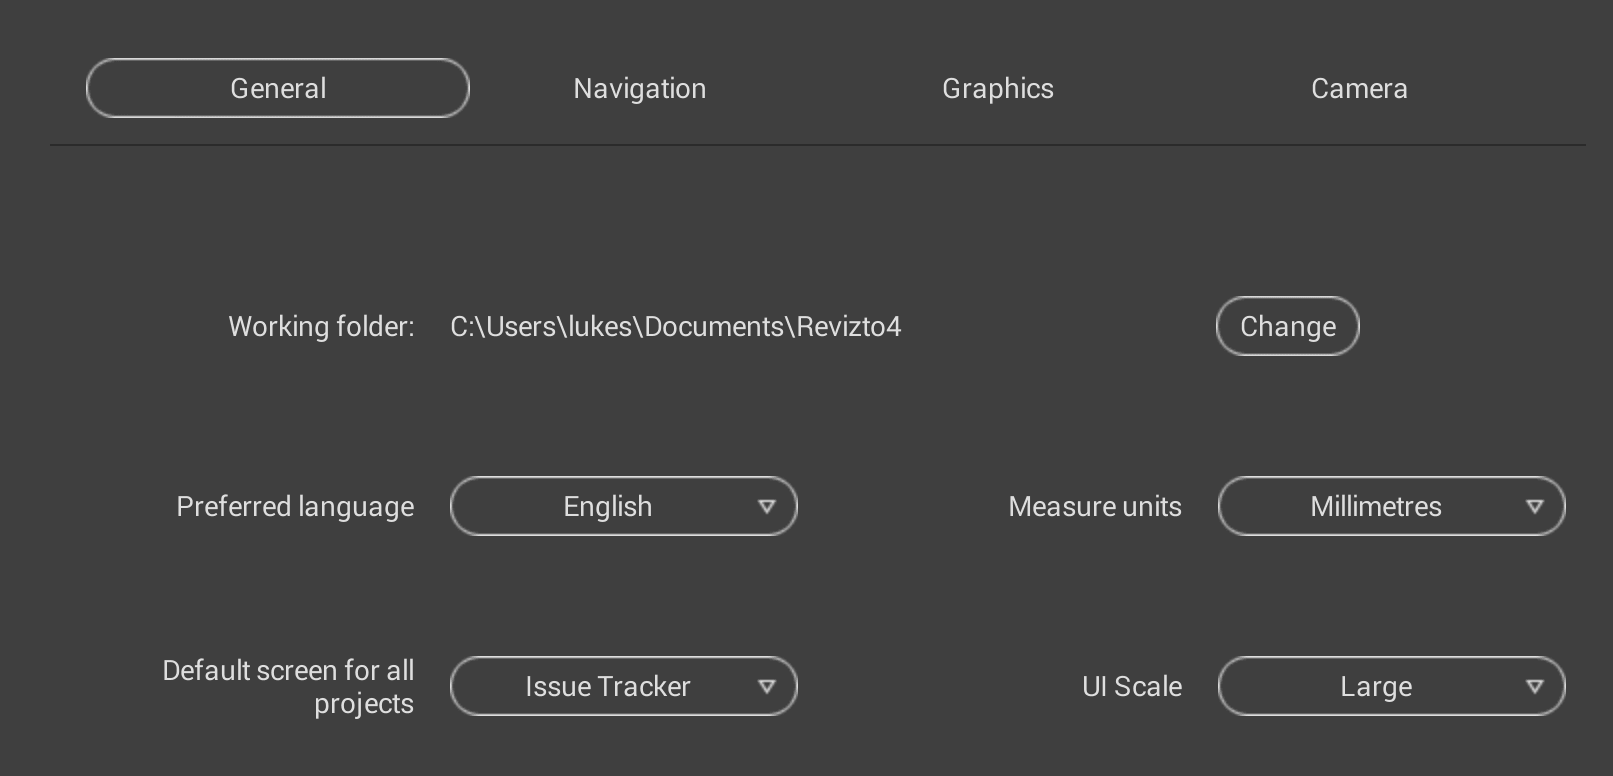
In the latest Revizto update (version 4.6.3, build 41736) you are able to change the UI scale in the General settings. This is very useful for 4K screen resolutions:
You can also set the Default Launch Screen as shown above.
The ability to update existing viewpoints is also present. You navigate to a Viewpoint, then as you move away from it a update icon will appear next to the viewpoint name. Just click that icon to update the Viewpoint. The video below shows this in action:
Revizto doesn’t strictly offer an API (yet) for connecting to its data. But you can use the command line to export an Excel file of all of the current issue tracker data. And you could schedule this export as a Windows Task. If you are in the habit of creating custom dashboards and connecting a whole lot of data together (as I am), then this could prove to be a pretty powerful way to access and share issue tracker data with the wider team. Further, it provides an opportunity for accessing model markup information even in a non-cloud-connected state
Here’s how to export from Revizto using the command line tool, called ReviztoConsole :
Get the Revizto Project ID by hovering over the project name in the Viewer:
The command line syntax is like this (notice the project ID):
As you can see, a lot of the issue tracker fields are available here. The Snapshot and Comment fields also may include hyperlinks to a web-hosted version of the issue snapshot as well.
Note: you can use the command ReviztoConsole projects to show a list of your current project IDs and their parent folder name on your system.
Revizto works by maintaining a local copy of cloud models, that are synced periodically with the cloud. The Issue Tracker will always try and automatically remain in-sync if an internet connection is available. This allows you to do things like download all current models and sheets to an iPad, head out on site (where you may have no internet) and do some work, come back to the office and then sync the changes.
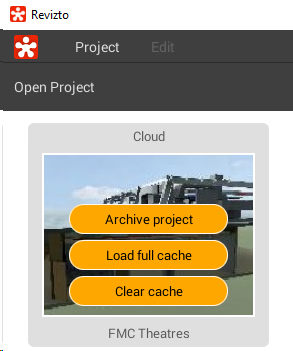
However, from time to time you may want to clear the cache of a particular project. Typically, this is so you can confirm you are running an identical version to the current cloud model. To do that, you have to clear your local cache of that particular model. Here is how you do it:
1. Sync the model if you have any recent local changes (this is to upload all of your local work)
2. Close Revizto.
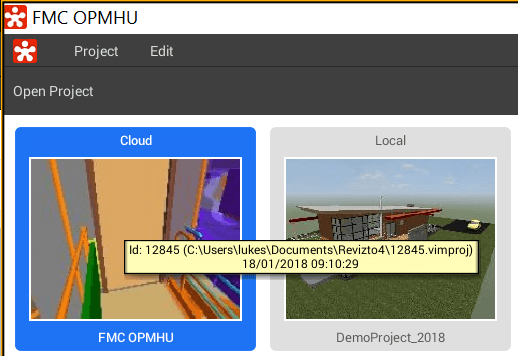
3. Open Revizto. While in the project gallery, click on “Edit” button in the top right corner. Then click on that project and choose “Clear cache” option.
4. Open Revizto project. Your project will re-sync with the latest cloud version.
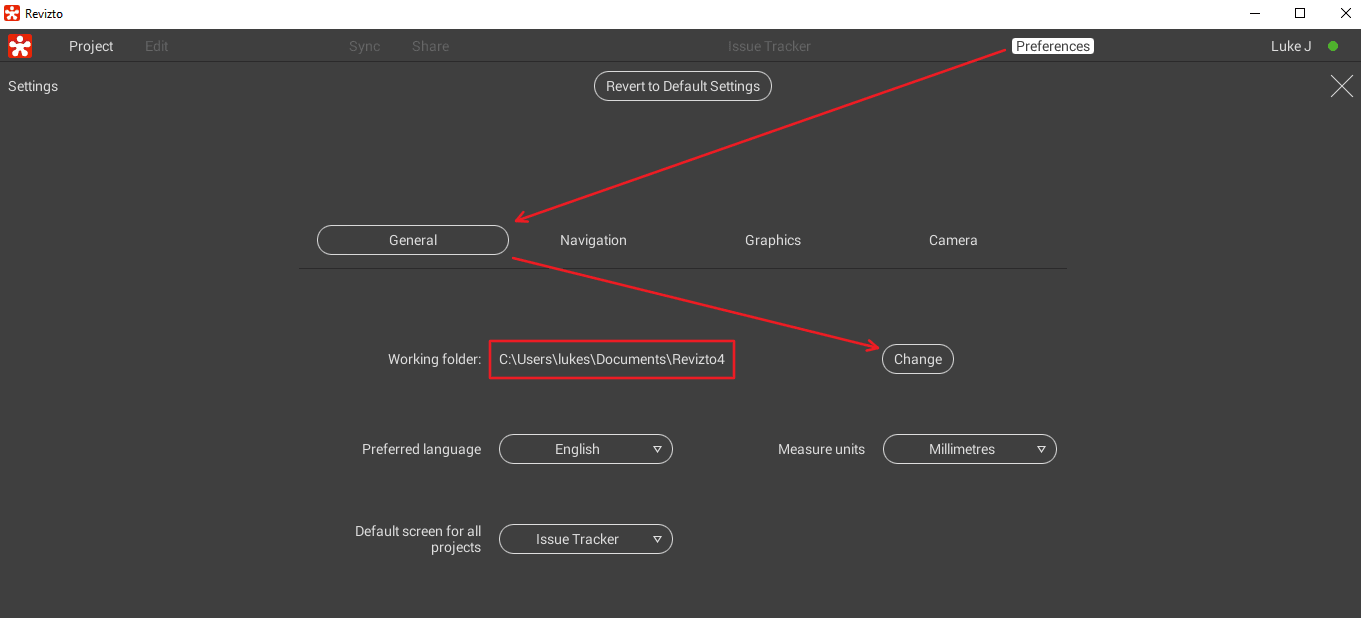
What if you want to completely remove all local project data at once? Or possibly, you are running out of disk space in the normal ‘working folder’ location (yourUser\Documents\Revizto4). In that case, you want to move the working folder. Then Revizto will download the latest cloud data for every project. As above, ensure you have synced all your local models first… Then take these steps:
Open Revizto
Click Preferences
Click General tab
Select ‘Change’ next to ‘Working folder’ and choose a new, empty folder. It should have sufficient disk space to download all the project data:
You probably should close and re-open Revizto, and then go ahead and open your project. Again, it will sync all data from the cloud for you.
In this webinar, LHB’s Dan Stine walks through a proven workflow for collaboration and client engagement using Revizto. This presentation simulates a client meeting, highlighting ways Revitzo can be used to explore the model and capture client comments and requested changes. You can see how several Revizto features can be used collectively to demonstrate the design intent and react to client questions with minimal effort.
I’m excited to share this release with you, because it has some amazing improvements. Here are my top 3 new features:
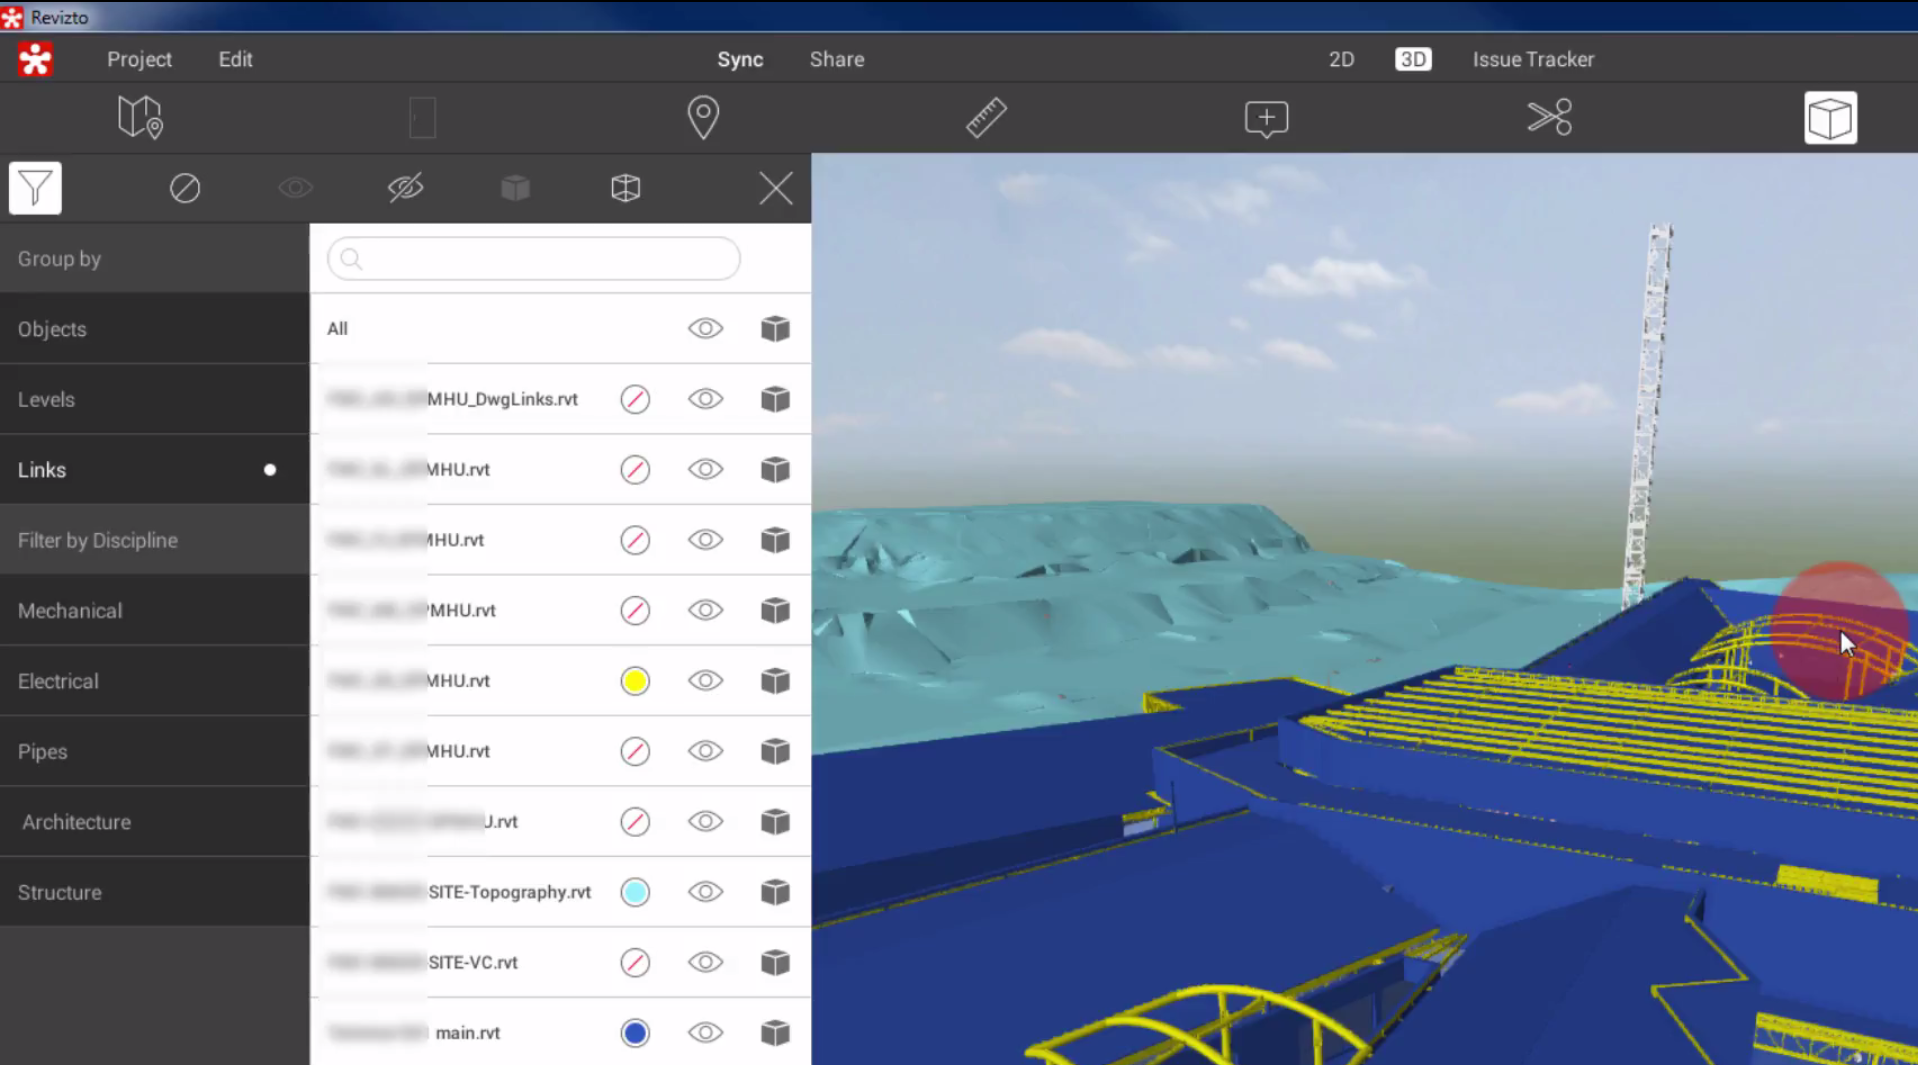
Visibility control of Linked Models. Basically, you can now turn individual models on and off like you would in Glue or Navisworks, and you can override colours! Those colour overrides can be saved into a viewpoint or issue. This is a massive enhancement.
Phases Support like Revit. There are some really nice visual effects possible, now that Revizto can show you Existing and subsequent phases, along with various phase filters. This opens up a range of new possibilities for sharing and discussing work in and around existing buildings. You can now ‘markup’ a demolition phase directly in the model, and assign issues to get items resolved quicker.
Clickable Links on Sheets. For sheets you export from Revit, you can now immediately jump to the related views by using the view symbol hyperlink, just like you would in Revit.
As you can see, the integration with Revit is getting tighter. This means Revizto is now even stronger for fully in-house review workflows, like model review and drawing markup within an Architectural firm. Of course, Revizto remains my favourite way to handle coordination for large multi-discipline teams, whether that be design coordination or services coordination tasks.
This image shows how you use the new Objects dialog to select ‘Links’ and then override the colours and visibility of each linked model:
What’s new in Revizto 4.4 release:
– Ability to color code links, categories and levels. New “Objects” dialog.
– Visibility control of linked models and individual objects.
– Phases support from Revit.
– Tag management system for the Issue Tracker.
– Clickable links on sheets.
– Console app for getting XLS reports from the Issue Tracker.
– Ability to attach new file formats to issues. The complete list of supported formats: pdf, txt, csv, xls, xlsx, doc, docx, jpg, png.
– Interface improvement. 3D tab: reconfigured toolbar.
– Brand new installer. Minor updates will come through as patches, containing only the differences and therefore being much less in size.
– Rhino support (direct plugin in Rhino).
Here is a direct link to the release build, or you can download from here:
Sometimes you will want to duplicate a Revizto project, perhaps for archive or testing purposes, or to re-share it with a new team. This post shows you how to do it quickly and properly.
Here’s how:
Start Revizto
Load Full Cache by clicking Edit, then the yellow hamburger:
Double-click to Open the Project
Click Project and Save As
Give it a new name
If you want it to be a cloud project, you now need to Sync it to the cloud now. Currently it is just stored on your machine and the issue ids will not have populated. Just press Share, and then hit the Upload button at the bottom of that screen
That’s it, you now have a full copy of all 2D, 3D and issue information from the original Revizto project. You will have to invite new users to this project if you want them to be able to collaborate. Your existing project and users will be unaffected.
Revizto completely transformed the way we manage and coordinate BIM projects, and I have posted about it several times before. I’m really pleased to share a very comprehensive PDF help document put together by the team at Revizto.
It goes through all the steps needed to get up and running with Revizto, including setting up your environment, creating and sharing projects, navigating your model, and collaborating in the Issue Tracker.
I’ve been using Revizto for years, but even I learned some things… like this tip about using FBX to get models from Revit LT into Revizto: Revizto supports all versions of Revit starting from 2014 except Revit LT. For Revit LT you can
load models into Revizto via FBX format.
Throughout the document you can click on links to immediately watch videos:
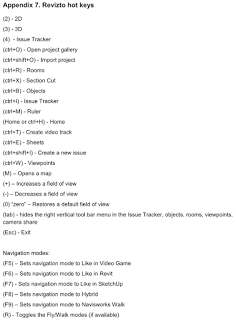
It has fully detailed descriptions of the various control schemes, including controllers for VR, and the general hotkeys:
If you are interested you can download and try out Revizto here.