Here’s how:

The following command should successfully silent deploy Unifi 3.1.1 to your network.

msiexec /I Unifi-admin.msi /qn

Download the Unifi .msi at:

http://installer.discoverunifi.com/Unifi-admin.msi


Below is a GPO:

Install:
wusa.exe Windows6.1-KB2819745-x64-MultiPkg.msu /quiet /norestart

Detection Clause:
File Exists C:\Windows\System32\WindowsPowerShell\v1.0\Powershell.exe
Version = 6.3.9600.16406

(via email)

Setting up a BIM workstation can take some time. From unboxing to actually being ready-to-work you have to go through various ‘layers’ of installation, like:

  • updating Windows
  • installing major software packages
  • installing addins
  • installing useful system utilities that speed up your day

In a large, corporate IT environment, most of this is handled by an IT department, and usually these are set up as deployment images. However, in a small or medium office, you may have to do some of this work yourself.

With that in mind, I’m sharing my notes on the steps I took to get my Metabox portable BIM workstation up and running. I may start to put links against most of these steps as time allows, because I have posted about a lot of these programs before. Feel free to comment if you have any thoughts or advice.

Installation Order – from unboxing to System Image:

  1. Windows 10 Pro (preinstalled)
  2. Sign in with a new, temporary, local user admin
  1. Do Windows Update Fix (see below)
  1. Setup E: drive (secondary large HDD, change drive mapping)
  2. Login with Microsoft (personal Id)
  3. Place OneDrive onto E: drive
  4. Change PC name
  5. Move Windows Downloads folder to E: drive
  6. Samsung Magician install – test speed of SSD. Very nice.
  7. Install Office 365 64-bit (work Id)
  8. Login with both Ids
  9. Change OneNote backup storage location to E: drive
  10. Delete previous Windows installations using Disk Cleanup
  11. All Windows updates again
  12. Box Sync install
  13. 3dconnexion software install
  14. Ccleaner install
  15. Teamviewer install, setup, login
  16. Set Desktop Scaling to 150%
  17. Revit 2015 install (not entire suite) from IDSU2015 media, perpetual license
    1. Transfer activation via Export / Import to Autodesk Id
    2. Confirm activation
  18. Building Design Suite Ultimate 2016 (subscription)
    1. Revit 2016
    2. Navisworks 2016
    3. AutoCAD MEP2016
    4. Raster Design
    5.  (not entire suite) via Install Now
    6. Confirm activation
  19. Infrastructure Suite 2017 (subscription)
    1. browser download method
    2. Revit 2017
    3. Navisworks 2017
    4. Civil3D 2017
    5. Raster Design
    6. Confirm activation
  20. Install Revit 2016 SDK R2
  21. Download and install latest version of Autodesk Desktop App
  22. Install Locate32
  23. Change Desktop App storage location to secondary drive?
  24. Autodesk Updates
    1. 2015 Updates

2016 Updates

  • Revit 2016
    • Revit 2016 Release 2
    • Revit 2016 R2 Update 6 Fixes
  • AutoCAD MEP 2016
    • AutoCAD MEP 2016 Service Pack 1
  • Navisworks 2016
    • Navisworks Manage 2016 SP4
    • SP4HF1
  • AutoCAD 2016
    • AutoCAD 2016 Hotfix 4

2017 Updates

  • Revit 2017
    • Revit 2017 SP2 Fixes
  • Autodesk Vehicle Tracking 2017
    • Autodesk Vehicle Tracking 2017 SP1
  • Recap 360 Pro 2017
    • Update 2 v3.0.2.12
  • Map 3D 2017
    • Map 3D 2017 SP1
  • AutoCAD 2017
    • AutoCAD 2017 SP1
  • 3DS Max 2017
    • 3DS Max 2017 SP2

Install BIM 360 Glue desktop app

Install latest Glue addins (Revit 2015, 2016, 2017)

Bit of a strange dialog box menu disappearing issue… so:

  1. Reinstall Chipset drivers
  2. Install Extreme Tuning Utility (for CPU overclock)

Had to manually remove ‘old’ Bim 360 glue addin from 2016 install, %programdata% location

Navisworks Exporter updates

  1. Navisworks 2016 R3 Exporter install
  2. Tested ok

Revit addin install:

  1. RTV Exporter
  2. Bonus Tools
  3. Unifi
  4. Revitlookup?
    1. All versions?

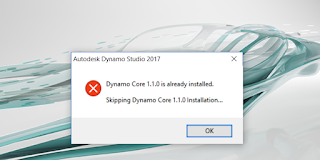
Uninstall Dynamo 0.9.1 (from 2017 install)Install Dynamo 1.1Install Autodesk ScreencastInstall Revizto

  1. Download building models

Set up Outlook

Install Firefox

Install Github Desktop

Install 7-zip https://sourceforge.net/p/sevenzip/discussion/45797/thread/3097bf8b/

Install Bluebeam Revu and activate

Reinstall Box Sync (due to some sync errors)

Install FreeFileSync

IFC Exporter Addins for Revit

  1. 2016
  2. 2017

Install Tekla Bimsight

  1. Move BIMsight storage location to E: drive

Properties+ addin for Navisworks

  1. Version 2.1.0 covers 2015, 2016, 2017

Install Advanced RenamerExport the ‘currently installed programs’ list from CcleanerInstall NotePad++

  • XML tools plugin
  • Use Language – XML for dyf etc editing.
  1. Install Paint.Net
  2. Install drivesnapshot
  3. Ccleaner – cleanup, empty recycle bin etc
  4. Revizto
  5. Create system image – done


Windows Update Fix

All Windows Updates

  1. Failed!
    1. And rolled itself back
    2. And wifi died
  2. Reset the pc using Windows Reset
  3. Connected to Lan port (no need for drivers)
  4. Internet problems so:
    1. Download all metabox drivers (1.8 Gb)
    2. Install Chipset
    3. Install Killer Wifi (2 x reboots)
    4. Killer BT (1 x reboot)
    5. Airplane mode utility (1 x reboot)
    6. Intel Management Engine interface
    7. Control Centre Utility (1 x reboot)
    8. Now, use Fn + F11 to turn off sleep mode.
  5. Almost thought wifi was working, but then…
    1. IRQL_ error again, BSOD
    2. Reboot BSOD
    1. Reset PC again!
    1. Now, use this page first https://www.microsoft.com/en-us/software-download/windows10
    2. Download 3gb and update
    3. Multiple restarts
    4. Finally windows is up to date

Other software installed:

  1. Install BD writer software
  2. Install imgburn
  3.  Install Collaboration for Revit 2016
  4. Install Killer network software (updated)
  5. 1-jpg-5367785

  6. Install Onetastic (for OneNote macros etc)
  7. Install Dynamo Studio
  8. 2-5758332

  9. Install Google Chrome (For Flux.io etc)
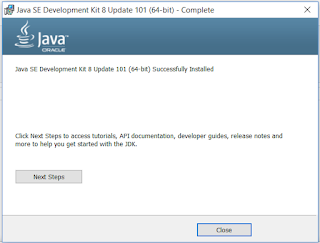
  10. Install JDK 64 bit
  11. 3-8519654

  12. Install Bimserver:
  13. bimserver-1.4.0-FINAL-2015-11-04
  14. bimserverjar-1.5.55
  15. Install Adobe Flash Player
  16. Install Oculus software
  17. Install Vive software
  18. Install Irfanview
  19. Install Unity
  20. Install Enscape
  21. Install Wix https://wix.codeplex.com/releases/view/624906
  22. Install Q-Dir

Other errors and notes:Boot error fix:

  1. Received the winload.efi error
  2. Disabled UEFI boot
  3. Restart
  4. Enabled UEFI boot
  5. Restart
  6. Working again

XTU Update error:

4-9006891


C:\ProgramData\Intel\Intel Extreme Tuning Utility\Temp
Or
Here are the basic steps:

  1. Download Office Deployment Tool
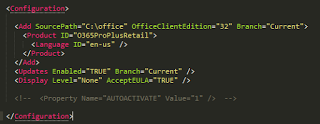
  2. Modify the configuration xml to include Updates Enabled TRUE and Current Branch info, as well as Display Level Full. Looks something like this for 32bit ProPlus (but I forget the DisplayLevel setting below):
  3. Run the setup command to download, like this
  4. After, download of Office 2016 has completed, run the installation command to install:
    setup.exe /configure c:Officeconfiguration.xml

Got this from Jetze’s blog:
to upgrade Office 365 ProPlus on a single computer to, just follow this procedure.

  1. Download the Office Deployment Tool and extract the files to a temporary location, for instance C:Office.
    image
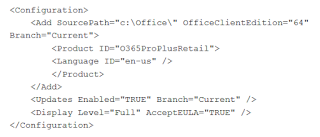
  2. Make a backup of the configuration.xml file and edit the contents to something similar to this:

    Note that the value for Branch is set to Current. Other valid values are Business or Validation (First Release).

  3. Execute .setup.exe /download c:Officeconfiguration.xml to download the Office files to your local computer, this may take a while.
  4. Next start the installation with .setup.exe /configure c:Officeconfiguration.xml

During the installation of Office you will be prompted to save your work and close any opened Office programs.

via
Jetze’s blog: Office 2016 update branches and how to force an upgrade for Office 365 ProPlus

It is pretty difficult to change the Workset of Pipe Insulation. The Properties Palette allows you to change them one at a time (but not multiple), while the method I posted about previously can change multiple Pipe Insulations to a different Workset, but it didn’t have a nice filtering mechanism.

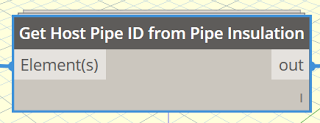
Enter Dynamo… I made a custom node that takes a list of Pipe Insulations and gives you the Host Pipe element:

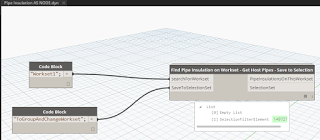
Then, I packaged this up in another node that collects all Pipe Insulations, checks their Workset, finds their Host Pipe, and then saves those Pipes to a SelectionSet:

So, if you have Pipe Insulations on the wrong workset:
1.    Install Bakery package in Dynamo
2.    Run definition as in image above
3.    Close Dynamo
4.    Load the Saved Selection
5.    Group these Pipes (which groups the Insulations too)
6.    Change workset (it will have already adopted the current workset)
7.    Ungroup
8.    Done

Thanks to Konrad and Andreas for archi-lab and Clockwork packages respectively. I get a few comments about my Bakery package having a lot of dependencies, but I like the fact that I just need to install Bakery and I get archi-lab, Clockwork, Lunchbox etc. Its like a rough and ready deployment solution…

Oh, one more thing. You may notice in recent versions (like 0.8.2 RC) that there is now some custom path management for Dynamo resources:

Good stuff!

I think its safe to say that Dynamo package deployment is still a work in progress, particularly when considering issues of intellectual property along with the complexity of IT networks in large organizations. For that reason, any step to make Dynamo easier to deploy and use is a good idea.

Dyno Browser gives us a very simple way to share and view DYN definitions using a certain file structure and the Roaming directory inside a user’s profile.

Steps to setup and use Dyno Browser on one PC:

  1. Close Revit
  2. Install Dyno Browser (download link)
  3. Open Revit
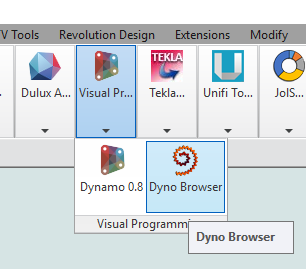
  4. Start Dyno Browser from the Dynamo ribbon dropdown (Visual Programming)
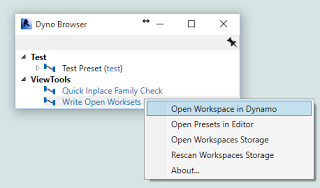
  5. Right-click in the pane and select “Open Workspaces Storage”
  6. In this folder, make a new top level folder and then put some DYN files in it, like this:
  7. Once we have some DYN files in the right location, we can right-click in Dyno Browser and select “Rescan Workspaces Storage”. This will update the list of available definitions in the Dyno Browser pane.
  8. Now, right-click on the definition you want to run and select “Open Workspace in Dynamo”
  9. You may not see your definition straight away, so just press the X button on the Start tab to close that tab. Your definition should now be visible
  10. Click Run

 So, what is good about this? Because now we can create a shortlist of important or ‘approved’ DYN files and deploy them using the appropriate file structure to the team, using Roaming profiles.

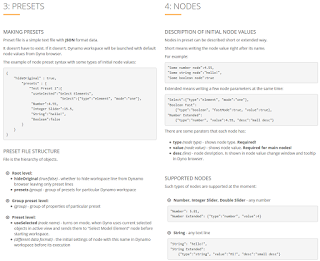
There is actually a bit more functionality available in Dyno Browser: it supports using JSON to feed certain preset values to Dynamo nodes. This is a bit more in-depth, and can be review at the home page.

Video:

The current alpha version is 0.2.52

Main site:
Dyno – Organising, deploying and running <strong>Dynamo</strong> workspaces tool for <strong>Autodesk Revit</strong>: Alexey Lobanov

In less than 10 steps, can you set up all the PCs in your office with all required software?  Here’s one way:

  1. Set up a Windows PC with all required programs
  2. Navigate to %WINDIR%system32sysprep and run the following command from command line:
    sysprep /generalize
  3. Pick options to Generalize and to Shutdown
  4. Reboot into some decent imaging software
  5. Make an image of the hard disk and partitions to an external USB
  6. Apply that image to as many PCs as you have software licenses for
  7. Upon bootup, you will have to re-enter proper Windows key for that hardware, and activate
  8. Also, you will need to set proper computer name and join domain if needed
  9. Done!

Sysprep /generalize will essentially make the image “non-unique” to that system, meaning it can easily be imaged to other hardware without activation or driver headaches.

Sysprep must always be run from the %WINDIR%system32sysprep directory

Sysprep Command-Line Syntax

Make this registry setting:

Note: The creation of a client log file is optional for network deployments. You must enable the option in the Autodesk® Deployment Wizard. 
Not all products create a client log file by default. In the event that no client log file was created, you can use Microsoft® Windows® Installer to create a log file.
To create a log file using Windows Installer
  1. Click Start menu (Windows) > Run.
  2. Enter REGEDIT and click OK.
  3. In the Registry Editor, browse to the following folder:
HKEY_LOCAL_MACHINESoftwarePoliciesMicrosoftWindowsInstaller
  1. Right-click a blank space in the right pane. Click New > String Value.
  2. Enter Logging for the name.  
  3. Double-click Logging.
  4. Enter voicewarmup in the Value Data box and click OK.
  5. Close the Registry Editor, and run the installation again.
Log files created using this method are located in the %TEMP% folder and are named MSI#####.log.

via
Autodesk – Autodesk AutoCAD Services & Support – Using log to troubleshoot installation errors

In our case, we had to add local PC “Users” permissions for Full Control to this file:
“C:ProgramDataAutodeskApplicationPluginsADSK-IFCExportUI2014.bundlePackageContents.xml”

I recommend that you review each PackageContents.xml in the ProgramData location to check for appropriate permissions.

Key lines from journal:
‘ 0:< Autodesk Revit 2014 
‘ 0:< 64-bit load point = C:Program FilesAutodeskRevit 2014 
‘ 0:< this journal = C:UsersljohnsonAppDataLocalAutodeskRevitAutodesk Revit 2014Journalsjournal.0008.txt 
‘ 0:< ::0:: Delta VM: Avail -54 -> 8387401 MB, Used +8 -> 186 MB, Peak +39 -> 218 MB; RAM: Avail -15 -> 12989 MB, Used +13 -> 241 MB, Peak +14 -> 242 MB 
‘ 0:< Exception occurred 
‘C 24-Sep-2013 09:05:39.639;   0:< ExceptionCode=0xe0434352 ExceptionFlags=0x00000001 ExceptionAddress=000007FEFD17940D 
‘ 0:<   System (MB) [Available /  Total ]  [Revit Memory Usage (MB)   ] 
‘ 0:< RAM Statistics:    12989 /    16291       241=InUse      242=Peak  
‘ 0:< VM  Statistics:  8387402 /  8388607       186=InUse      218=Peak  
‘ 0:< Unconverted MessageBox “An unrecoverable error has occurred.  The program will now be terminated.  All of your data has been recently saved, so there is no need to create recovery files.” 

Basic fix method found at:
Other possible solutions:
  • Delete Autodesk, Inc. folder
  • Delete cascade
  • Make a new user profile and see if that works
As per: