From Daniel Gijsbers blog:
“if you try to open a revit workshared file (central file) with LT it right away makes a copy of the file with LT added to it’s name.

But what is even more surprising it leaves the central file intact. With that I mean I saved the central file in Revit LT and next I open the same file in it’s bigger brother. Big Revit says right away: Would you like to create a new local? In other words, you are trying to open a central file. Revit LT doesn’t throw away the worksets!

When you have opened the file take a look at the worksharing display


Revit LT has created it’s own workset… called Revit LT user”

Read more about the implications of this:
Daniel on Autodesk AEC software: Revit files and Revit LT

From rvit:
We got everyone else to sync and get out of the model.  Then, in the central file’s backup folder, we hunted down the SLOG file… and deleted it.
And that works.  He opens his local file and all is right in the world.  Everyone else hops in and all is still well.  Revit generates a new SLOG file and people can get work done.

Read the rest (including disclaimers) at:
SLOG it Out – Cannot Find Central File � RVIT – Revit rants, tips, and junk

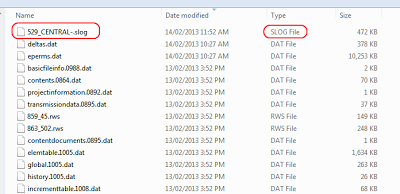
Note: you should be able to find the slog file under the _backup folder of the affected Central (order by Date modified):

Steve’s post recently reminded me of something I have done in the past – using multiple pseudo usernames to access the same Central File in different instances of Revit.

Let’s say that you wanted to render a certain scene in Revit, and then save the resultant image to the Project (a Central File).  As this render could take 10 minutes, you want to keep working on something useful in the same Central File.  What to do?

You just need to open a new instance of Revit and change the Username, then open a Local Copy of the Central as per usual.  You now have 2 instances of the same Central model open, and you can work in and Synchronize from both of them … obviously you are going to need some decent hardware if you are working on a large central file with links.  Set the first instance to render, and work in the second instance while that is happening (keep in mind that local renders in Revit can use multiple cores, so you may want to think about manually adjusting core affinity).

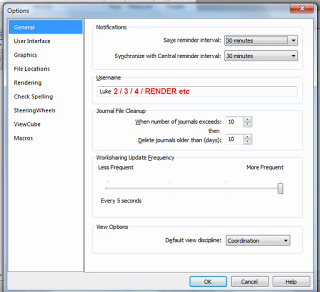
The username can be changed in the Revit Options dialog:

From Steve’s post:
You can however change your username anytime you want when you work in a central file. It isn’t a great idea to actually work this way, switching usernames as you go. It is however a way to clear out users that have not relinquished worksets properly though. When nobody else is working on the project you can open a central file and pretend to be the ill mannered users that haven’t relinquished elements properly. It’s another reason you might consider working in a central file, even though it is generally frowned upon.

Read more at:
Revit OpEd: Changing a Username

Daryl Gregoire posted about this recently and I found his post very helpful.  In the past, if the checkbox was grayed out to ‘Create New Local’, I would just manually copy the file to my C: drive, append my username to it, and then open it that way.  This is ‘old school’ Revit, before the automated local file creation became available.  However, Daryl’s fix is better than my workaround…

Why is the checkbox not available?
you are NOT using the same version of REVIT that was used to create the Central file

How to fix it properly?
open the file, upgrade it to your version of REVIT (done automatic) then ‘save as’ the file and click the ‘Option‘ button in the Save dialog box and tick the option for ‘Make this a central file after save‘.

Read more:
REVIT Rocks !: REVIT – My Create New Local is Greyed Out

EDITSteve posted about another cause for this problem, and he gives some wise advice along the lines of “before you upgrade, think about the consequences…”  Check out his post:
Revit OpEd: Can’t Alter Create New Local Selection

You can increase your productivity by opening Multiple Instances of Revit when working on the same Central file. This is particularly useful if you want to set one instance to render a view, and continue modelling or drafting in the other Revit instance.

This is how to do it:

  1. Open Revit, and open a local copy of the Central file. This instance will be using your normal user name (eg. Luke).
  2. Open another instance of Revit. Click the ‘R’ button, and go to ‘Options’.
  3. Under General, type a different Username into the applicable box (eg. Luke-SECOND)
  4. Click OK.
  5. In this second instance, open another local copy of the Central file. This is done by navigating to the Central, and then ensuring that the ‘Create New Local’ box is ticked before opening the Central.
  6. You now have two instances working on the same Central file. You can test this by ‘Synchronizing’ each instance.

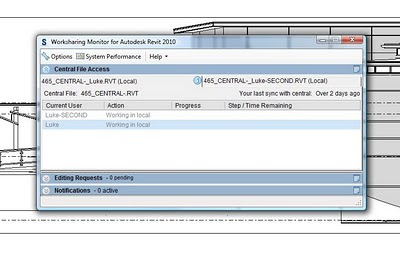
If you have Worksharing Monitor installed, open it up and have a look at the two instances. You should see something like that shown below:Please note that you will need a decent PC to take advantage of this ability. It will be particularly useful if you have 4 or even 8 processing cores available.
We use a Netgear ReadyNAS Duo as our fileserver. Recently we started to experience some annoying and disturbing error messages, such as:

  • Access to {path}{CentralFileName}-backupeperms.dat was denied
  • Encountered a hardware I/O error while accessing {path}{CentralFileName}-backuprequests.dat
  • An unknown error occurred while accessing {path}{CentralFileName}.rvt

This resulted in some loss of work and lots of annoyance.
I discussed the issue with our local reseller and they basically recommended I stop using the NAS and use a different share. But I didn’t want to do that! However, it did seem likely that the problem was with the NAS. I played around with some settings in the NAS setup…and I think I found the answer. It was to do with ‘oplocks’. I needed to disable the oplocks for the share, and the problem went away! How do you do it?

  1. In the Netgear ReadyNAS Duo ‘Frontview’ administration page, go to the ‘Shares’ page.
  2. Go to the ‘Share Options’ for the share you are using to store Revit Central Files.
  3. Scroll down the bottom to ‘Opportunistic Locking’ and disable the ‘Enable oplocks for this share’ tick box.

What are ‘oplocks’? According to the utility:
Opportunistic locking (oplocks) can enhance CIFS performance by allowing files residing on this ReadyNAS to be cached locally on the Windows client, eliminating network latency when files are repeatedly accessed.
This definition indicates that oplocks could certainly have caused this issue. Since disabling the option, we have experienced none of the aforementioned errors.
Have you experienced this problem? If so, I hope my solution helped you.
Also, it looks like I haven’t been the only one with an issue like this:
http://forums.novell.com/novell-product-support-forums/open-enterprise-server/oes-platform-independent/oes-client-windows/371285-revit-2009-64-bit-opportunistic-file-locking.html
http://www.mail-archive.com/samba@lists.samba.org/msg86717.html
http://forums.novell.com/novell-product-support-forums/open-enterprise-server/oes-netware/oes-nw-install-upgrade/369243-cifs-xp-pro-x64.html
http://community.riverbed.com/rvrb/board/message?board.id=24&thread.id=30
“Specific applications known to exhibit this behavior include Solidworks and AutoDesk Revit, as demonstrated by your experience.”

EDIT Associated issue may result in error such as:
This issue was with a user not being able to write to a particular file that Revit uses to maintain the state of the central file.
\pathdeltas.datpath

deltas.dat>

First off, if you are working with Central/Local Files and Worksharing, then I encourage you to head over to Autodesk Subscription, login and get the Worksharing Monitor.

Then, open Revit. Go to the ‘Add-Ins’ tab on the Ribbon, and under the ‘External Tools’ you will find the Worksharing Monitor.

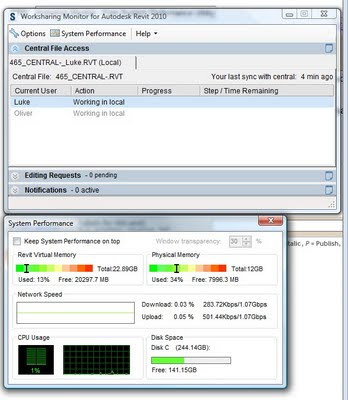
Once you go into the Worksharing Monitor, click the ‘System Performance’ button and a handy little utility will pop up. Enjoy!