1. Download and install Advanced Renamer
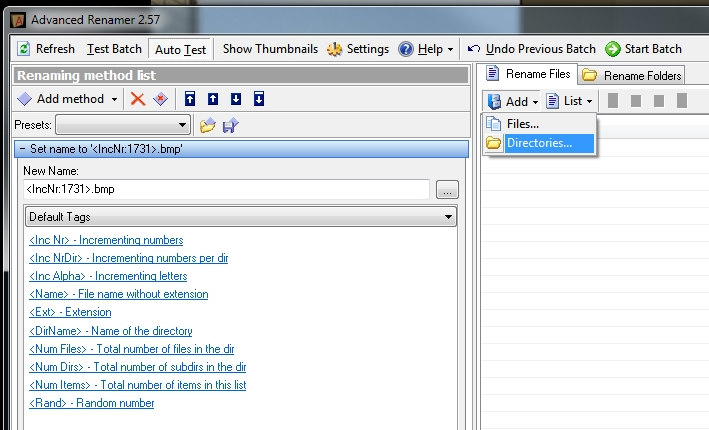
  2. Open Advanced Renamer.  Add – Directory and choose the folder that contains the sequential set of files.
  3. Add method.  Choose ‘New Name’ from the dropdown list.
  4. In the entry box, use a name like the following:
    .bmp
  5. This will create 4 digit sequential filenames ending in BMP.  The first file name will be 1731.bmp
  6. Click ‘Start Batch’ (you can use ‘Test Batch’ if you want to check the results of the rename process first).

These sequential bitmaps can then be joined into a AVI file.  Refer to the main post entitled Distributed Parallel Rendering in Revit.

Citrix readiness has resulted in a few file locations being changed in Revit 2012 products.

 
Journal file locations
For 2012 products:

  • Windows XP: %USERPROFILE%Local SettingsApplication DataAutodeskRevitJournals
  • Windows Vista or Windows 7: %LOCALAPPDATA%AutodeskRevitJournals

Who moved my Cheese (Files) ? – Important File location changes for Revit 2012 – The Revit Clinic
This post from The Revit Clinic includes a link to a VBScript utility that ‘gathers’ your journal files together…and it also includes the following info about the revit.ini  and UIState.dat locations in Revit 2012.

Revit.ini location
“The active revit.ini file is no longer located in the Program files directory. A number of files have been relocated to a new UserDataCache subfolder in the Program directory (C:Program FilesAutodeskRevit Architecture 2012ProgramUserDataCache). These files are “template” files and are copied into the user data “roaming” folder on the first launch of Revit, per user. From then on, these files will be loaded from and saved to the user data “roaming” folder. Revit.ini can be customized and pushed to users by an Administrator by editing or replacing the copy in the UserDataCache folder prior to the users launching Revit for the first time.”

UIState.dat
C:UsersusernameAppDataRoamingAutodeskRevitAutodesk Revit Architecture 2012

Thanks to The Revit Clinic for this information.

blog.bimkicks.com | REVIT Journal File Locations CHANGED in 2012
This post focuses on the Journal file location differences.

Autodesk – Autodesk Revit Architecture Services & Support – Location of journal files
Autodesk’s explanation of the Journal file locations in 2012.

Autodesk – Autodesk Revit Architecture Services & Support – How to download a previous release of an Autodesk Design & Creation Suite:

Scenario

You are an active Subscription Member and have upgraded to an Autodesk Design & Creation Suite, and would like to download a previous release of the Suite, or one of Autodesk software components within the Suite.

Solution

As a Subscription Member, you can download and activate the latest release, or previous releases, of eligible Autodesk products. You can activate one release of a product, suite, or the components of a suite, per license, purchased on Subscription.

Generally, if you purchased a license on Subscription for the first release of a Design & Creation Suite, then you can download and activate a previous release of the Autodesk software components within the Suite.

To download the product software for which you are eligible, follow the instructions for How to download a previous release of Autodesk software.

What happens behind the scenes in Revit?  The Revit Command Prompt utility developed by Jose Guia can help you learn.

Here is a direct link to the addon:
http://blog.bimkicks.com/file.axd?file=2011%2f3%2fRevCmdPrompt.zip

To install:

  1. Download the ZIP
  2. Extract anywhere
  3. RIGHT CLICK the INSTALL.cmd file and select “Run As Administrator”
  4. Restart Revit.
  5. Under Add-Ins, External Tools, you will have a new option called Command Prompt

Via:
blog.bimkicks.com | REVIT COMMAND PROMPT – aww yeah!!!!!!!