This previous post on using a Microsoft Kinect in Revit generated quite a bit of interest. Do you want to get more involved with Dynamo?  Quote:

… go to the Dynamo site on gitHub, download the source or the executeables and open an issue if there’s a feature you’d like to see implemented. I’m in the process of putting together a tutorial for how to create your own nodes. In the meantime, if you’re a developer and you want to take a crack at coding your own components for Dynamo drop me an email, and I’d be happy to help you get up and running.

via
This is the software you’ve been waiting for… (Ian Keogh)

From the gitHub page:
Dynamo: Visual Programming for Revit
This project was started by Ian Keough. The intent of this project is to provide a code playground for building interesting parametric functionality on top of that already offered by Revit, and to do so with a graphical interface that allows you to share your work with others less inclined to write code themselves.

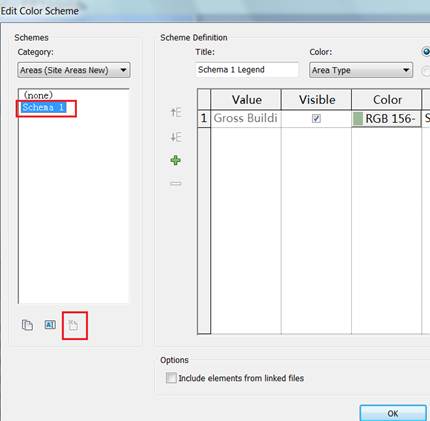
The last color scheme of some area schemes were lost, therefore the color fill function for that area scheme was also lost in the model and the user is unable to assign it color schemes.

Solution

To restore a default color scheme for these problematic area schemes in the Revit Project follow these steps.
  1. Create a new Revit project (project1.rvt) with default template.
  2. In project1.rvt, open the Home > Room & Area > Area and Volume Computations dialog.
  3. On the Area Schemes tab, click the New button to create an area scheme and rename it to match the Area scheme name in the Revit project containing the missing color schemes.
  4. Click OK to exit the dialog.
  5. Switch to the original Revit project file and go to Manage > Transfer Project Standards.
  6. In the dialog, choose Copy from: Project1.
  7. Click the Check None button and select Color Fill Schemes.
  8. Click OK.

via
Autodesk – Autodesk Revit Architecture Services & Support – Area schemes have lost their color schemes

The Revit Kid demonstrated today that PNG files exported from a Revit render have no background.

In the spirit of one-up-man-ship, I recommend that you use TIF if you want to keep the background, but quickly separate it from the model elements.  When you export as TIF, you get a bonus Alpha channel that you can use to create a selection area and move the background to a new layer.

In simple terms:

  1. Export Revit render as TIF
  2. Open in Photoshop
  3. Isolate the Alpha channel
  4. Use Magic Wand to pick everything that is ‘white’
  5. Turn the color channels back on
  6. Invert the Selection
  7. Convert the background to a true layer
  8. Edit – Cut
  9. New Layer
  10. Edit – Paste
  11. Done!

Now you can manipulate the model elements and the background separately.

Here is a video:

 
Of course, you can also do this easily by:

  1. Doing two separate renders, 
  2. one of them with Model Elements turned off (which will just show the background) – Export this to any format except PNG
  3. and one of them with Model Elements on (export this to PNG)
  4. Copy and paste these two images to separate layers in Photoshop

 The TIF method is probably quicker and easier in most instances.

Here is a link to the aforementioned PNG post:
The Revit Kid.com!: Revit Tip – Export Rendered Images Without a Background