We often have to deal with data that hasn’t always “lived” in our CAD, BIM or Revit world. Take a hand sketch, for example – how can you get that into a format that can easily be used in AutoCAD or Revit? Some PDFs have vector information, which I have described how to access before. But the below workflow takes it one step further – how to get any raster image into a vector format, using a few free tools.

Here’s how to do it, without Adobe Illustrator:

  1. Make your source file (PDF / Scan etc) into bitonal TIFF image (I use Bluebeam and Irfanview in the video, but you could easily save the PDF to image using GSView)
  2. Open in Inkscape
  3. Vectorize using Path – Trace Bitmap… Brightness steps, set to 2.
    Untick: Smooth, Stack scans, Smooth corners and Optimize paths.
    (this step makes the black and white image into lines and outlines)
  4. Save as EPS
  5. Open in GSView (requires Ghostscript and pstoedit)
  6. Save as DXF (using Convert to Vector format). From here, you can get to AutoCAD or Navisworks easily…
  7. Open in AutoCAD
  8. NWCOUT and/or
  9. Append the DXF directly to Navisworks
  10. Scale and position appropriately

Here’s a quick video of the process:

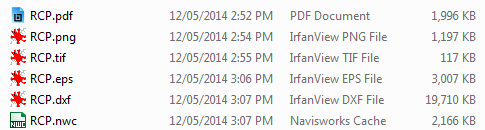
The file sizes at each step look like this:

I wanted to convert a PDF file into content I could use in a Planting family in Revit.  Part of that process involved converting the image into DWG hatches that Revit could understand, either as an import or as a Filled Region.

Here is the process (scroll down for video):

  1. Download Adobe Illustrator
  2. Open the image in Illustrator.
  3. Select the image
  4. Click the ‘Live Trace’ button in the bar at the top.  There are a number of different methods to choose from.  The most accurate seems to be ‘Photo High Fidelity’, but this will likely result in the largest DWG.
  5. Save the file in Illustrator.
  6. Click File – Export and save as a DWG!

 Here is the video:

So, you try and print a view with an image in it, and Revit 2010 just decides to crash…and you can’t figure it out!

Well, Revit wants you to choose ‘Raster’ instead of ‘Vector’ under the ‘Print’ dialog – ‘Setup’ button…

There you go, no more crashing!

I have reported this to Autodesk (see below 😉

Summary: Printing ‘linked view’ with image – crashes
Description: When printing a host view with a linked RVT view that contains a high res image.

The same problem occurs if printing the drawing from the linked file (the image seems to crash revit).

However, changing the print type to ‘raster’ solves the problem. Revit should realise that ‘vector’ is going to crash, and switch to ‘raster’ automatically.

Please correct this problem as it is irritating.