We often have to deal with data that hasn’t always “lived” in our CAD, BIM or Revit world. Take a hand sketch, for example – how can you get that into a format that can easily be used in AutoCAD or Revit? Some PDFs have vector information, which I have described how to access before. But the below workflow takes it one step further – how to get any raster image into a vector format, using a few free tools.

Here’s how to do it, without Adobe Illustrator:

  1. Make your source file (PDF / Scan etc) into bitonal TIFF image (I use Bluebeam and Irfanview in the video, but you could easily save the PDF to image using GSView)
  2. Open in Inkscape
  3. Vectorize using Path – Trace Bitmap… Brightness steps, set to 2.
    Untick: Smooth, Stack scans, Smooth corners and Optimize paths.
    (this step makes the black and white image into lines and outlines)
  4. Save as EPS
  5. Open in GSView (requires Ghostscript and pstoedit)
  6. Save as DXF (using Convert to Vector format). From here, you can get to AutoCAD or Navisworks easily…
  7. Open in AutoCAD
  8. NWCOUT and/or
  9. Append the DXF directly to Navisworks
  10. Scale and position appropriately

Here’s a quick video of the process:

The file sizes at each step look like this:

Sometimes you will have access to a PDF file, but not to the original DWG.  Is there any way you can get the base vector data, such as lines and arcs, out of the PDF and back into a DWG?  Yes, there is – and it’s free.

You will need 3 things:
Ghostscript or here
GSView
pstoedit (or Windows exe link here)

Download and install each of the above tools.  Make your life easy and stick with the 32-bit version of everything.

Once you have installed them all, open a PDF file using GSView.  GSView is usually located in  
C:Program Filesghostgumgsviewgsview32.exe

With your PDF open, take the following steps:

  1. Click on ‘Media’ and set the correct paper size.
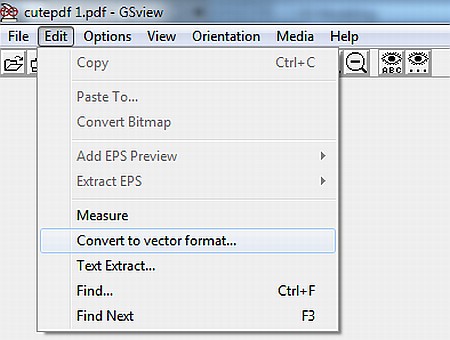
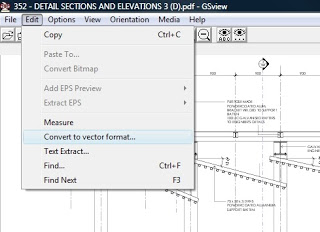
  2. Go to ‘Edit’ and click on ‘Convert to vector format…’
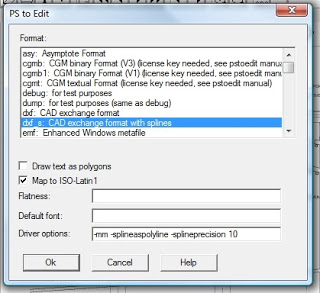
  3. At the resulting PS to Edit dialog box, choose dxf_s, and add the following Driver options:
    -mm -splineaspolyline -splineprecision 10
    (I have found these settings to work quite well)
  4. Click OK.
  5. Select the page in the next dialog (usually only 1), press OK, and then pick a place to save the DXF file.
  6. Click Save.
  7. Open in AutoCAD and scale to correct size.
  8. Save as DWG.

If you have any problems, feel free to comment and I will try and help you out.  If you intend to import the DWG into Revit, keep in mind that Revit is not very impressed with very short lines.

Enjoy your PDF hacking!