You should all know something about adaptive points by now. I will here describe how I recently used them to solve a modeling problem.

Basically, I need to create a surface that was quite irregular – it did not fall in a way that could be describe in 1 or 2 slopes. I didn’t want to use a shape-edited floor, as I wanted a form that would be smooth – not triangulated. Further to this, I wanted to be able to easily edit this form, and I wanted to be able to be able to derive some intelligence from it (ie. report the slope of the form). What would you do?

Here is how I handled it:

  1. Create an Adaptive Component (generic) family.
  2. Place some points and make them Shape Handle Points (Adaptive)
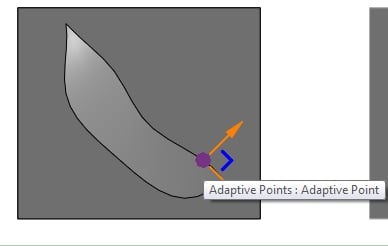
  3. Create two splines based on these adaptive points that meet at two endpoints (see image below).
  4. In the Project, create an in-place Mass family.
  5. Create an Instance of this Adaptive Component inside the in-place Mass.
  6. Finish the in-place Mass.
  7. Create a new Wall based on the face (surface) from the Adaptive Component family.
  8. You are done!


The fun part is editing – here is how you do it:

  1. Select the in-place Mass (use the Project Browser if you can’t pick any actual Mass geometry), and edit-in-place.
  2. Hold your mouse over one of the points and ‘Tab’ until you can select the actual adaptive point (see image below).
  3. Once selected, you can pull this point around.
  4. Adjust the points to suit, and then Finish Mass.
  5. Pick the Wall that you applied to the face (surface), and then ‘Update-to-Face’.


If you wish to add further details or even ‘trim’ the Wall, just create another in-place family of Category walls and go for your life (you can use Cut Extrusions etc to trim the face-applied wall to a form that suits you).

I’m sure that this isn’t the only way of attacking this problem, and I’m sure that it may not be ‘recommended’ in every case. But I hope you enjoyed this tutorial. Here are the Adaptive Component family and the Project for you to download and look at:

Project File – Bending the Rules with Adaptive Points

Family – Adaptive Component

I am quite sure that I was the first to post about the Web Update for RAC 2011 (please feel free to correct me if I am wrong). So I thought this might be a good time to encourage you to subscribe to this blog.

Subscribe using RSS

Subscribe using Email

Also, here are the updated links to the downloads for the various flavours of Revit (thanks Revit3D.com)

Revit Architecture 2011

Autodesk Revit Architecture 2011 Update 1_32-bit (exe – 39575Kb)
Autodesk Revit Architecture 2011 Update 1_64-bit (exe – 59876Kb)

Update Enhancement List (pdf – 204Kb)
Service Pack Readme (htm – 39Kb)

Revit Structure 2011

Autodesk Revit Structure 2011 Update 1_32-bit (exe – 39575Kb)
Autodesk Revit Structure 2011 Update 1_64-bit (exe – 59881Kb)

Update Enhancement List (pdf – 254Kb)
Service Pack Readme (htm – 37Kb)

Revit MEP 2011

Autodesk Revit MEP 2011 Update 2_32-bit (exe – 39555Kb)
Autodesk Revit MEP 2011 Update 2_64-bit (exe – 59867Kb)

Update Enhancement List (pdf – 212Kb)
Service Pack Readme (htm – 36Kb)

If you have correctly applied the update, you should see ‘Web Update 1 Service Pack’ in the ‘About Autodesk Revit 2011’ dialog box (see below):


Also, as Steve noted, it pays to check the Communications Center when first opening Revit each day:

There is a Maintenance Update available for Revit 2011 x64.

Please use the link below to download the update for 64-bit:
http://updatesdl.autodesk.com/updates/files/rac_x64_ur10.exe

For 32-bit:
http://updatesdl.autodesk.com/updates/files/rac_x86_ur10.exe

The readme file is at:
http://updatesdl.autodesk.com/updates/files/autodesk_revit_architecture_2011_update_1_readme.htm


Enjoy! And remember where you heard it first…

This guide is for beginners who want to view the Revit database in 2011. I have previously posted about rvtmgddbg. This has been replaced in 2011 by RevitLookup. This is an API tool that allows you to view (‘Snoop’) the elements in the Revit database.

How do you set it up? Its quite simple really:

  1. Download this file (thanks to The Building Coder).
  2. Unzip the file to the C: drive (such that you have paths C:RevitLookupCS etc)
  3. Double click on the file “C:RevitLookupCSRevitLookup.csproj”, this will open in Visual Studio tools for Applications.
  4. Click on Build – Build RevitLookup (this creates the RevitLookup.dll file)

  5. Now, open the file “C:RevitLookupCSRevitLookup.addin” in Notepad.
  6. Replace this-
    RevitLookup.dll

    with this-
    C:RevitLookupCSbinDebugRevitLookup.dll

  7. Save the file.
  8. Now, copy the RevitLookup.addin file you just saved to the following location (depending on your OS):

    For Vista
    C:ProgramDataAutodeskREVITAddins2011

    For XP
    C:Documents and SettingsAll UsersApplication DataAutodeskRevitAddins2011

  9. That’s it! You should now see the Revit Lookup menu on your Add-Ins ribbon:


One of the simplest ways to use this tool is to select an Object, then use the ‘Snoop Current Selection’ option. Enjoy!

A sure-fire way to become more productive when using Revit is to utilise the Project Browser effectively. It can allow you to quickly find and navigate your project, instead of laboriously searching for views or families.

In Revit 2011, you can use the persistent Properties Palette to quickly sort the Project Browser views.

  1. Click on top-level of Browser (Views…)
  2. Click on Properties Palette and choose option.


This method also works when sorting Sheets in the Project Browser.

The above post assumes that you know how to create new sort groups for the Project Browser. If you don’t, have a look at this page.

There is a sneaky command in Revit 2011 called ‘Replicate Window’. It is NOT the same as Duplicate View. Instead, this opens another instance of the current view in a new window. It is on the View Ribbon, Windows panel:


I actually thought this was new in 2011, but when I checked Revit 2010 it was there too. However, the 2010 documentation did not show anything when searching for ‘Replicate’. The 2011 documentation is a little more helpful:

To open a second window for the current view, click View tab, Windows panel (Replicate). This tool is useful if you want to pan and zoom on certain areas of the design, while also viewing the entire design in another window. (Use the Tile tool to see both views at the same time.) Any changes that you make to the project in the new window also display in other windows of the project. (Expand the Manage Views part at this link).

One of the Most Viewed Knowledge Base Issues relates to the inability to print using the ‘Ambient Occlusion’ option.

There is a very simply way to get around this. Just use ‘Print Screen’ on your keyboard when you have a view using Ambient Occlusion open on your screen. Then paste the image into Irfanview (or your viewer of choice), crop it and then resize to get the DPI that you want.


This is obviously not an elegant way to go about things, but for the time being, it works 🙂

Awesome post from Zach at this link.

This is kinda what I alluded to back in my post about Adaptive Components (when I said there would be some ‘neat workarounds and tricks’ coming out).

This certainly is a ‘neat workaround’ isn’t it? It demonstrates the power of adaptive components, along with an understanding of Revit Categories (in this case, the ‘Cut Dominance’ of Structural Columns is exploited). Zach certainly and repeatedly discourages the use of this method, but provided you have an understanding of the ‘cons’ of this level of hack, you should be ok.

If you understand ‘What Revit Wants’ when it comes to Categories, you too can come up with similar tricks to Zach’s.

Wow, Revit is starting to finally allow some actual customization of the User Interface!

If you intend to use the Quick Access Toolbar a lot, have a look at the new things you can do – such as sorting the icons…


Put your most used shortcuts to the far right of the QAT – this is closer to the centre of the drawing window.


As with 2010, you can move the QAT below the Ribbon if you like.

I fear the day that the Revit UI adopts a tool like the CUI manager from AutoCAD. Keep it simple!