As software and standards mature and even become archaic, they inevitably attract baggage along the way. Years of technical debt amassed by well-intentioned developers and product managers will be paid for by us and our children.

This is particularly evident when we start talking about the Id of Revit elements, and the IFC GUID syntax. As most of you are aware, Revit carries a number of different identifying attributes for each and every element. Here is a basic list:

  • Element Id – the numerical form of a Revit Id, you can interact directly with this using the Select By Id command in Revit
  • UniqueId – “A stable unique identifier for an element within the document.” This is not a correctly formed UUID, but rather a concatenation of a standard UUID for the Revit EpisodeId (session based), along with the Revit element Id. From Jeremy’s post: similar to the standard GUID format, but has 8 additional characters at the end. These 8 additional hexadecimal characters are large enough to store 4 bytes or a 32 bit number, which is exactly the size of a Revit element id.
  • DwfGuid (Export Guid) – this is a correctly formed UUID in .NET / standard format
  • IfcGuid – identical to DwfGuid, but encoded differently according to IFC rules created in the mid-90s. At the time, it was deemed worthwhile to ‘compress’ the IFC Guid to the shorter form we still have to deal with today.

It would be nice if Revit and IFC shared a single common unique identifying syntax, but unfortunately this is not the case.

The above Ids do actually bear some predictable relationship to each other. The UniqueId is formed by Revit joining the EpisodeId and the encoded Element Id, the Dwf or Export Guid is created by an algorithm that has a number of conditional rules, and the Dwf Guid can be converted to the backwards-compatible IfcGuid format through a different algorithm, originally created in C. Those algorithms can be sourced in various places (see links in Further Reading below).

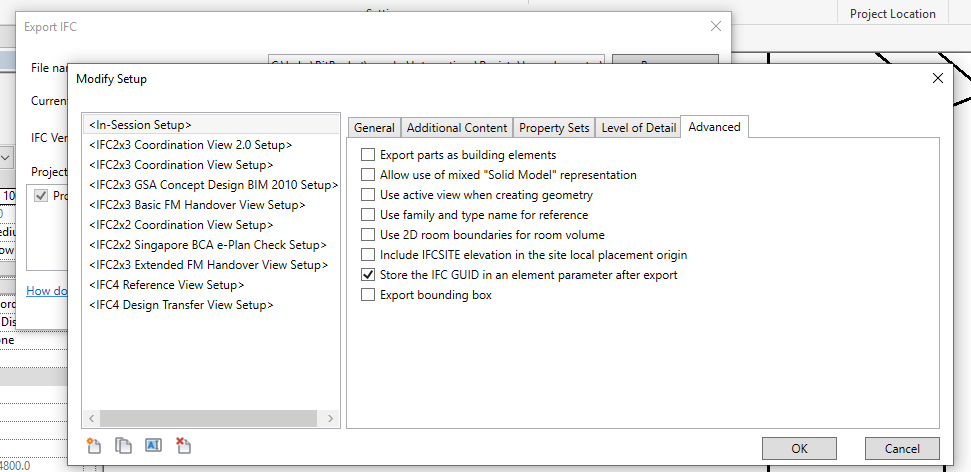
Also, some of these get exposed in different ways – if you create Element-bound BCF files, they will typically show the IFC Guid syntax. Further, if you export an IFC file from Revit and tick the option on the Exporter, it will write the IfcGuid to a parameter on the element.

You can query the Element Id directly in Revit (Modify ribbon, Inquiry panel, IDs of Selection):

However, for the purpose of this post, let’s assume you are using Dynamo with IronPython, and you want to query all 4 Ids from an element.

We at least need to import the Revit API and the Revit IFC API:

clr.AddReference("RevitAPI")
import Autodesk 
from Autodesk.Revit.DB import *
clr.AddReference('RevitAPIIFC')
from Autodesk.Revit.DB.IFC import *


Following this, we can use the various Dynamo and Python commands to access the Ids:

elementIds, uniqueIds, DwfGuids, IfcGuids, successlist = [], [], [], [], []
for i in e:
    try:
        elementIds.append(i.Id)
        uniqueIds.append(i.UniqueId)
        DwfGuids.append(ExportUtils.GetExportId(doc, ElementId(i.Id)))
        IfcGuids.append(ExporterIFCUtils.CreateSubElementGUID (UnwrapElement(i),0))
        successlist.append("Success")
    except:
        successlist.append("Failure")
OUT = elementIds, uniqueIds, DwfGuids, IfcGuids, successlist


Notice the commands and properties used:

  • Element Id – query the Element.Id member
  • Unique Id – query the Element.UniqueId member
  • Dwf or Export Guid – use the ExportUtils.GetExportId method
  • IfcGuid – use the ExporterIFCUtils.CreateSubElementGUID method (index 0 refers to the main element itself)


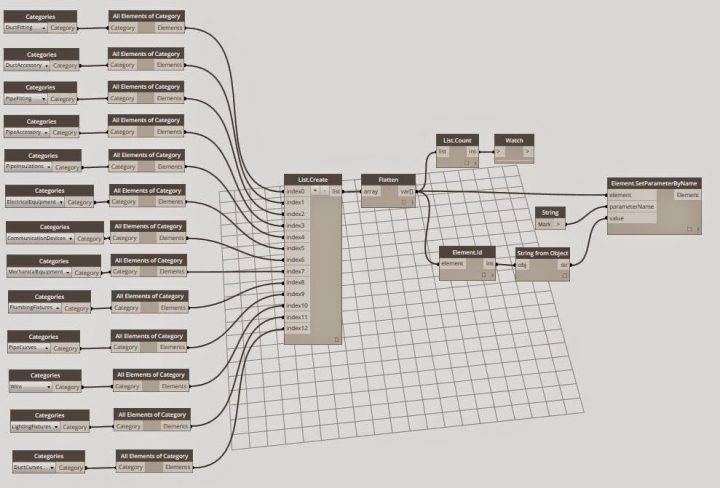
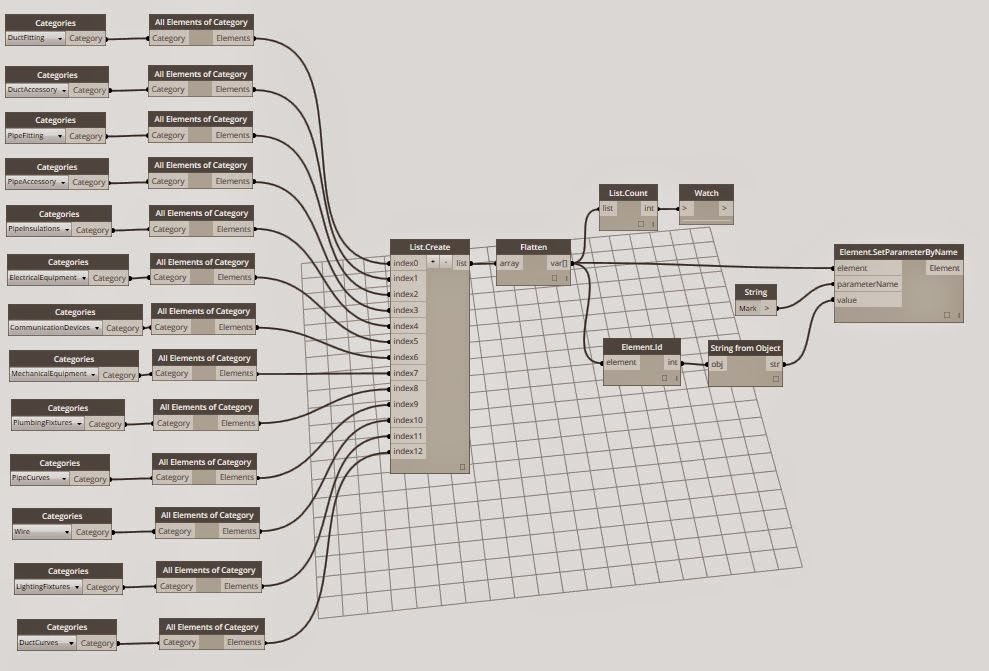
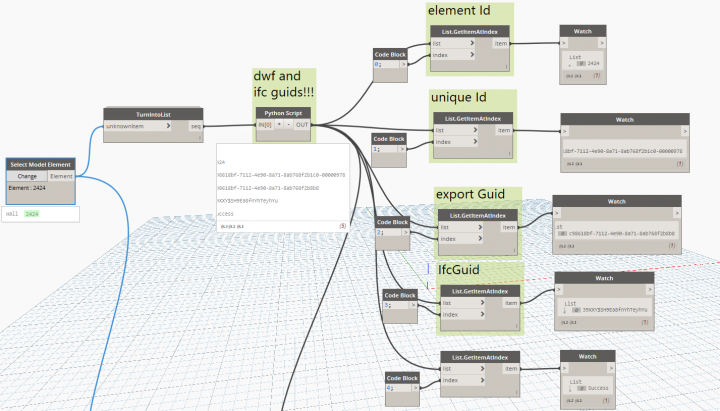
From here, I create a Dynamo node that eats Revit elements and gives us back these Id values:

before node created


After “All The Ids” node created


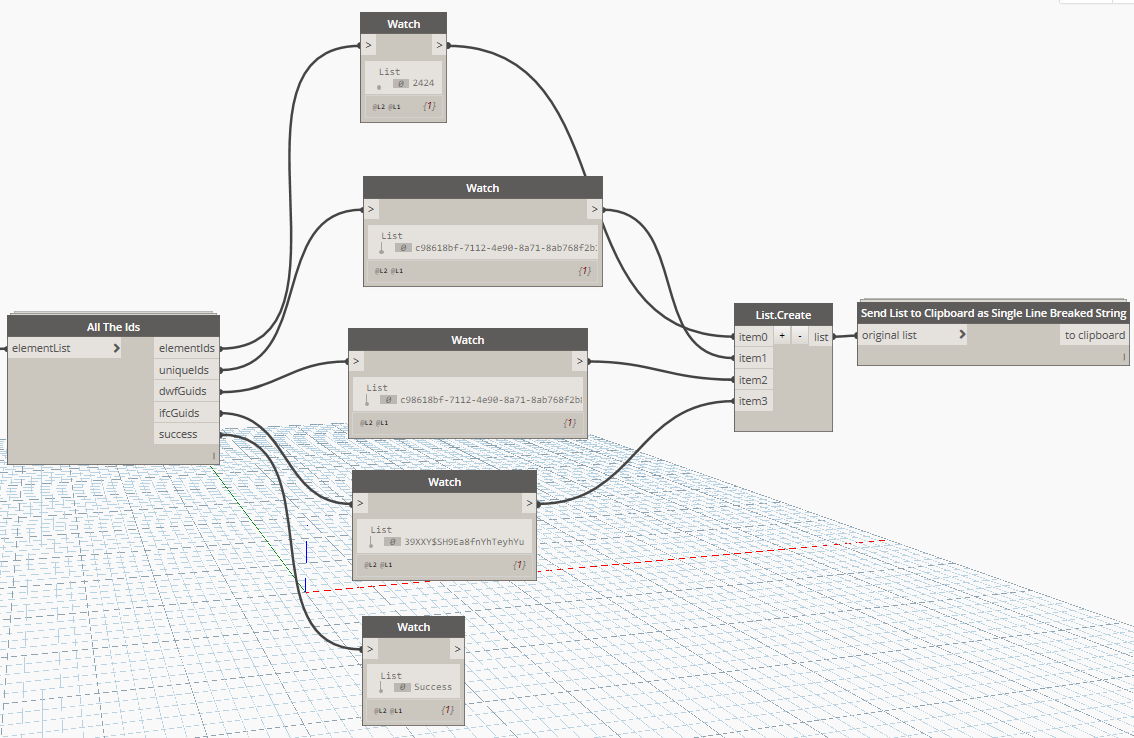
This node will be published in the Bakery package on the package manager, and to Github.


Further, our VirtualBuiltApp platform has been developed to store and query multiple Ids for a single element.


Example output from the Dynamo / Python (initial test showed the Dwf Guid is still a .NET object, that probably should get converted to a string for consistency).

[2424]
['c98618bf-7112-4e90-8a71-8ab768f2b1c0-00000978']
[<System.Guid object at 0x0000000000000071 [c98618bf-7112-4e90-8a71-8ab768f2b8b8]>]
['39XXY$SH9Ea8fnYhTeyhYu']


I added str() to the Python:


Final test showing the 4 different Id values for a single object:

2424
'c98618bf-7112-4e90-8a71-8ab768f2b1c0-00000978'
'c98618bf-7112-4e90-8a71-8ab768f2b8b8'
'39XXY$SH9Ea8fnYhTeyhYu'


Further reading:

BIM One have released a new automatic color filter addin for Revit. It is very simple to use, and its free:

  1. Install the addin using the install tool (refer here for steps on using the addin manager)
  2. Open a Revit project
  3. Go to BIM One ribbon
  4. Click on Color Splasher
  5. Click on a Category
  6. Click on a Parameter
  7. A color set is automatically generated
  8. Click on Apply color set

If we check the element VG, we can see that this addin basically runs through and applies a By Element override to each element in the view:

Note: a nice added bonus to the above functionality is that if you open Color Splasher and click “Clear Set”, every Element visibility override in the current view will be removed. Might be handy for QA and model management?

They have also provided a Element GUID tool. It works like the Select by ID tool in Revit, but instead of using the Element ID, it works on the GUID parameter inherent in all Revit elements:

I previously posted about the BIM One NWC Batch Exporter here:
NWC Batch Export from Revit – multiple Revit views to multiple NWCs with one click

via
http://us8.campaign-archive2.com/?u=f58c55b9516e3ecd984b6ff84&id=95df102b3a&e=3729ed9af6

This tip comes from Troy. He has provided a simple Dynamo definition to set the element Mark to Element ID. It is very fast, and I have tested it on a fairly large data set. As usual though, ‘use at your own risk’ etc.

I posted about how Bonus Tools can handle this too, over here.

How to use it:

  1. Install Dynamo (currently 7.5)
  2. Start Revit, open a project
  3. Open Dynamo, then open DuplicateMarkValuesFromID file from here
  4. Click Run…

Basically, it iterates through each Category in the left most part of the diagram, and sets the Mark parameter to the Element ID. If you aren’t using Mark for anything else, this will instantly clear duplicate mark warnings for those Categories. You could expand or reduce the list by adding or removing Categories and All Elements of Category node sets.

I made a trimmed down version for one Category (Sprinklers), but you can use this to choose a specific Category if you just want to do one at a time.

Thanks to this email from Troy:
Here you go. Feel free to post it and use it as you wish. It is fairly straightforward.

At the left is all of the categories I was checking in my model (mostly mechanical and plumbing). To add or change them just copy and paste the two left boxes, then add an array to the list create. The list count and watch to the top are just there to tell me how many items are being modified. I did about 30,000 objects in all of 30 seconds in one button push.

I’m no expert with Dynamo but I just did this with a spare hour I had int he morning.

I obviously take no responsibility for any damage it may do to any projects, files or computers etc etc.

Regards,
Troy

For some projects, Revit Warnings become a metric in model audit processes (this may be regardless of how much impact those warnings may have in real terms). For example, perhaps your model has become populated with many “Elements have duplicate ‘Mark’ values“. How can we fix these quickly?

I explored a number of options, and I think I have found the easiest. In one particular situation, the Mark value was not important for documentation, and it was simply necessary to make them unique to clear the warnings. What if we could also grab some otherwise unavailable information and apply it to the item? Like Element ID or GUID?

Bonus Tools can do that. Here’s the steps:

  1. Get Bonus Tools
  2. Open your RVT model, check the Warnings dialog, and see what Category is affected
  3. In Bonus Tools 1 ribbon, start Copy Parameter tool
  4. Pick options as per screenshot below

After clicking Ok, the tool will quickly copy the unique ID into the Mark parameter. You can now tag it or schedule it (keeping in mind that it is a static value and may need to be updated from time to time). What I like is how quickly the tool runs – it can do an entire category of thousands of elements in a minute or so.

Note: you could also use Bonus Tools to:

  1. Export multiple categories to Excel using a Multi-Category Schedule – “Export Schedule to Excel”)
  2. Adjust the Mark quickly in Excel with autofill, and 
  3. Re-import to Revit. This method is a bit slower, but you can have more control over how the parameter looks, and you can span multiple categories with unique-yet-readable Mark values.

There have been various other automated ways suggested to fix this over the years, such as:
Automatic Numbering of Elements Within Revit 2015 – Cadline Community 
using element positioning

Revit OpEd: Duplicate Mark Values
using Model Review
 
UPDATE: Recent updates to Bonus Tools include

  • new “Show Warnings” tool (applies a temporary Hide/Isolate after you select a html warning export from Revit) and 
  • a “Renumber Categories” tool (select multiple elements on different categories and it will renumber all elements on those categories by pushing the Element ID into the Mark parameter. It is very fast)

If you paste a heap of elements from one Revit model to another, you may come across this error:
“There are identical instances in the same place. This will result in double counting in schedules.”

If you want to quickly select and delete the duplicate elements, here is one possible method. Basically, we are parsing the element IDs (every second one) from the Error Report and then quickly selecting them in Revit.

This relies on an Error Report that only has “identical instances” error messages (see images at end):

  1. Export the Error Report
  2. Open the HTML file directly in Excel
  3. Select all of Columns A and B, then Ctrl+C
  4. Switch to the XLS template (download here), click in cell A1 and Ctrl+V
  5. This will fill up the table, and using formulas it will find every second element ID. It ignores the first ID, because this “should” be the original one. The template file is good for around 600 data rows (255 identical items), but formulas can be extended to more elements if necessary.
    (EDIT: the main concatenate formula is at its “limit” at Row 513, anything below this is ignored – Excel doesn’t like it bigger than this, so I recommend you either:
    – do this operation 300 duplicates at a time or
    – make a new concatenate formula for rows 513 to 1026 etc…
    its still going to be quicker than clicking every duplicate manually in Revit 🙂
  6. Scroll down to the end of the data that you have pasted and click the Row Label for the first empty row
  7. Ctrl+Shift+End
  8. Delete (this prunes the formulas and element ID list)
  9. Click in cell H3 (this has the list of element IDs)
  10. Ctrl+C
  11. Switch to Revit and start the “Select Elements by ID” command
  12. Ctrl+V
  13. Click OK
  14. Duplicate elements are now selected – press Delete

 You might get some unexpected results (broken systems etc) depending on your project type. Use with care…

This page helped with quickly making a long CONCATENATE list.

Konrad Sobon has put together a Dynamo definition that parses a Warning HTML from Revit, picks out those associated with a particular warning type, and then lists the associate element IDs so they can be isolated in a view. What Revit Wants is this kind of cool.

Original post:
http://archi-lab.net/?p=94

Video demo:

Check out his channel for more Dynamo things:
https://www.youtube.com/channel/UCr_CFVPDPN53DxFjPRs7wZQ

You can also:
Download Dynamo here