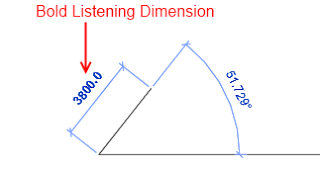
Listening dimensions is the technical term for the little blue dimensions that appear as you start drawing a line in Revit. The bold entry is the one that Revit is ‘listening’ to the keyboard for. When it comes to angular dimensions, if you start drawing a line then hit TAB it basically ignores the Angular snap increments and shows you the exact angle at your cursor position (go Manage – Snaps to see the increments). Also, if you put an increment in the Angular dimension snap increments that is not divisible into 360, Revit will basically ignore it.
Holding Shift will constrain you to either vertical or horizontal directions.
In AutoCAD, you can access either the angle or the length of a line when creating a new line. Sadly, Revit does not allow you to access the angle while creating a new line or wall – you can only enter a Length (as this is the bold listening dimension at creation time).
Basically, then, we need to consider some workflows for allowing angular entry. Most of these are time consuming (see below).
Workflows:
Option 1 –
- Have a Drafting View open, with a line in it
- Select the line
- Adjust the angle
- Copy / paste into your current working view
Option 2 –
- Select a Plan View crop region
- Rotate it to the specific angle that you want to work with
- Start drawing a line
- Use SHIFT to contrain the movement (Revit respects the view crop boundary as defining the vertical and horizontal directions)
Option 3 –
- Draw line
- Select line
- Use angle dimension box
Option 4 –
- Draw line
- Select line
- Trigger rotate command
Do you have a better solution for angular entry at element creation time? It wouldn’t be hard to come up with a better way than those described above.
Here is some more information I found while exploring this issue …
Unit entry:
=45d1 results in 450mm? Why?
Also refer to Entering different units while using Revit natively
Great thread:
the value typed goes into the “listening” temporary dimension (which is the one that is bold).
http://forums.augi.com/archive/index.php/t-40708.html (note – this thread is AWESOME for shortcuts and tricks)
Wikihelp:
If there is no linear dimension, you can enter an angular dimension, if applicable.
http://wikihelp.autodesk.com/Revit/enu/2013/Help/00001-Revit_He0/1468-Document1468/1744-Annotati1744/1745-Dimensio1745/1786-Listenin1786#GUID-84FFE118-6EF7-4747-8DF7-AE675818645E
Failed forum posts asking for listening angular dimensions:
http://forums.autodesk.com/t5/Autodesk-Revit-Architecture/Listening-Dimensions-Line-angle/td-p/2487339
http://forums.augi.com/showthread.php?134150-Listening-Angular-Dimension
http://forums.augi.com/showthread.php?46169-listening-dimensions-for-angles
Line drawing tip – Radius between straight lines:
select Radius and specify a value.
A radius creates fillets at the specified radius between line segments, allowing you to create a rounded chain of lines. A line must be joined to the end of another line for a fillet to display. If a line is connected to more than one line, a fillet cannot be created.
The following image shows line segments sketched without Radius selected and line segments sketched with Radius selected.


