(insert obligatory Revit 2017 blog post here…)
The annual Revit release schedule can become very tiring. Also challenging is the fact that you will probably not start running real, big, live Revit 2017 projects for around 6 months, so all of this new features noise will be a distant memory by then. However, it is good to be aware of the new abilities in the software, so that you can (possibly) stop using outdated workarounds and start using the software in the way Revit 2017 Wants.
By now, we should all be focusing on getting more useful data into our models. In accord with that aim, these are my top 3 new features:
1) Keynote Legends are better – Use Keynotes!
When a keynote legend is set to By Sheet, Revit takes into account whether a keynote is visible in the view as a result of View Range settings, Design Option settings, or Depth Clipping/Far Clipping settings.
2) Combined parameters in Schedules – Use the Data you Have!
Combine parameters in a schedule to display the values in a single cell. You can specify a prefix, suffix, sample value, and separator to display with each parameter. See Combine Parameters in a Schedule.
3) Schedule view templates – Templates are Good Revit
View templates for schedules and assembly views: To simplify the reuse of schedules, create a schedule view template. Schedule view templates include parameters for Fields, Filter, Sorting/Grouping, Formatting, Appearance, and Phase Filter. If the model contains RVT links or design options, Visibility/Graphics Overrides parameters are also available. See About Schedule View Templates and Create Assembly Views and Sheets.
The Help file:
Help: New in Revit 2017
The 1 minute video:
The playlist:
https://www.youtube.com/playlist?list=PLY-ggSrSwbZo26bEbxXCXJzSGjjutm5PY
Steve’s big post:
Revit OpEd: Revit 2017 – New Features and Enhancements
Top 5 from Sean David Burke:
Five Standout Features from Autodesk Revit 2017 | Architect Magazine | Software, BIM, Construction Software, Design Workflow, Architecture, Autodesk
The Revit Kid Top 3:
Revit 2017 – My 3 Favorite new Features | TheRevitKid.com! – Tutorials, Tips, Products, and Information on all things Revit / BIM
Tim Waldock’s Revit 2017 posts (very thorough as usual):
http://revitcat.blogspot.com.au/2016/04/whats-new-in-revit-2017.html
http://revitcat.blogspot.com.au/2016/04/installing-revit-2017.html
http://revitcat.blogspot.com.au/2016/04/elevation-depth-cueing-in-revit-2017.html
—–
Problems (these are the Not So Good Things) so far:
- The View Range bypass View Template problem
Revit 2017 View Range Quirk – BD Mackey Consulting | The Revit Geek Blog - Text close error
Revit OpEd: Revit 2017 – Text Element Error Message
- If you don’t like the new navigation system, you can disable it like Jay
http://revit.blogspot.com.au/2016/04/disable-optimized-view-navigation-in.html
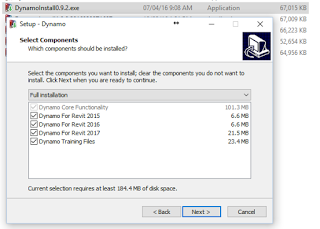
- Some install challenges:
http://revitcat.blogspot.com.au/2016/04/installing-revit-2017.html
—–
Licensing, and the ability to switch from Network to Standalone after installation:
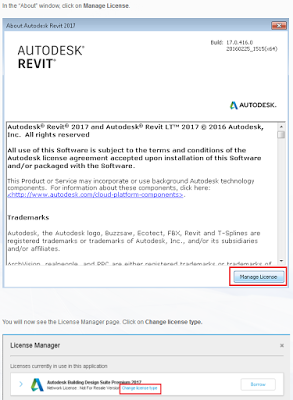
via Autodesk 2017: Changing From Standalone to Network | Microsol Resources Blog
Other posts:
- In the Fold blog post http://inthefold.autodesk.com/in_the_fold/2016/04/revit-2017-advances-bim-for-future-of-designing-buildings.html
- What’s New Revit 2017 page that went live today http://www.autodesk.com/campaigns/whats-new-revit
- New features in Revit 2017. – CADGROUP
- The super linky post from The BIMsider
Weekly Roundup – Special Edition – What’s New in Revit 2017 | The BIMsider
Navisworks 2017 New Features are summed up here:
BIM 360 Glue + Navisworks 2017: Reinforcing Construction Collaboration