I have been searching for a quick and easy way to compare exclusions between Group instances – and nothing really exists at this point.  So, I have developed a method to do this by using Revit and some schedules.  It doesn’t require add-ins, macros or extensions – but it does require full Revit 2014.

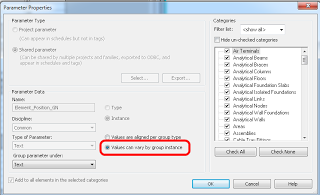
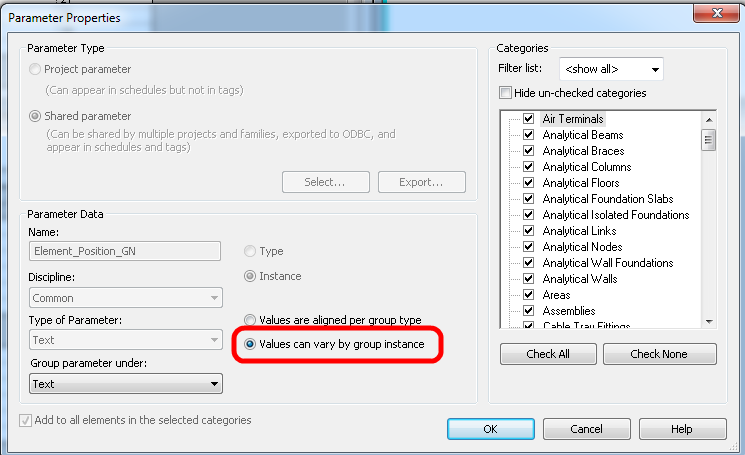
Part A – create a Shared Parameter, applied to all Categories, that can vary by Group instance

Part B – To automatically create selection sets for each group instance

  1. Open a new 3D view
  2. Edit the most complete version of the Group (the one with the least exclusions, ideally none)
  3. Select everything
  4. Save Selection set
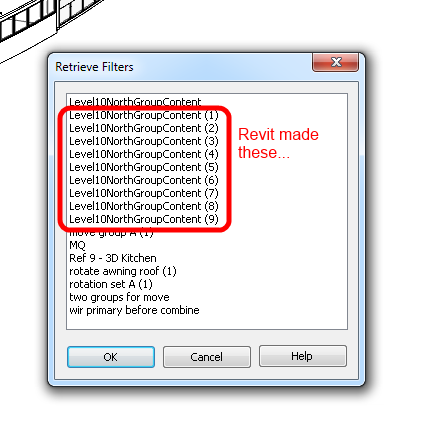
  5. Finish Group – Revit will automatically create a unique Selection Set for each Group instance

Part C – fill the parameter from Part A with appropriate values for each Group instance:

  1. Load one of the automatically created selection sets
  2. Determine what parameter value represents that Group instance (for example “Level 8”)
  3. Filter the Selection – you will need to untick Lines, Wall Openings and Curtain Wall Grids (these items do not accept parameters)
  4. Make Elements Editable
  5. Edit the Shared Parameter with the appropriate value and Apply (ie. “Level 8”)
  6. While the elements are still selected, save the filtered Selection Set
  7. Deselect everything
  8. Select the Group instance and Isolate it
  9. Load the Selection Set from step 6 and Temporary Hide
  10. Any elements left over will need to be selected and have the same parameter from step 2 applied to them
  11. Rinse and Repeat steps 1 to 10 for each Group instance you want to audit / compare.
Make a set of Schedules.  You will typically need at least these Schedule types (depending on what Categories exist in your Group):
  • Multicategory Schedule
  • Walls
  • Floors
  • Ceilings
  • Columns
Make sure the Schedules have at least these fields:
  • The Shared Parameter you created in Part A
  • Family and Type
  • Count field added and set to Calculate Totals
Filter the schedules – you can use the Shared Parameter you set up with an “is greater than” blank operator to show only elements that have something in that parameter.

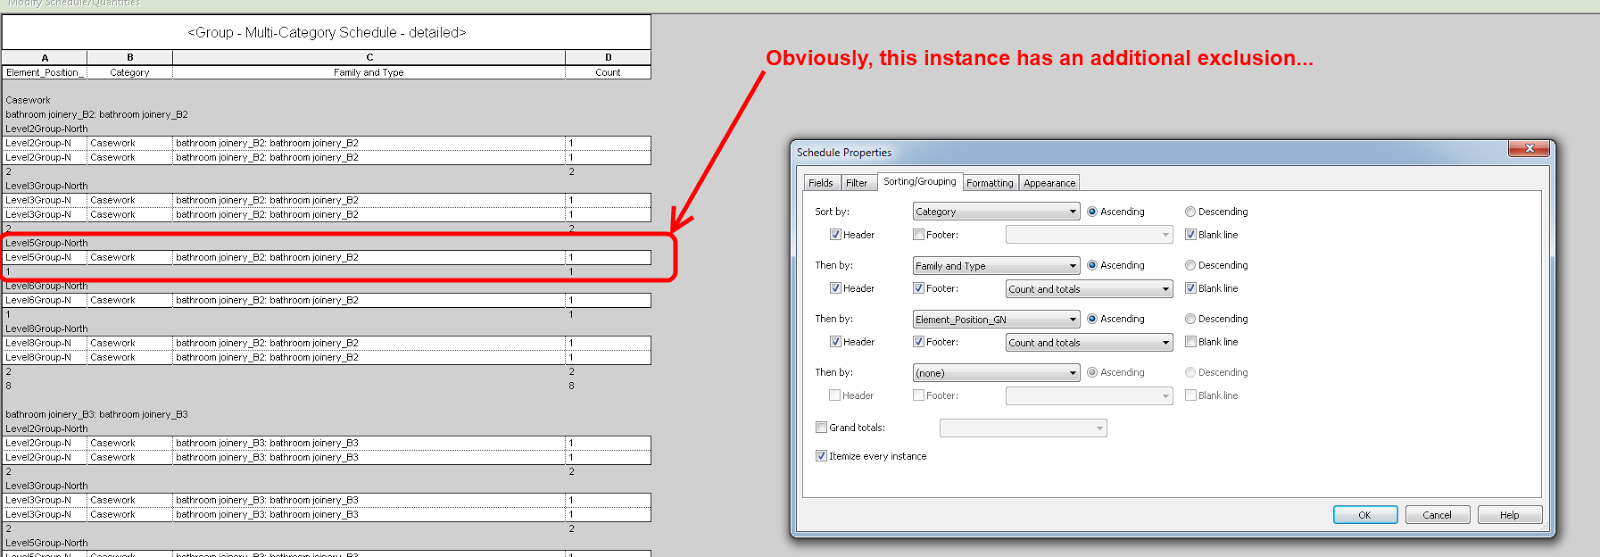
Using Sorting to make things look right, you can end up with a schedule you can quickly scroll through to find differences in Model Groups:

Additionally, using Highlight in Model directly from the schedules will help you to figure out exactly what elements are missing or different.

EDIT Along similar lines, you can check out Dave Light’s post at:
Revit : Scheduling Apartments

After inserting an image in Revit, sometimes the X and Y (Raster Image Width and Height parameters) values of the image are somewhat “warped” and need to be adjusted to match your model background.

I created a Line Based Detail Item family that generates a scaling factor that can be used to properly warp the image aspect ratio.

Just untick Lock Proportions, type an = sign in front of the value that needs to be warped and then put an asterisk (meaning multiply) followed by the Scaling Factor that the family generates.  It will look something like:
=34542.8*1.056

The image below explains it further:

Download the Family here

UPDATE: most of the links seem to be dead now… here is latest from archive.org:


What is it?  It is essentially a cleanup utility for Revit backup files.

AroCLEAN offers to clean these files backups and copies to take care of the free space on your disk storage space…

Click to download

Icone100_Download_Free

Serial valid to Jan 2014:
1-B-1530-BbCc-112-OVMM

From here:
http://arodev.fr/aroclean-2014-mise-a-jour/?utm_source=rss&utm_medium=rss&utm_campaign=aroclean-2014-mise-a-jour

Read:
Translated page

Autodesk offers several different browser-based user interfaces for different reality capture scenarios.

They all use the same underlying ReCap REST API.

You need a special developer key to make use of the API. To obtain one, please contact ADN and ask to become a pilot partner.

ReCap is built on Amazon web services, using queues to manage jobs.

current pilot partners and their work, some of which was also being shown in the AU exhibition:
  • SoundFit custom fit ear gear, creating a precise model of the inner space within the ear for prosthetics, a fully automated complete custom application.
  • Kubit, dealing with AutoCAD applications for real-world as-built capturing.
  • Skycatch, providing a low cost, highly flexible, intelligent & scalable aerial robotics platform.
Tilo Pfliegner of Kubit demonstrated easy integration of calibrated photos, point clouds and ReCap models into AutoCAD.
Point clouds are sometimes too imprecise for modelling needs. Using photos directly instead is better, because they are often more precise, and the photo quality is often better than the generated point cloud.
Read more / via:

Go to this link to download free resources / ebooks:
on Itunes

Other direct links to free items:
http://www.cadlearning.com/products/ebooks/autocad-2014-new-features/
http://itunes.apple.com/us/book/reality-capture-autodesk-recap/id643288491
http://www.cadlearning.com/products/ebooks/revit-architecture-2014-new-features/

Heads up:

via email:
We are very pleased to announce that today we have released the first build of Family Browser Labs Project to the general public. Family Browser Labs Project is the most powerful & sophisticated Family Browser for Autodesk Revit. It handles not only Revit RFA Families but also Revit System families, drafting views, schedules and groups. The best part of this is that it is absolutely FREE. The only thing we ask in return is your feedback.

Check it out at:
http://www.kiwicodes.com/products/31-family-browser.html

You may have struggled to cut a pattern based form with a loaded void, where you have modelled extrusions  or other forms directly into the Pattern based family template.

If you actually replace your plain extrusion forms with a nested Adaptive Generic Model in the Pattern Based template, you will be able to cut it with a Loaded Component, such as my SuperVoid family.