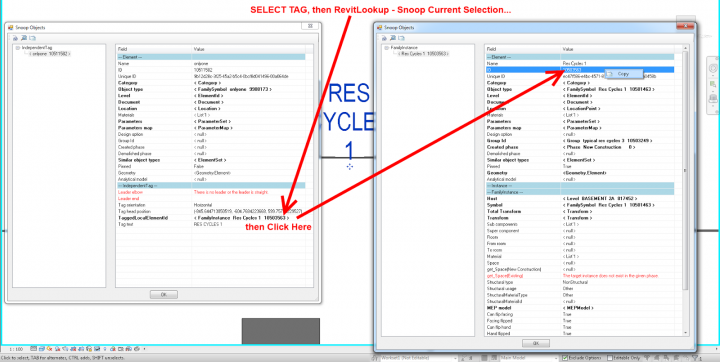
Use RevitLookup, like this:
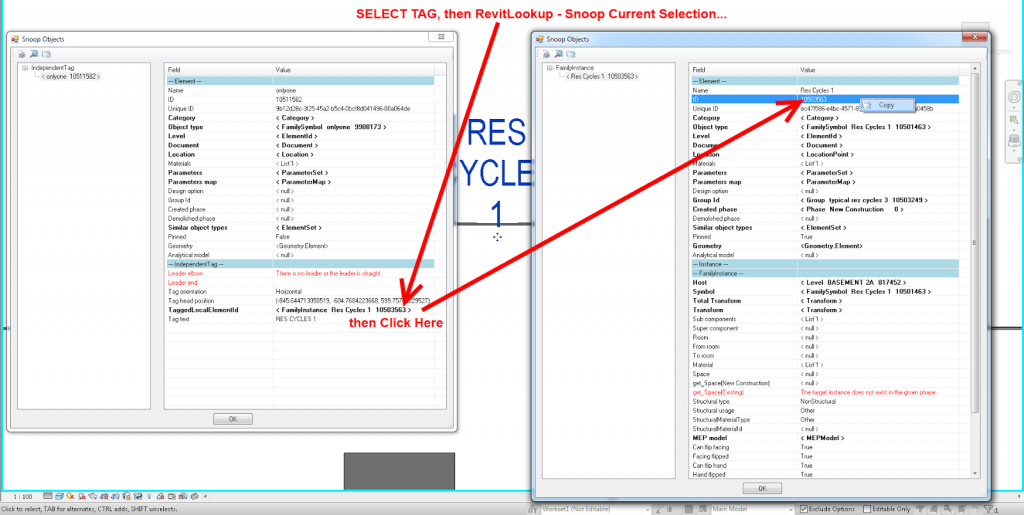
What Revit Wants

Use RevitLookup, like this:
Using Schedules, you can usually use Highlight in Model to find an element (or group of elements) from a schedule row.
However, this does not work if the element is hidden in the only view that it is instantiated in – for example, a single Generic Annotation entry in a Note Block (Schedule). Revit will not be able to find the element.
One workaround – interestingly, selecting a Schedule row actually selects the object/s in Revit, but at least in my configuration (Properties Palette on second monitor), it does not show the Properties in the Palette for that object while the Schedule view is active. However, you can:
Another workaround:
Some cool ideas from the June 2011 issue of AUGIWorld, article entitled ‘Revit, in a Database’ by Paul Crickard:
Once a Revit model has been exported to a database, the things
that can now be done with it are limited only by your imagination.
Build web-based or stand-alone front ends to access and modify
your model—without knowledge of the Revit API. Bring existing
data into a database and join it with the Revit model.
In this article he discusses some of the potential connections between MS Access and MS Excel, and the benefits of such interoperability.
I have posted numerous times about how to view the Revit database using various methods. To start with, perhaps you would be interested in this post:
What Revit Wants: HOW-TO View the Revit Database (2011 Secret #14)
And, yeah, I twisted the title of this post a little bit 🙂
As a follow up to my previous post (Exposing the Revit Database), I will now explain how to install and use the RvtMgdDbg add-in for Revit, which allows you to “Snoop” the Revit database.
What does RvtMgdDbg really stand for? ‘Rvt stands for Revit, Mgd for Managed, and Dbg for Debug.’
It is most commonly used by programmers in the Revit API. You may find it useful, however, in just understanding the structure of the database. You can also use it to find information that otherwise may be very difficult to obtain.
How do you get this RvtMgdDbg, and how do you make it work?
It’s not too difficult:
EAClassName?=RvtMgdDbg.App
EAAssembly?=C:RVTMGDDBGRvtMgdDbg.dllThere you go! Close and save the Revit.ini file.Now, to try it out…
Or, to browse most of the Revit database at once:

You can now browse around and learn how the database is put together.Keep in mind that there may be issues and bugs with this method. For instance, on one version of RvtMgdDbg that I was using, it seemed to cause Revit to prompt me to Save Coordinates (on a project with linked Revit models using shared coordinates) – even though I had not moved the linked models.So, be careful! You might want to use this on ‘test’ projects to start with. If you want to remove this add-in, simply reverse steps 15 and 14 in the first list (remove the lines you added to Revit.ini and reduce the EACount= value by 1).Feel free to comment or contact me if you have any problems or questions related to the above method.If you are really interested in the Revit API, head over to http://usa.autodesk.com/adsk/servlet/index?siteID=123112&id=2484975 and check out some of the material on that page.