Let’s face it, sometimes Shared Coordinates can be a pain. Issues may arise when trying to make small adjustments to very large numbers, and that comes up in other places in Revit too. In some cases, using “Specify Coordinates at a Point” has almost no effect, and you need to resort to workarounds like these.
In Revit, if we follow certain steps in a certain way we can solve these issues. It may seem a fiddly, but if you want to fix coordinates on an existing model, perhaps one of these methods will work for you.
Method 1 – Transfer Project Standards, Project Info
This transfers the ‘location’ data of a Shared Site…
On a real project, you will probably have a control model you can use in the workflow below. The control model needs to have some lines showing at the desired Project Base Point position, probably in a Linked View, as well as a SITE fixed named site that has the ‘correct’ shared coordinates.
- Open one of your models to fix
- Go to a Plan view
- Link in the COORDINATES file Origin-To-Origin
- Set Linked view – COORDINATES
- Turn on Site – Project Base Point
- Select it and ‘unclip’
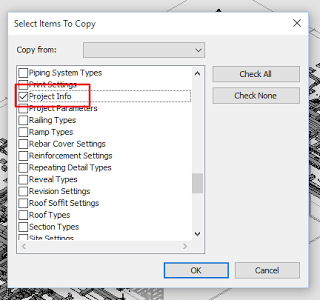
- Transfer Project Standards (from the link) – Project Info
- Choose ‘New Only’
- Go to the Location – Site dialog box
- Set the SITE fixed to ‘Make Current’
- Delete your old SITE, and rename SITE fixed to SITE (we have now replaced the shared site coordinate info with that from the control model). Now, to get a moved PBP in the right spot for the project…
- Back in Floor Plan view, slightly drag the unclipped PBP away from the two green lines (the pbp position in the control file), then move it back to exactly that point
- PBP should now be fixed
If this doesn’t work, you may try
Method 2 – neutralizing coordinates and re-Acquiring
- Select your PBP, unclip it, rightclick and “Move to Startup Location”
- Link in a new, blank RVT such as a NEUTRAL_COORDINATES.rvt and Acquire Coordinates from it (this resets coordinates)
- Save your file (your PBP should report 0,0 coordinates)
- Link in the control model PBP RVT
- Acquire coordinates from it
- Delete it (yes)
- Re-link it again (this is to get around a Revit bug, that sometimes ‘shifts’ the linked model after acquiring coordinates)
- Save your host file (shared coordinates are now set correctly, and the PBP can be moved into place as below)
- Select your PBP, unclip it, and move it to the location from the control model. You may need to set up a plan view that has PBP switched on, and view range all the way down to AHD 0.00.
Both of these methods are somewhat involved, but they may be useful to you in those situations where “nothing else works”.
