Had an interesting challenge this week – we needed to restore some 20 year old CAD files from archive.  Turns out we had no viable way to restore them from the physical tape, but we could get the old workstation going.  In this case, it was a SPARCStation 5 which runs a UNIX derivative called SunOS.  On top of that was a window manager called Open Windows 3, and it had a somewhat proprietary CAD system called Sun Eagle installed.  The main file format was a *.mod.

There were a few challenges: we didn’t know the root password, so I couldn’t modify any system settings (IP / network etc) on the workstation.  Additionally, it obviously did not have a USB port, so copying any of the data off was going to be challenging.  It did have an external SCSI drive (1gb I think) daisy chained with the 150 mb QIC tape backup drive.

I tried connecting these SCSI devices to a modern system using a PCI to SCSI card.  While I could get the basic devices to be recognized, I couldn’t get the UFS file system to mount in Linux Mint.

The solution?  As the SunOS was running Samba / smb, I needed to get LAN access to it to copy the files.  But I couldn’t change the IP or subnet… In fact, I couldn’t even run IFCONFIG (the UNIX program for setting IP etc) easily, because I wasn’t a root user.  I could copy the IFCONFIG executable to the home directory and run it in a console from there.  This gave me the current IP and subnet.

Then, I connected my netbook running Linux Mint to a network switch, and connected the SPARC system to the switch also.  I manually edited the IP for the LAN adapter on the Linux system to match the same IP range and subnet – and the shared folders from the SunOS workstation appeared almost instantly.  I could then copy the project files from the old system to the Linux one.

Happily, someone had already converted this particular project to DXF and DWG files on the SPARCstation, so the end result?  Success!

Here is the system:

And my ad hoc network to copy the files:
Had a pretty persistent error which wouldn’t allow Recap to install SP1.  In hindsight, it was probably related to the error at this post:
http://upandready.typepad.com/up_and_ready/2013/07/autodesk-recap-10-error-installing-sp-1.html

Basically, the program thinks it needs an update when really it doesn’t, and you might have to do a registry edit to fix it.

If you want to know more about MSP files generally:
http://msiworld.blogspot.com.au/2008/09/installation-of-msp-file-in-silent-mode.html

http://www.windowswiki.info/2009/02/19/how-to-extract-msumspmsiexe-files-from-the-command-line/

http://www.msigeek.com/647/command-line-switches-for-msi-and-msp-installations

Also – UniExtract can be used to extract MSP files.

Links:
UniExtract Installer (5.3 MB) – This is the recommended download. The installer will automatically install the application and optionally integrate with the Windows Explorer context menu. This package does not contain source code.

UniExtract Binary Archive (4.95 MB) – This archive contains the binaries. Download this if you want portable version or just prefer not to use the installer.

EDIT:
You can also use the command line.  See below for workflow related to Autodesk 360 update 3:

  1. Download Autodesk 360 Update 3:
    http://usa.autodesk.com/getdoc/id=DL21520422
  2. Open a Windows command line:
    Click Windows Start menu  > Search > type cmd and press Enter.
  3. Change the working directory to the folder where you downloaded Autodesk 360 Update 3.
    Example: cd c:a360u3
  4. Run the following command to extract the msp file:
    c:a360u3> Autodesk360_x64_Release_update3.exe /e a360u3.msp
  5. Install Update 3:
    c:a360u3> msiexec /update a360u3.msp /passive /norestart

Let’s say you get half way through extracting a very large (like 15gb) archive and for some reason the extraction fails.  For example, the BDSP 2013 media I downloaded had one RPC file corrupt, and the Adesk extractor failed to push through that problem.

7-zip is not only more robust, you can also “resume” a failed extraction attempt by using some switches:
-aos (skips files already there)
-y (prompts yes to every question)

The whole command looks something like this:
7z x {archive_name_and_path} -o{target dir} -aos -y

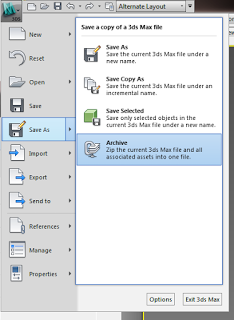
  1. File – Save As – Archive
  2. This will make ZIP with all the resources.
  3. If you want to view them all in one folder, use 7-Zip, Extract Files… with no pathnames (this will put all the files in one folder)

If you have exported a file from Revit to 3ds Max Design (perhaps using Suite Workflows), this is a good way to capture all the texture and material resources that are needed and put them in one easy-to-use location.

This may allow you to export more easily to other formats and use the associated bitmaps in those other formats (like OBJ or similar).

I actually don’t need to transmit RVT files too often (yet).  However, I often want to archive a ‘snapshot’ of all the data associated with a project.  eTransmit for Revit makes this possible – and relatively easy.  I recently used it to archive a project, and the resulting folder contained 235 files!

Obviously, you need to be on Subscription to download.  Here are the links:

eTransmit for Autodesk Revit 2012 Extension 2012-05-31

eTransmit for Autodesk Revit 2013 Extension 2012-05-10

One interesting error that I came across was:
A file with the same name but a different path has already been transmitted.

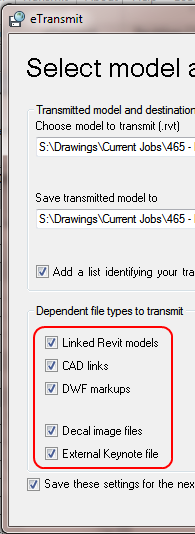
Here are items eTransmit currently includes:

PS – I remember how excited I was when I first saw eTransmit for AutoCAD!  I’m not that old, am I?