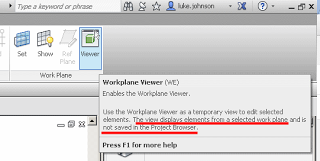
Have you ever used the Workplane Viewer?  It looks like this:

When you open it, a new window opens and orients itself to the current workplane.  This window is the Workplane Viewer.

Revit Wants you to be understand workplanes, and to host things on correct workplanes in the model.  Virtually the entire model in Revit is built up on a series of 2D planes.  Additionally, being comfortable working in 3D views is an important Revit and BIM skill.  This is why you should use the Workplane Viewer…

A few impressive things about the Workplane Viewer:

  • Can be put on a secondary monitor and it remains open
  • It respects the Section Box of the currently active 3D view
  • Auto zooms to the extent of proper sketch elements when in a Sketch Mode
  • Keeps itself oriented to the current and correct workplane
  • It reports the currently set workplane in text form in the bar at the top of the window
  • Triggering Zoom Extents will affect both the current view and the Workplane Viewer
Interestingly, if a horizontal workplane is set (which is typically the case) and you are working in 3D, the Workplane Viewer will be giving you a Top View of the current 3D view – quite useful really.
The extent to which you can edit elements in the Workplane Viewer is dependant on the mode you are currently in.  Sketch modes allow you to edit sketch lines in the Viewer.  Editing a Family In-place allows you to select and modify extrusions.
It is a bit strange that the Workplane Viewer itself actually allows you to Orbit and use the Viewcube (meaning that you are no longer perpendicular to the current workplane.)  To fix this, go to a normal view and use the Set Workplane tool – the Workplane Viewer should now be back in sync with the current workplane.
In some respects, it is like the Replicate Window command, but the Workplane Viewer has a bit more intelligence when it comes to planes, and it is allowed to live on a secondary monitor.
Link to help:
Editing with the Workplane Viewer – WikiHelp

I recently viewed the class All In the Family: Creating Parametric Components In
Autodesk® Revit® (Matt Dillon) AB4013
, on AU Virtual.

It was a class targeted at users with Intermediate expertise.

I learned this:
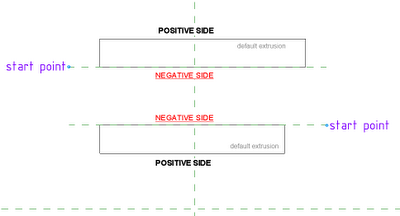
The Left hand side of a Reference Plane is the ‘positive’ + side.  The ‘handedness’ of the plane is derived from start and end points of plane (the start point of the reference plane is the first point you click when drawing a new reference plane).

When you set a particular workplane as active, and use the default positive extrusion depth, the extrusion will be created on the positive side of the plane.

I have attempted to display this effect in the image below:


I’m sure this has been described elsewhere, but it was a eye-opener for me!

***applause*** (as I finish listening…)

I really enjoyed listening in to a Webcast through the New York City Revit User Group. Its the morning for me here in Australia, and it was a refreshing start to the day. Thanks to David Fano from Case Design, Inc (DesignReForm.net) for sharing his knowledge.

I was also quite excited to hear my name (Luke Johnson) credited for a tip on how to Orient View to a Plane…would you like to know how to do it? Like this:

  1. Shift + W to show the Steering Wheel
  2. Right-click on the Wheel and select ‘Orient to a Plane…’
  3. Select the Plane you want to Orient to.

No doubt this is something I learnt from a blog or from AUGI or somewhere…I recommend you check out the New York City Revit User Group and listen in on their next webcast.