You have received one of the Autodesk Suites, installed it, and you want to use the USB key for some other purpose.
It is not immediately obvious that this is possible. There is some very decent write protection in play here – you can’t delete the partitions in Windows or Linux, you can’t format in Safe Mode, you can’t even use low level format tools or the HP USB Format tool.
You have to go deeper. Continue at your own risk… (below the bars)
NOTE: When reading the Comments, you may have to press “load more” at the very end of the page to see the most recent ones.
EDIT 12
Recent anonymous comment refers to a pin mod that may save bricked drives, screenshot included here:
From the comments:
- MPALL_F1_7F00_DL17_v363_0C / Phison MPALL v3.63.0C-DL17
- Start it, put your usb stick into your USB 3.0 port.
- Click update, then settings.
- Choose advance settings and load the ini file, the same that Mike created.
- Click save, and ok on a pop-up window.
- Close settings window by clicking on “x”.
- Click start, the process lasts for about a minute and it’s doneWARNINGSThere is some evidence of newer drives being bricked.
Some things you shouldn’t do:
- Do not use the formatter.zip on the latest 2014 version TOSHIBA USB 3.0 with the 2251-03
- Do not try to force a certain BIN file onto the drives firmware using MPALL
EDIT 10 – 2014 drives
Solved by Mike in the comments. He also provides a link to download the proper version, at:
https://docs.google.com/file/d/0BwZ-eoAYLKKAMnpnQi1hbnpVSUk/edit?usp=sharing
Mike’s steps:
I used Phison MPALL v3.63.00.. not the 3.63.0C or the 3.63.0c-DL17
Plug into a usb3.0 port.. this is critical. YOU MUST USE USB3
Copy the contents between the ===== to a new file named 2014_2251-03.ini
===========================================
[PenDriveMP]
IC Type=PS2251-03
[Parameter Mark]
Parameter Type=F1_MP_21
[Customize Info]
USB VID=0x0930
USB PID=0x1400
String Product Name=USB DISK 3.0
String Manufacturer Name=TOSHIBA
Inquiry Version=PMAP
Use30Fixture=1
IDBlkLibrary_Version=1.2.16.0
[Configuration]
Reset Serial Number=0
[TestItemOption]
Do Preformat Test=1
[Extra]
Mode=3
[Misc]
Volume Label=USB DISK
Burner Erase All=1
Wafer Erase All=1
set1667=0x00
[Advance]
FC1=0xFF
FC2=0x01
CheckLegacy=1
[Firmware]
ISP=0
===========================================
Open MPALL_F1_0702_V363_00.exe
Click Update
Click Setting, select “Advanced Setting” then press OK
Click the load button and select the 2014_2251-03.ini file you created earlier.
Click Save, press OK
close the settings window
Click Start…
EDIT 9 – 3 step process for 2013
This may seem a bit long winded, but I think it might be a good way for 2013 media kit:
- Run MPALL 363 c (as per settings below) (make sure its revision C)
- Run Silicon Power Formatter
- Format using Windows
You can try this process in MPALL (step 1 above):
Recieved Brand New USB’s For Autodesk Design Suite 2013 Premium
IC version 2251-67
This is how i reformatted them
Download MPALL_F1_9000_v363_00 and MPALL_F1_9000_v363_0C
Run Getinfo
open MPALL_F1_9000_v363_00
Click Update
In Advanced settings
set Controller to PS2251-67 and FC1-FC2 to 01
In Firmware tick ‘Do ISP’ ‘Erase Code Block’ and ‘Auto ISP’
In Partition Seeting Tab
Set Number of Partition to 1
Save and Press Start
This will Fail
Close MPALL_F1_9000_v363_00
run getinfo in MPALL_F1_9000_v363_0C folder
and open MPALL_F1_9000_v363_0C
Update again
go into advanced settings
set Controller to PS2251-62 and FC1-FC2 to 01
Untick all boxes in firmware
In Flash Settings Tab Check
Auto Detect
Preformat
Erase Flash
In Partition Setting Tab
set ‘No of Partitions to 1’
save and press start
IC Type=PS2251-67
[Parameter Mark]
Parameter Type=F1_MP_21
[Customize Info]
USB VID=0x13FE
USB PID=0x4100
String Product Name=USB DISK 2.0
Inquiry Version=PMAP
[Configuration]
Reset Serial Number=0
AutoFirmware=1
[TestItemOption]
Do Preformat Test=1
[Extra]
Mode=3
[Misc]
Volume Label=USB DISK
Burner Erase All=1
Wafer Erase All=1
set1667=0x00
[Advance]
FC1=0xFF
FC2=0x01
[Firmware]
ISP=1
EDIT 7 – For PS2251-67 (From Ryan Ruta in the Comments)
I found a solution for the latest drive that I received with the PS2251-67 Controller.
1. Download the file from this link… http://www.silicon-power.com/UFD_Recover_Tool/UFD_Recover_Tool.rar and extract it to your drive.
2. Plug in your USB drive.
3. Run the format tool from the download.
4. Unplug your USB drive and plug it back in.
5. Format the drive using the Windows format tool (or other tool of your choice) as NTFS.
EDIT – 5 From the comments, for DaneElec zMate USB 32 GB:
Inside my USB Drive (also named DaneElec zMate USB 32 GB) I found a controller SM3254Q AE, produced by SMI. I used smi_mptool_v2.03.34_v7_j1118_3254ae and now it works.
The software I downloaded from site: http://tagievara.narod.ru/pages/programs/flash/smi.html
Direct URL: http://depositfiles.com/files/acu0018d9
1. Run sm32Xtest.exe.
2. Press “Scan USB” button.
3. Press “Start” button.
After few minutes the device is ready to use.
EDIT 6 – for Autodesk Product Design Suite Ultimate 2013
The installation USB flash memory (key, dongle) used for distribution of Autodesk Design Suites is a read-only device and cannot be overwritten or formatted with standard methods.
If you want to “misuse” this USB memory to store your data you can “hack” it with internal reformatting, make it a standard R/W device.
E.g. Autodesk Product Design Suite Ultimate 2013 uses the USB key of the type “DaneElec zMate Aero” (blue) – see Dane-Elec – with the controller SM3254Q AE.
To overwrite this USB key you can use the utility SMI ReFixInfo. This tool can be downloaded here (file MI_ReFixInfo_1_0_0_1.7z).
Start the downloaded EXE and click “Reset Write Protect”, W.P select Un-Write Protect. Then click Start.
Be warned! Make sure you have a backup copy of your original installation files. This procedure may lead to a damage of your USB key and is completely unsupported.
(by P.Hrazdil)
via CAD Forum – How to re-format the Autodesk instalation USB key?
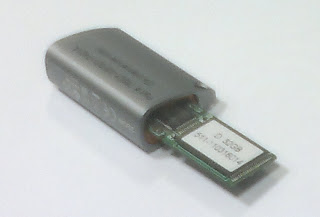
I dismantled a spare USB key that we had received for Building Design Suite Premium. This wasn’t such an easy thing to do…but hopefully you won’t have to, now that I have done it for you!
I already knew that it was ostensibly a Toshiba flash drive, code PA3708, 32 gb (have a look on the case of yours, see if it is the same).
However, what I really needed to know was the IC, or controller chip brand / make / model. Dismantling the key told me it was a:
PHISON 2251-60-5
Ok, from here I found this page, which led me to download the Phison MPALL utility bundle. You will need to download it too:
Phison_MPALL_v3.20.0B
Read on below the bars…
Also, if you’re looking for a flash drive or an external drive, try looking here with coupons
EDIT-1 You may be able to find updated versions of MPALL via Google Search. I am unsure what the copyright / usage license situation is with this program (deleted some links).
EDIT-4 You may want to try Formatter first – Craig at iRevit has hosted the Formatter.zip and tested it (May 2012)
From here, it was a bit of trial and error. This is how you do it:
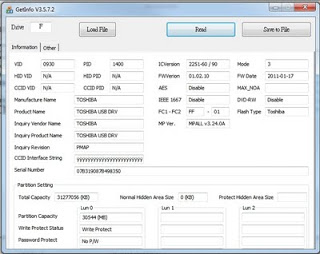
- First of all, open GetInfo.exe
Put in your drive letter and click ‘Read’. You should be able to get an output that looks something like this:
- Next, open MPALL_F1_9000_v320_0B.exe
- Click ‘Update’. Your drive should show up here.
- Click ‘Setting’
- Choose ‘Advanced Setting’ and ‘New Setting’ and OK.
- The controller that I had to choose was the PS2251-90 (which is a bit weird, because the chip said it was a 2251-60, but that didn’t work). So, anyway, here are the settings I chose:
- Controller = PS2251-90
- FC1-FC2 = 01
- Go to next tab – Flash Setting
- I think leave the defaults but tick the ‘Erase Flash’
- Next tab – Partition Setting
- No. of partition = 1
- Choose ‘Removable Disk’
- And once you are done, click ‘Save’
- Then you should be able to click ‘Start’ and away you go! You should see some formatting happen, then you will have to remove the drive and plug it in again…then you should have a nice 32 gb USB drive to use.
EDIT: For the 16 gb USB, try using -60 controller setting.
Note – the settings are saved in the MP.INI file. Here is what my MP.INI file looked like:
[PenDriveMP]
IC Type=PS2251-90
[Parameter Mark]
Parameter Type=F1_MP_21
[Customize Info]
USB VID=0x13FE
USB PID=0x3D00
String Product Name=USB DISK 2.0
Inquiry Version=PMAP
[Configuration]
Reset Serial Number=0
[TestItemOption]
Do Preformat Test=1
[Extra]
Mode=3
[Misc]
Volume Label=USB DISK
Burner Erase All=1
Wafer Erase All=1
set1667=0x00
[Advance]
Tick=0
FC1=0xFF
FC2=0x01
[Firmware]
ISP=0
You can check and see if yours looks similar, or even load these settings and try them.
PLEASE NOTE THAT THIS PROCEDURE MAY COMPLETELY BRICK OR DESTROY YOUR USB DRIVE. Make sure you have a backup of the software if you are going to attempt this.
So, how did you go? Do you feel pretty good about yourself? Really, that USB key would eventually become redundant, so we are making an environmentally wise choice by recycling it, aren’t we?


thanks for this tip.
worked like a charm.
@jrostar Jason Rostar
@dsmeade Need a new 32gb USB Drive? http://bit.ly/j4Z5Vl – Just did it to one of our extras and works GREAT!
21 Jun via TweetDeck
@BIMfacts Brian Myers
This works, how to format an Autodesk Suite flash drive to be your personal 32GB flash drive. http://t.co/hmR0dV8 (Just back it up first.)
via Twitter
@Tyrael17 Alex
How to Format Autodesk USB, goo.gl/SrGCr
via Twitter
Any insight into the 16gb settings?
I posted a new version of the utility
Phison MPALL v3.29.0B
Added support for:
PS2251-01
PS2251-61
PS2251-73
PS2251-83
http://tagievara.narod.ru/pages/programs/flash/phison.html
choosing the -60 works for the 16gb.
Here is something a bit weird – after copying the Autodesk data from the supposedly 32 gb drive, Windows Explorer reports the properties of the copied data Size on Disk at 38.0 gb! Why is this? Something to do with the allocation or sector size?
Anyway, I compressed the copied data using some pretty decent settings on 7-zip and got it down to 15.7 gb…
Yeah Me too… but running GetInfo.exe doesn't work, so I am kinda stuck.
Worked on Autodesk Product Design Suite Ultimate and Product Design Suite Premium 32GB USB Keys 🙂
Worked for me too! 🙂
Worked for me like a charm for Product Design Suite Ultimate, IC version 2251-50 . Thanks for this tip
Thanks a lot, it work very well
Amazing …. worked without any glitches.
Merci beaucoup cela à fonctionné pour nous !!
Nous somme Français !!
Translation:
Thank you very much it worked for us!
We are French!
Thank you. Worked great.
Thanks so much. It worked perfectly on the first try. I didn't want to just have this USB drive collecting dust in our office for all eternity. I searched and searched for generic help with this and nothing else worked. Cheers!
It worked with the 32 GB USB drive for me too.
I also have a 64 GB USB drive from the Product Design Suite Ultimate. Anyone know which one to use then?
Did you use GetInfo to determine the IC version?
Worked Great Fanks
Thanks from Germany.
Thanks from the Czech Republic … you are awesome … GREAT JOB!!!
Hey! Thank you so much!
Amazing tutorial, works 100% here
32Gb Suite P.
Great job!
Couldn't get it to work but not sure why. I tried most of the IC settings and none of them worked. I'm doing the 32 GB just like everyone else
Spino – Did you use GetInfo to determine the IC version?
Thanks for sharing! Worked great!
IC verison 2251-38
FWVerin 02.08.20
MPALL v3.29.00 MPALL v3.29.00H
after the above the steps. Not if i open the pen drive, it says" Please insert a disk into drive f:"
Please help me to resolve the issue
Hello Luke, I tried again the same steps. it work awesome.. thanks again
U did a grat job of finding and describing this process. THanks 4 sharing
Too funny. I can't believe you cracked it. Thanks for the tip!
Cheers! Worked fine when i waited long enough for it to complete 🙂 Infrastructure Design Suite Standard – 16G.
IC Version: 2251-38
FWVersion: 02.08.20
Here are MP.ini settings that worked for me:
[PenDriveMP]
IC Type=PS2251-60
[Parameter Mark]
Parameter Type=F1_MP_21
[Customize Info]
USB VID=0x13FE
USB PID=0x3D00
String Product Name=USB DISK 2.0
Inquiry Version=PMAP
[Configuration]
Reset Serial Number=0
File System 1=2
[TestItemOption]
Do Preformat Test=1
[Extra]
Mode=3
[Misc]
Volume Label=USB DISK
Burner Erase All=1
Wafer Erase All=1
set1667=0x00
[Advance]
FC1=0xFF
FC2=0x01
[Firmware]
ISP=0
It's a 16 GB Stick from a Building Design Suite Standard 2012 with the ICVersion 2251-50 / 30.
I tested it with the ICVersion 2251-50, -30, -38, -60, -90 Versions. But I couldn't get it to work.
"Preformat….BuiltPartition…Format File System Error, returned 0x5020"
Can u help me? THX! 🙂
You could try the MP.ini settings posted above?
You could also try a different version of the Phison MPALL software to see if that works?
Worked Awesome took 5 minutes!
Thanks!!!!!! My IC read said xxxx-50/30 I entered the "-50" selection and it worked a charm!
thanks man worked great
Thanks a lot : it works perfectly
Thank´s a lot, it work´s fine:-)
New Version
v3.23.00v3.32.0Cv3.33.0C
in v3.32.0C ISP for UP21 (PS2261)
On a desktop computer we got an error saying "Lock drive volume". After that we tried it on my laptop and it worked fine.
Thanks a lot.
MPALL 3.32.0C didn't work
MPALL 3.33.0 was no longer available due to copyright.
Finall MPALL 3.20.0B worked.
THX a lot from Germany
Life is waaaay too short for this, stick it in the drawer of forgotten objects and nick your mates USB stick I say …. mwhahahaha!
Grettings from Sweden!!
God Jul & Gott Nytt År
Mine too. Thanks all…
IC Version: 2251-38
FWVersion: 02.08.20
[PenDriveMP]
IC Type=PS2251-60
[Parameter Mark]
Parameter Type=F1_MP_21
[Customize Info]
USB VID=0x13FE
USB PID=0x3D00
String Product Name=USB DISK 2.0
Inquiry Version=PMAP
[Configuration]
Reset Serial Number=0
File System 1=2
[TestItemOption]
Do Preformat Test=1
[Extra]
Mode=3
[Misc]
Volume Label=USB DISK
Burner Erase All=1
Wafer Erase All=1
set1667=0x00
[Advance]
FC1=0xFF
FC2=0x01
[Firmware]
ISP=0
Yesssss It's work very fine
Thank
Tried the latest Phison_MPALL_v3.33.0C but, even though it accurately showed my PS2251-50/30 in the drop down list, it didn't work.
So resorted to the MPALL_V3.20.0B as in the original blog and worked perfectly.
Damo
London
Worked exactly as stated. Thanks so much for this helpful walkthrough!
hi this worked great and thanks
but could you please share how you managed to dismantle the key as i want to house it in Lego and i need to remove the case and i cant see how to do it
Thanks again
I basically had to deform the amber end cap and then force the internal circuit board out this opening.
ok thanks for that
v3.29.0B worked for 32gb in Jan 2012.