Read Marcello’s whole post at:
Simply Complex: Applying IK in the Revit Classical Family Editor (one application… Folding Doors)
or watch his video:
What Revit Wants

Read Marcello’s whole post at:
Simply Complex: Applying IK in the Revit Classical Family Editor (one application… Folding Doors)
or watch his video:
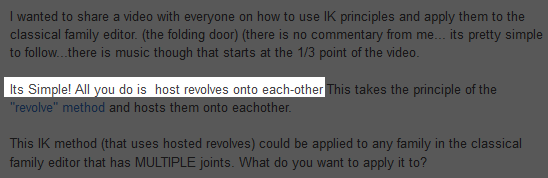
Dave Light gives the very concise version:
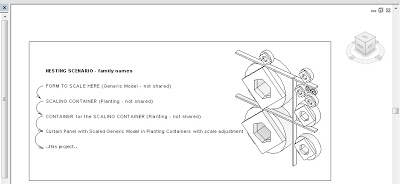
So as others have shown, I have various nested generic model families, dropped them into a plant family template. This family is then nested into another plant family. This is then placed into a project. Using the height parameter in the family, changing this, scales the family.
via
Revit : Scaling families – #empirebim
In brilliant form, he then describes how you can use an instance reporting parameter in a Curtain Wall Panel family to drive the Height value in a nested Planting family, making a Curtain Panel that can scale its nested geometry to any panel size.
To save you some time and trouble, I have created a template for this scenario. Basically, it is a Revit project file that contains the Curtain Wall Panel family with the fully nested setup already in place. I also added a Scale Override type parameter in the Curtain Panel family that allows you to globally adjust the scale of the resident geometry.
Download the project and family files here
(the project RVT is Family Scaling Template – GM to Planting to Planting to Curtain Wall Panel.rvt)

Note: using a shared Generic Model family will not work (it breaks the automatic scaling ability of Planting families)
EDIT:
Looks like original credit actually goes to Kelvin Tam.
Original credit for this general idea goes to Marcello (I think), and partly to Dave. It is definitely one of those hacks that is getting re-interpreted and expanded upon as it gets blogged and reblogged…
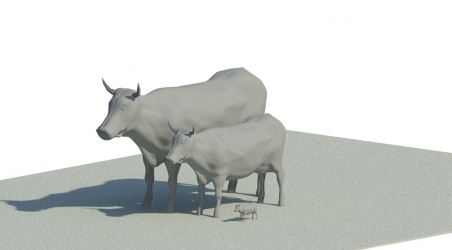
Some quotes from Making Breakthroughs in Revit: An Interview with Marcello Sgambelluri (the cow and elephant guy 🙂
“I realized … that Revit is much more than a program to be used to document buildings and I started my pursuit to push Revit to its limits so I could better myself.
Refocusing Phase: This is when I realize that there has to be a different way of doing something to achieve the end goal. I find a way.
there is nothing that motivates me more than when I hear the words “You cannot do that in Revit.”
My engineering training has helped me to step back and look at my Revit problems in a new light.
I am working on how to use the site modeling tools to model complex shapes… (*)
If you don’t know how to do something in Revit, try it. Remember it’s only a program—you can’t hurt it!
Get to know Revit and its environment. (**)
I realized that the only way I could achieve breakthroughs in Revit was to change my mindset about the program. “
Read more:
Making Breakthroughs in Revit: An Interview with Marcello Sgambelluri | AUGI
(*)
For my take on this, check out Using meshmixer to morph your Revit Topography
(**)
This goes hand-in-hand with the theme of this blog – finding out What Revit Wants. For further reading on this, check out The Revit Mind and What Revit Wants
 |
| Image from AUGI, by Marcello |
via AUGIWorld September 2011, page 36:
However, there is a phenomenon in Revit whereas if you
“join” any two solids together, they result in a new entity, the edges
of which are “pickable.” To illustrate this method, let’s create a sac-
rificial wall at the same location as the wall shown in Figure 9. Join
the wall and the roof surface. Notice that the roof surface now has
new edges where the wall profile line is located.
http://www.augi.com/images/uploads/augiworld_issues/AW201109_lr.pdf
Thanks for this article Marcello!
If you are interested in Marcello’s blog, you can check it out by clicking on the image below: