Here is the problem:

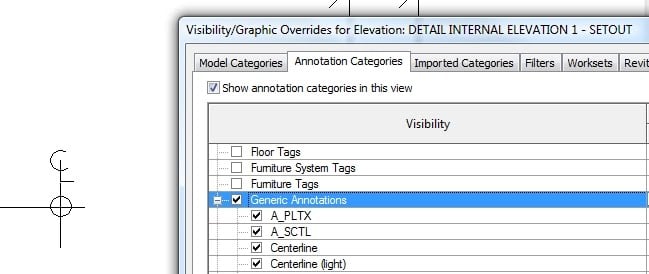
An elevation crop region is not visible. It cannot be turned on using any of Visibility/Graphics settings. The problem is not anything to do with the ‘Show Crop Region’ switch. There are no Filters applied. Using the ‘Reveal Hidden Elements’ lightbulb, uncropping the view and then selecting all visible elements DOES NOT select the Crop Region (when you filter the selection, the Crop Region shows up as ‘Other’).

So, what do you think? Where is this Crop Region?

I noticed that there were Design Options present in the project. However, there are NO Properties with regard to Design Options while in the Elevation view (Properties Palette), OR while selecting the ‘Elevation Head’ in a Plan View.

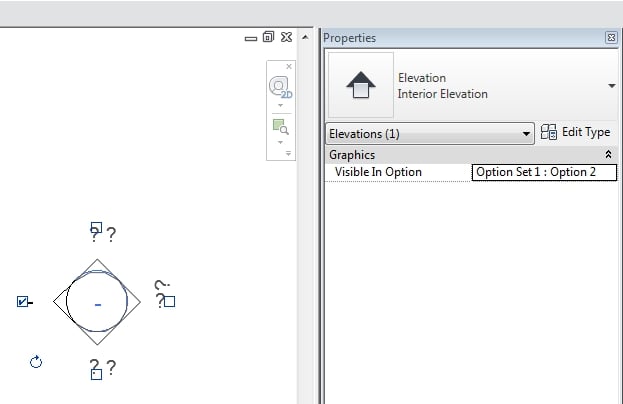
However…selecting the Elevation circle (or square) itself yields ONE property – ‘Visible in Option’. Yay, we have found the problem!


This problem can also be diagnosed by attempting to add the Elevation Head to another Design Option – the following error results:


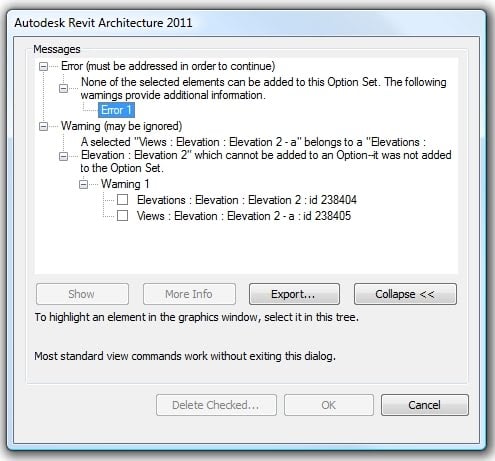
This shows how Revit views Elevations in a somewhat ‘cascading fashion’ – ie. Elevation (circle) as a parent of the actual Elevation (head).

Yet another example proving that it pays to know What Revit Wants.

Let’s say you have isolated a few categories, and you have included Dimensions so that they are still visible.

However, your dimensions are no longer showing the Centerline symbol text – do you know why?

It is because this item is on a different category to dimensions themselves. In my case, I had to turn on the ‘Generic Annotation’ category in order to show this text.

This is the first post in a new series for this blog, called RATAS Solutions. What is RATAS, and why should you make sure you read every one of these posts? Well, RATAS is what you say when ‘Revit Appears To Act Strangely’. Try it out, while you are sitting there…”RATAS” (pronounced rat-ass…feels good, doesn’t it? Now, whenever you are getting annoyed, and Revit seems to be acting strangely, what do you say? “RATAS”, that’s what!

RATAS Problem #1
File-A.rvt is linked into File-B.rvt. In File-A, you have created a new Phase Filter called ‘Custom Phase Filter 1’. You have mapped phases from File-A to File-B (using the Type properties of the link File-B). When you apply ‘Custom Phase Filter 1’ to a view in File-A, the File-B link does not obey the filter (for example, demolished items are still shown, even though they should not exist in this phase). You check and you have definitely set the File-B Visibility/Graphics to ‘By Host View’. So, you change the Phase Filter to ‘Show Complete’ and everything works! What is happening? RATAS!

RATAS Solution #1
Revit understands the Custom Phase Filter 1 for the Host View (in File-A). However, when Revit attempts to apply this Phase Filter to the File-B link, something breaks. File-B doesn’t have a definition for Custom Phase Filter 1 present. When you change to ‘Show Complete’, it works, because File-B DOES have a definition for this Phase Filter present.

The Solution? Open File-B, and create a new Phase Filter with the same name (Custom Phase Filter 1) and properties as the Phase Filter in File-A. Save and Reload…and the problem is fixed!

Now, I put a lot of thought into naming RATAS – because while Revit often ‘appears’ to act strangely, usually it has good reason to act the way it does. Thus, we get back to the same advice I have given before – you need to try to understand What Revit Wants, so that you can solve these kinds of problems yourself.