At Virtual Built, we typically create a federated Revit model for every project we work on. This allows us to run a host of automated processes on the links, right from the federated file.
Recently we received a dataset for a high rise building. The Architect had used 5 typical linked ‘module’ files, copied throughout a master file.
Initially, I used a Dynamo script to collect all the link instances into a saved selection set. I could then copy / paste aligned the link instances into our federated Revit model:

The Problem
This works fine, but in this models there were also nested consultant links inside the Architectural linked modules. So we have:
Architectural container file -> Architectural module files -> Consultant nested links
We want:
Federated Central file -> Everything else (no nested links)
Next challenge: how can we quickly promote those nested links into our federated model? Well, we currently have the module files populated, so how can we leverage those positions to promote the nested links?
Promoting Nested Links
It is a bit hacky, but here is how I went about it. For each module file:
- Create an empty proxy file (New Revit project, no template)
- Open the Module file and resolve all link paths (so they are loaded)
- Set links to Attachment
- Copy / paste the link Instances from the module file (Level 0 or Base Level) into the empty file (Level 1, default level). You can use Dynamo graph above.
- Save the new proxy file as ‘ModuleContainer’ or similar. We know have a file that only has link instances in it.
- Open a detached copy of the Federated Central file (you can save as temporary copy if you like)
- Manage Links
- Select the current Module file,
- Reload From,
- replace with the ModuleContainer you created. Once you have done all the modules, you are ready for binding as described below.
After populating the detached Federated Central file, we just need to Bind and then Copy / Paste the free instances:
- After load, Bind the ModuleContainer files to the detached Federated Central model
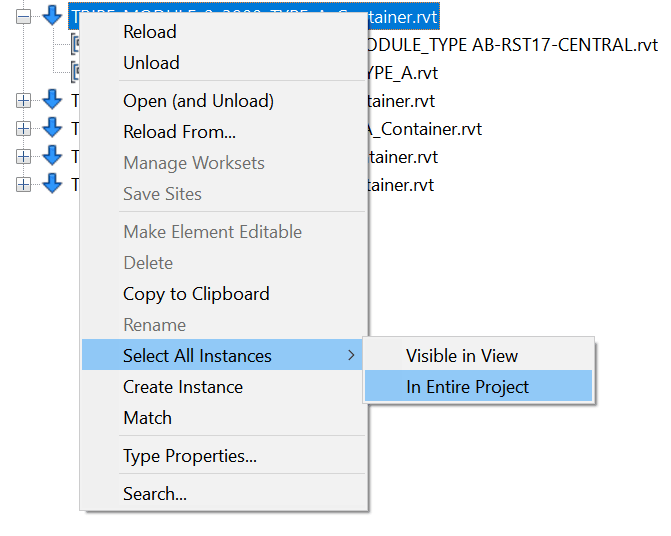
- To do this, right-click on the file in Revit Links in Project Browser

- Select All Instances – In Entire Project
- In the Ribbon, click Bind Link
- Untick Attached Details, Levels, Grids
- Click Remove Link when prompted
- Your nested links are now promoted!
- To do this, right-click on the file in Revit Links in Project Browser
- Optional: Ungroup all of those bound free instances (select all from Project Browser, Ungroup in Ribbon)
- Open the real Federated Central file
- Copy / paste the populated free instances from the detached Federated Model to the real Federated Model. Use the Dynamo script to collect them.
Tip: Paste into a closed workset for better performance. - Close the detached one, and sync the real one
The only thing we technically ‘broke’ or lost in this process is the module link->nested link relationship. So if someone decides to move one of the nested links in the module link, obviously that won’t replicate into the Federated Central file.
Hope this helps some of you out there building or dealing with large federated models.

