What is the Revit Mindset? Great question! I have been telling everyone I taught Revit to for years that it’s the ability to clear your mind of any preconceived “knowledge” or “understanding” of Revit and then layout a plan of attack before even beginning a project. You could spend an entire day simply planning out your direction and needs for the project. I assure you it will payoff in the days, weeks, or months to come.

quote from Adam Thomas at:
The Revit Mindset | ArchDesignLabs:

I personally agree with the concept of ‘planning out your direction and needs’ – it can make a big difference to give it some thought before getting too stuck into a Revit project.

“It boils down to this – bad habits easily translate between CAD and BIM packages – and the tools and models are only as good as the information you put into it. IT’s like saying the car made me drive home drunk, ’cause I didn’t know any other way to get home…”

The MEP CAD Engineer: Interesting article on a BIM failure:

I know I don’t need to say this again…but Revit WANTS you to put good information into it.

“It is the biggest project the firm has ever undertaken. There was very little planning with respect to file configuration; as a result, the project has now endured two model splits. We don’t want to do this again.”

(emphasis added)
From Huntington Beach, Here We Come

But isn’t that really at the heart of BIM? We push the limits, get beat up a little along the way, and then come out tougher than ever!

And…what Revit wants is for you to break up models that are huge.

There was time spent changing a design that didn’t need to happen, all because of an unwillingness to accept that something might be different than what we know.

And in BIM, everything is. You have to be willing to get outside the box – do things differently – ask questions – be humble, but be motivated…to learn, to change your ways. It doesn’t matter if you’re a newly graduated intern or a 40 year engineer. The day you stop learning is the day you need to retire, so don’t be afraid to challenge yourself.

From The MEP CAD Engineer: What drives a successful BIM project…?

Revit Fox recently re-posted about the 6 Phases of Revit.  Ultimate credit for this apparently goes to Chris Zoog.

It is “perhaps the most re-posted Revit resource in history!”
http://seilercadsupport.wordpress.com/2010/12/11/the-6-phases-of-a-revit-user/

One of the oldest blog posts I found about it was at REVITit http://revitit.com/blog/?page_id=207

I am trying to find the ‘original’ post document to link to it – anyone have any idea where the ‘oldest’ ‘in the wild’ version of this exists?

In harmony with the title of this blog, I thought the description of the final phase was worth re-stating (yet again, I know…)  Here it is:

You have mastered nearly all things Revit. You “know” what Revit “likes”, and what it “dislikes” during model construction, a sixth sense, really. You spend your time exploring and tweaking advanced scheduling, OBDC, external parameters, AR3. You have a template to beat all templates, families for every situation.

Copyright 2003 Chris Zoog

To know What Revit Wants is indeed to “know” what Revit “likes”, and what it “dislikes”…a sixth sense, really.

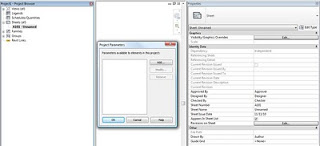
So you have added a bunch of Shared Parameters to your Project, but you never bother to set the ‘Group Parameter under:’ property correctly…you are naughty, aren’t you?

It can make using Revit a lot easier if you Group Parameters properly – its what revit wants you to do.

How do you do it?  Quite simply:

  1. Manage – Project Parameters
  2. Select Parameter – Modify
  3. Change ‘Group Parameter under:’ property to something more appropriate.
  4. OK, OK etc
Here is a quick video on how to do it:
Annoyingly, you can’t change the grouping of parameters that are ‘built in’ to Revit.  It annoys me that ‘Drawn By’ is not grouped with Checked By, Approved By and Designed By on the Sheet Parameters:
If you know how to fix this, please comment!
Here are some of my most popular posts from the last 2 years:

How to use the new Keyboard Shortcuts Dialog and Tips

Make a Good…Impression Workflow (simple guide from Revit)

Unpredictable Properties Box Behaviour

How to add symbols to Schedules and Text in Revit

How to Print a large set of drawings to individual PDFs with automatic naming

Windows 7 and Vista ‘God Mode’ – very powerful

I hope you enjoy these links.

I will periodically do a ‘Top Posts’ post for your convenience.

Here is the problem:

An elevation crop region is not visible. It cannot be turned on using any of Visibility/Graphics settings. The problem is not anything to do with the ‘Show Crop Region’ switch. There are no Filters applied. Using the ‘Reveal Hidden Elements’ lightbulb, uncropping the view and then selecting all visible elements DOES NOT select the Crop Region (when you filter the selection, the Crop Region shows up as ‘Other’).

So, what do you think? Where is this Crop Region?

I noticed that there were Design Options present in the project. However, there are NO Properties with regard to Design Options while in the Elevation view (Properties Palette), OR while selecting the ‘Elevation Head’ in a Plan View.

However…selecting the Elevation circle (or square) itself yields ONE property – ‘Visible in Option’. Yay, we have found the problem!


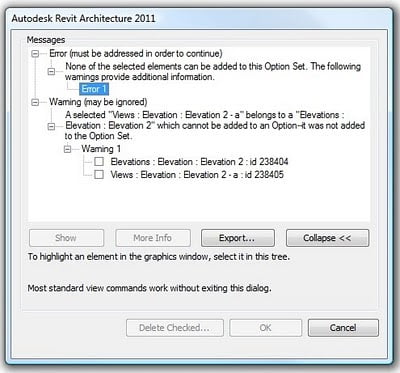
This problem can also be diagnosed by attempting to add the Elevation Head to another Design Option – the following error results:


This shows how Revit views Elevations in a somewhat ‘cascading fashion’ – ie. Elevation (circle) as a parent of the actual Elevation (head).

Yet another example proving that it pays to know What Revit Wants.