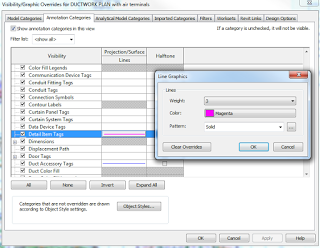
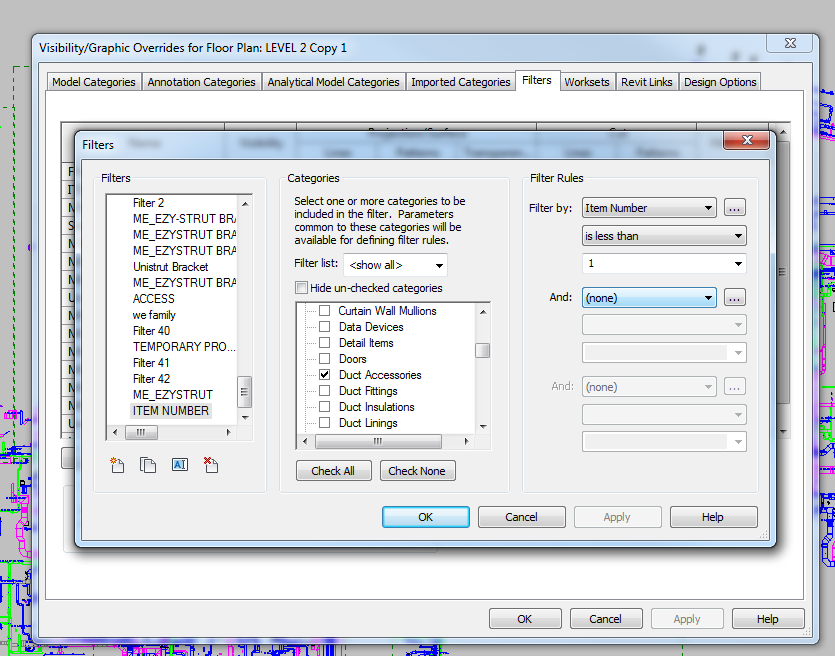
Did you know you can override the lineweights and colors of a Generic Annotation or Tag and its Leaders in Revit? You can use Visibility / Graphics annotation tab like this:

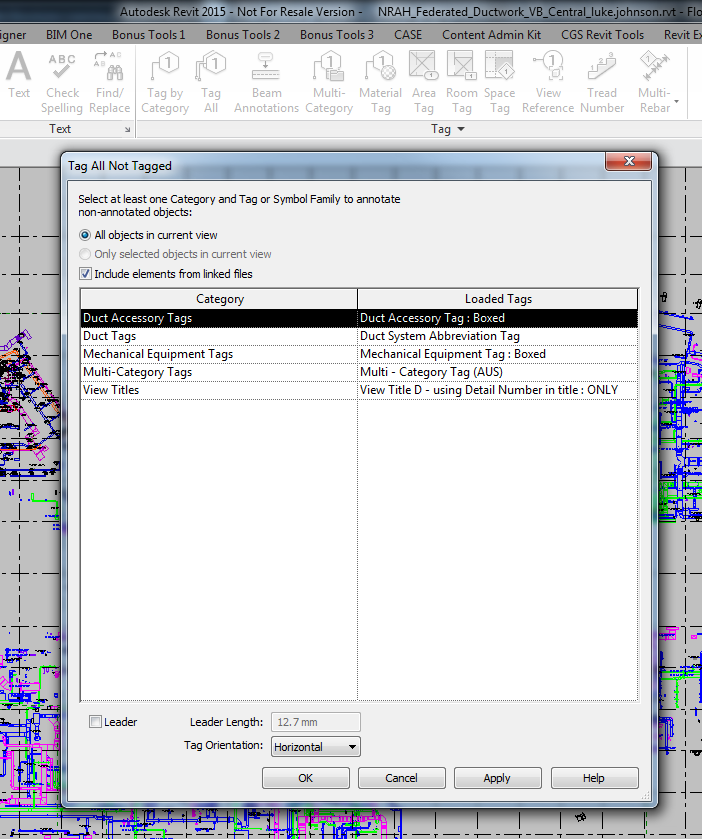
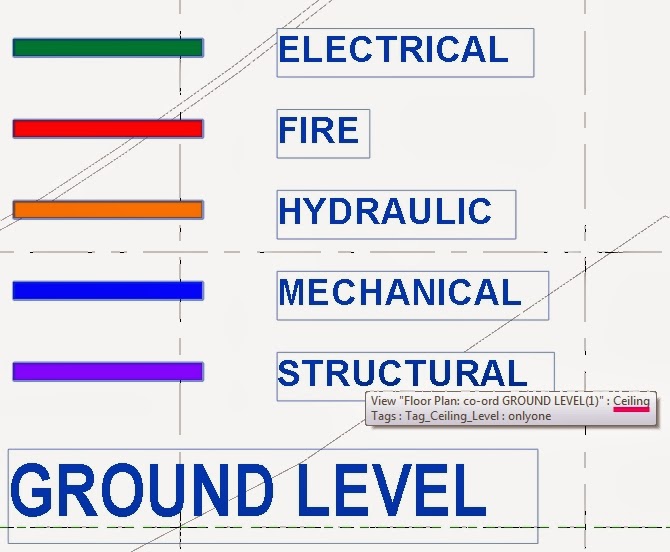
But what if you have two Tags that are of the same category, say Detail Item Tags, but you want to override them differently? You can’t use a normal model-based filter, as these generally do not act on annotations. However, you can use a selection-based filter…

Just:

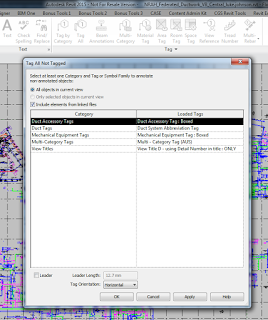
  1. Ensure you are using a unique Type of Tag, then right-click, Select All Instances, In Entire Project
  2. Save Selection, and choose an obvious name
  3. Go to your view filters (in the relevant View Template if necessary) and add the Filter you named in step 2
  4. You can now freely override those Tag elements separately to any existing overrides

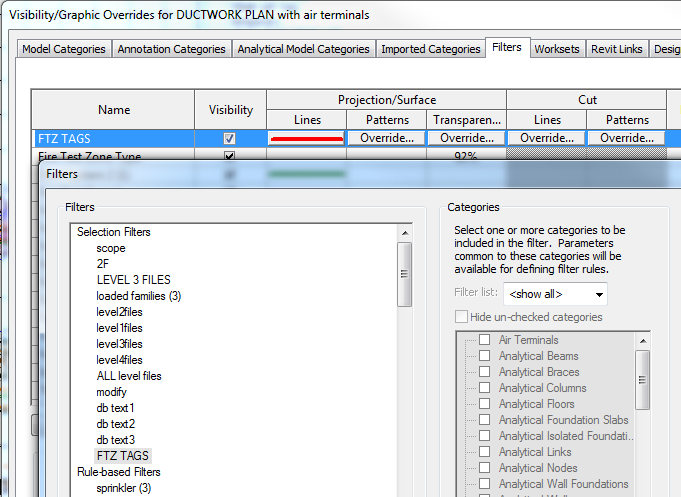
Now, keep in mind that you need to manually update this selection-based filter. You might make it part of your printing workflow to do steps 1 and 2 above immediately prior to printing, thus updating the saved selection set to be in line with the current status of your model.

Let’s say you want to tag Duct Accessories in a linked Revit model. That’s easy, because Revit can Tag All… Linked Elements by Category. Just tick the box in the dialog below:

But what if you only want to Tag certain Duct Accessories, like those that actually have a value in a given parameter? What we need to do is limit the view to only showing what you want to tag, and then run the Tag All Not Tagged command as above.

Here’s how:

  1. Duplicate the view you are working in
  2. Hide all unnecessary Links
  3. Use View Filters to hide the elements you don’t need, by using the parameter you actually want, something like this:
  4. After you have hidden off these elements, run the Tag All command in this view
  5. Select all of those new tags (right-click on one of them, Select All Instances – Visible in View)
  6. Copy
  7. Switch back to the original view and Paste Aligned to Current View

So What does Revit Want? For you to think about how it works, and then use it accordingly. In this case, we realised “hey, Revit tags only what it sees…” Then, we can develop the workflow above to solve the problem.

    Heads-up from Ideate Solutions, originally from Revit Clinic:
    tagging the physical wires instead of tagging the device:

    1. draw wires coming off of each connector as small as possible 
    2. (if the wire is short enough, the arrow head will not show up.) You can then 
    3. hide the dot/short line of the wire in the symbology of the family and 
    4. tag it.

    via
    Ideate Solutions: Revit MEP FAQ – Tagging Families That Have Multiple Connectors

    Konrad has posted a video along with Dynamo nodes to demonstrate the management of tags based on their host type. Fire rated walls receive a certain tag, while non-fire rated receive a different one.

    This is just one example showing that Dynamo isn’t just good for form creation. It has a legitimate role among the Python / Ruby / vanilla macro / API addin realm of Revit modification and customization.

    Downloads at:
    Revit/Dynamo | archi-lab

    Original post:
    Managing Family Types with Dynamo | archi-lab

    From Mark Wieringa in comments on my previous post:
    Hi Luke,
    There’s a quick workaround for your problem. You’re able to hack tags for certain categories to show the Level that the elements have been created on.
    What you need to do is open a ceiling tag, then make the label for Level. Copyclip the label and delete the original, then change the category to for instance floors and pasteclip.The label will still refer to the Level parameter and will report it for categories that have the parameter available.

    Greetings
    Mark Wieringa

    Great tip!  As proof of concept, please see files for download at:
    https://drive.google.com/file/d/0B1dGdRkpk2beVVZNSGU4UlRrcE0/edit?usp=sharing

    It is one of the few tags that can directly access the Level parameter – quite useful, even to the point where I created secondary Design Option called Level Tagger with a bit of Ceiling on it, and then use a Ceiling “Level” Tag to give me the Level in given views.

    Using Copy – Paste Aligned to Selected Levels for the bit of Ceiling, and

    Copy – Paste Aligned to Selected Views for the Ceiling “Level” tag.

    The secondary Design Option is only turned on when I want to use this particular tag, meaning that the Ceilings are typically hidden.

    Oh, you can also tag normal Ceilings with Ceiling Tags 🙂

    Another method of tagging the Level parameter is using the Case Param to Param tool:

    1. Add a Text SP in the Project (shared parameter) to the Category for which you want to tag the Level property (ie. Floors)
    2. Use Param to Param to copy the Level parameter of Floors to the SP you added in step 1
    3. Add that SP to a Floor tag to tag the “Level”
    The obvious problem – this is not a live link.  Also, it doesn’t work too well with Grouped Floor elements.

    You can’t simply use a Floor Tag to tag the thickness of a Floor in Revit…

    However, you can:
    Convert the Floor to a Part, and use a Parts Tag

    Parts tags can natively report thickness of the Part.

    EDIT There is another method that comes via Kym Vdz on Facebook, it refers to this post on RFO (you will need to login to download).  I haven’t looked into this deeply yet, but it seems to basically use a Floor-based family with a shared Reporting parameter to pass the Floor Thickness into a nested Generic Annotation… there is always many ways to solve a problem in Revit!

    Julien writes “you should try this family….hope you like it. it reports the slab thickness. just place it on a floor.

    credits to: Revitez!: Utiliser les paramètres de rapport pour coter l’épaisseur d’une dalle dans un plan d’étage

    Attached Files Attached Files

    EDIT: This seems to be broken in 2014 at this point.  Even if you have it working in 2013, when you open in 2014 it will “break”.  I’m unsure if there is a good workaround yet…

    Absolutely awesome workaround from Dave Light!  He shows how to use an instance Shared Parameter to pass Keynote value via a Family formula to allow the tagging of Window Mark and Keynote in the same tag.  Read the whole post here.

    On a wider level, this method shows that you can formulaically reference System parameters (built in family parameters) and pass their value to a Shared Parameter to allowing tagging.

    1. Turn the Underlay on for the Level that shows the items you want to Tag
    2. Tag the Item/s
    3. Use Linework tool on the items that you have tagged.  This is important – if you don’t do this, then the Tag will disappear when you turn the Underlay off.  *However*, you can use the Linework tool with Invisible Lines (if you don’t want to see them) – this will still force the element to be considered by Revit when it determines if it should keep the Tag visible or not.
    4. Turn the Underlay off
    5. Your items are still Tagged!
    Interestingly, if you use the Linework tool again, this time with By Category on the lines you previous selected, then the Tag will immediately disappear (Revit is no longer considering the object when drawing the view).