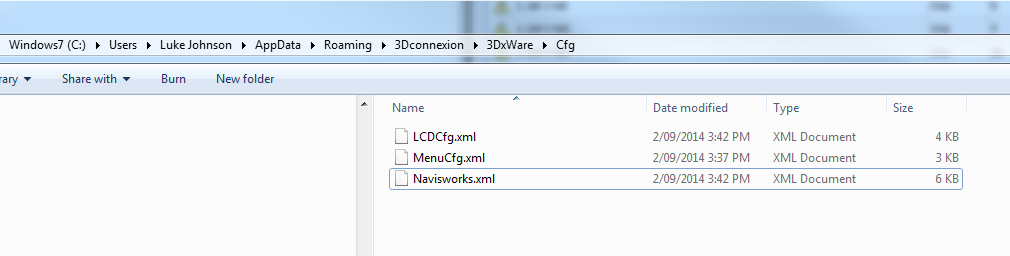
If you use a 3Dconnexion mouse with Navisworks, and you have installed the latest drivers (which I highly recommend), you may struggle to find out how to map a Spacebar to a button on your Spacemouse. Obviously, in Navis it is important to be able to hold down the Space key for selection purposes. If you try to record a macro for Spacebar in the 3Dconnexion management menu, you will find that it has both a ‘press’ and ‘release’ action.
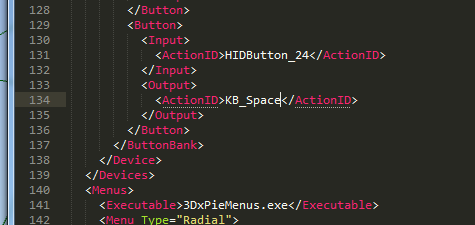
You need to use the Keyboard list to map a key press correctly. However, Spacebar does not appear in the default menu… Happily, you can directly modify your profile XML to map the KB_Space action to a button on your 3d mouse. The images below show where to find this file, and how to edit it:
This method will fix the ‘press and release’ nature of macros, meaning you can “hold” the 3d mouse button for a Spacebar or Shift+Spacebar multiselection in Navisworks.
Revit Keyboard Shortcuts don’t work too well in Schedules, because Revit thinks you are trying to input data.
However, you can use the alternative key entry method – basically, it starts by pressing Alt, then following the onscreen text options that show up.
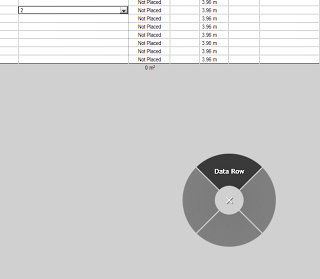
In some cases, this will be all you need. But I wanted to make a quick way to Insert Data Row in a Room Schedule, and unfortunately it is buried under a drop down list on the contextual ribbon.
Here is part of the solution – add the Insert dropdown to the Quick Access Toolbar. Now, when you press Alt, Revit will assign a shortcut to that position. In my case, to trigger the insert data row command, I had to press this key sequence: Alt 0 2 downarrow downarrow downarrow Enter
So, still a pain. But what if we could assign this as a macro to some smart shortcut system. That’s where the new Radial Menus on the SpacePilot Pro come in. I created the above key sequence and added it to a Radial Menu. Now I just press a button on my 3D mouse, select the Data Row shortcut that I created, and there it is…
There are at least three reasons why this is a great product:
the new driver package, which provides an onscreen display for the quick selection of shortcuts using the SpaceMouse Wireless. They call it the “Radial Menu”. You can customize the Radial Menu to take the place of traditional keyboard shortcuts (but there is a still definitely a place for the higher end pro devices, as you cannot use “multi-selecting” keyboard modifiers like Ctrl or Shift (which you can find on SMP / SPP) via the radial menus as you can’t “hold” them on the radial menu while navigating with the cap)
wireless tech combined with 6 degrees of freedom for 3D editing
the competitive price point (more accessible to many users than the SpacePilot Pro)
According to the release notes, 3DxWare64: includes all x64 (64-bit) Windows driver and plug-in software for all currently supported 3D except SpacePilot Pro.
Note: if the above underlining was too subtle, you can download and use this new driver package and get the “Radial Menu” with your current 3Dconnexion device!
Just had a great meeting with Andy Parnell-Hopkinson of 3Dconnexion GmbH.
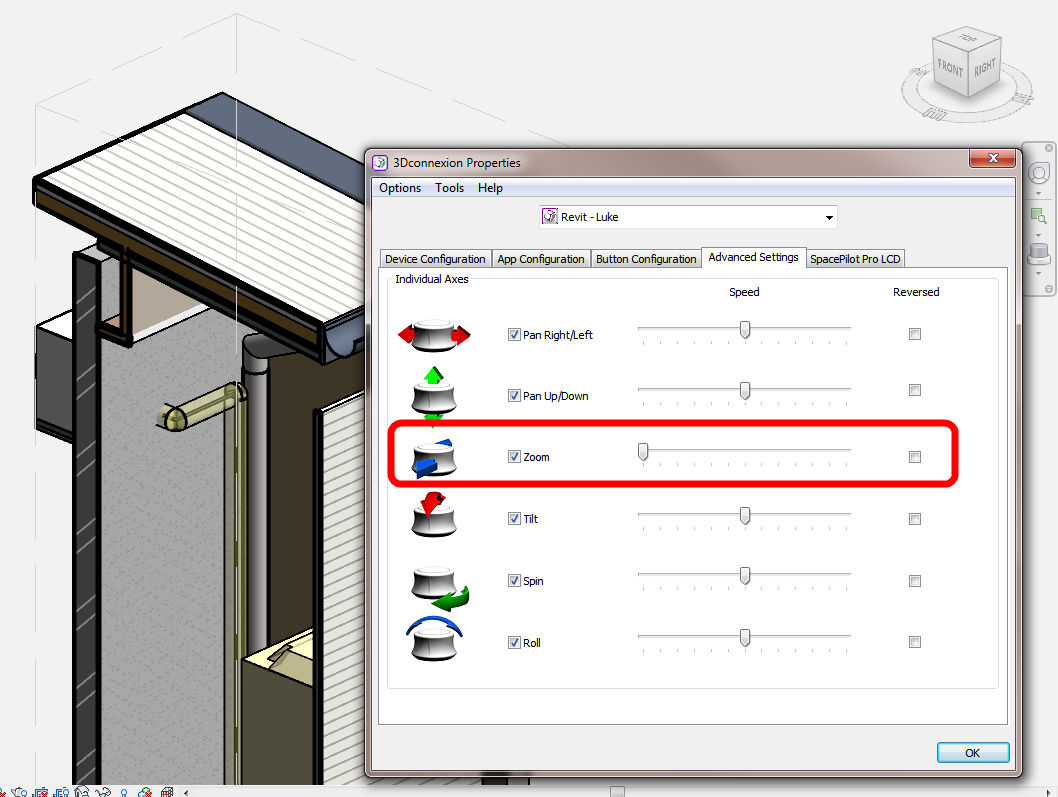
In the course of our discussion, Andy solved a problem that had bothered me with the SPP – how to use Fly mode in a 3D orthographic view (the option is greyed out). The solution is so easy, just reverse a few axis:
By reversing these axis, the Fly mode is basically simulated – instead of moving the objects toward you when pulling back on the SPP, it pushes them away etc.
As you know, 3D orthographic views are probably the most useful view for modelling in Revit, so this tip should make some of you very happy 🙂
Model aggregation – either from pure Revit or from a mixture of 3D software
Clash Detection
Programme Visualization (timelining)
Some great things about Navisworks:
it is very fast to navigate around the model in 3D, and files are generally lightweight
you can easily switch between Orthographic and Perspective (its funny the things that impress you as a Revit user…)
SpacePilot Pro integration works very smoothly, even better than Revit (probably because the models are lightweight, so the SPP isn’t fighting your system specs to redraw things, as in Revit)
Note: this article based on using Navisworks Manage 2013, Service Pack 2 (10.2.0.91043) on Windows XP 64-bit.
Key things to keep in mind when exporting or opening Revit files for use in Navisworks:
Firstly, it seems most people recommend using the Revit add-in to export a Navisworks NWC from a dedicated Revit 3D view (rather than opening the RVT direct from Navisworks). This way, you can have some certainty about the export result (the correct Design Option is exported etc)
If you have Shared Coordinates set up and working between your various Revit models, things will be a lot simpler. There is an option in the exporter where you can specify that it uses Shared Coordinates. If you are working with a set of RVTs where shared coordinates were never properly set up, you may need to pick a particular RVT and publish coordinates to all related RVTs in the set. This may become tricky if there is no site / main host file and you have to play around by cascading coordinates into all related RVTs… you get the idea.
Some things that will help you:
Press F2 anywhere to rename
Navisworks has a Project Browser (View – Windows – Project Browser). You can append a 2D DWF containing drawing sheets, and view these sheets in Navisworks from the Browser. You can also select objects from these imported Sheets and find them in the 3D model! (more info on this below)
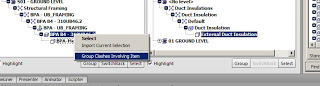
When clashing, you can group clashes related to a particular item by right-clicking on it and selecting “Group Clashes Involving Item”:
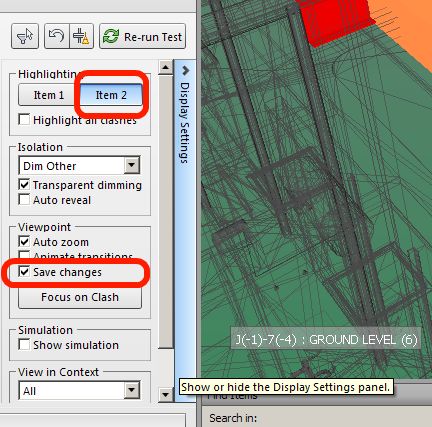
There are a few tweaks that I find useful on the Clash Detective – Display Settings panel. I only set Item 2 to be highlighted (leaving Item 1 controlled by a previously applied Appearance Profile), and set the Viewpoint to Save changes. Now, as I go through the clash list, I use my SpacePilot Pro in Fly mode to get the view looking nice, and when I switch away and back to that clash, my previous camera movement is preserved
If you do a search using the Find Comments tool, but don’t enter any search critera, you will be presented with a detailed history of your interaction with the project – very helpful
How to re-path NWC file links (basically just close NWF, slightly rename, open NWF, dialog will walk you through it): Revit .NWC files not updating
Here’s an idea I came up with for document aggregation:
As you know, Design Review can open almost anything and save it as DWFx. And Navisworks can append / import DWFx data (append = 3D, import =2D). So you can use this to create a combined project document that has a combination of different data – images, project submissions, markup sets, meeting minutes etc.
Download Design Review install package from here (700mb).
You can also download the 2D DWF writer (printer driver) from here.
The really cool part is if you create a DWF set from the same originating application (ie. if you export DWFx from Revit) as your geometry, you may be able to select an element on the Sheet View, and find that same element in 3D (see below)
I even went so far as to make a PDF of my Clash Report, then print to 2D DWF, then import the pages back into my Navisworks set – interesting way to store Clash report snapshots huh?
Importing 2D DWF data: When trying to import a 2D DWF, don’t use the Append command (it won’t work, and will tell you it doesn’t contain 3D data). Instead, use the Import Sheets button on the Project Browser:
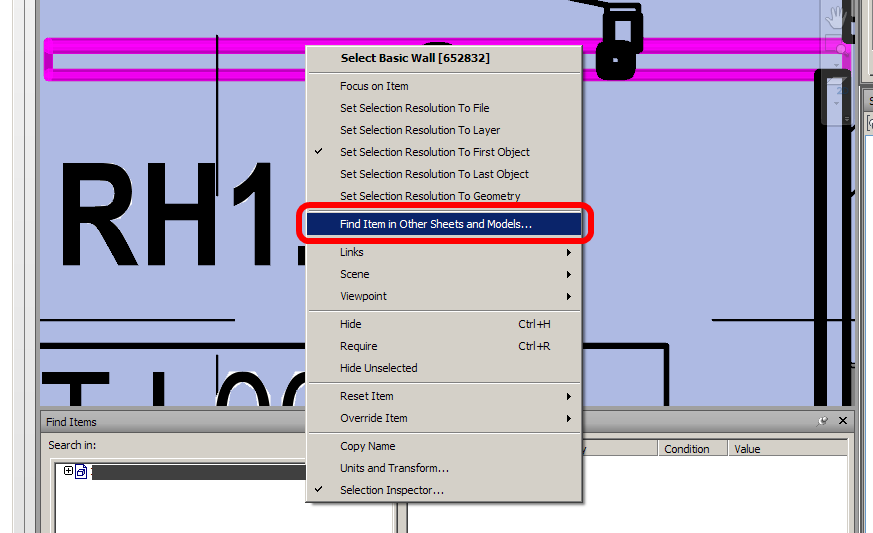
Now, you can navigate to an item on the Sheet view, right-click and Find Item in Other Sheets and Models. To make this all work properly, you should also click the Prepare All button at the bottom of this dialog…
Once you have found the item in your main NWC, click View. You can then use Focus or Zoom commands to correctly visualize the item from that particular sheet.
You can’t easily put items in folders in the Project Browser, but when you import a new DWF, it puts all of those Sheets together (adding them to the bottom of the list)
You can save multiple viewpoints for each Sheet View. If you draw redlines on one of these saved sheet viewpoints, be sure to finish the command or switch to modify to input the redline / text into the saved viewpoint.
Double-click on the toplevel NWC in the Project Browser to return to your model.
A note on Phasing:
I mistakenly assumed that Navisworks would understand if one object was demolished in a clash set, and thus ignore the clash (because at the time of New Construction, the clash would no longer exist, right?). Apparently not, so…
I created a Rule based on two Search Sets, one of Demolished items, one where the Demolished Phase was undefined. The rule type to use is “Specified Selection Sets” (pick the two sets). This effectively excluded the problematic phasing condition from the clash results – and reduced clashes from 177 to 118 in one case…
When exporting a report:
I like the Tabular HTML option. It also exports a folder with a set of larger images. You can use a PDF printer like CutePDF or Distiller to print the report from IE into a PDF, thus making it easier to transmit
After exporting a report for transmission, it might be a good idea to save the clash views into your Navisworks project, like this:
Now, using these viewpoints, you can arrange them into folders in Navisworks. When you export to DWFx, the views will be available to someone using Design Review (or Navisworks Freedom).
Keep in mind than an NWF file retains links to NWC files and updates them accordingly, while an NWD is a single container of all data in a Navisworks file at a given time (a snapshot).
Sadface – There is no Tab key for selection cycling of objects under the cursor.
Download link for the free viewer (does anyone else find it funny that Navisworks – inherently a viewing program and not a content creation tool – also has its own viewing program?): Navisworks Freedom | Free 3D Viewer Download
A kind-of workaround for the selection cycling annoyance:
@lukeyjohnson Use Selection Box and select them all, then isolate what u want in the Selection Inspection dialog box. — Chris Ehly (@cjehly) August 7, 2013
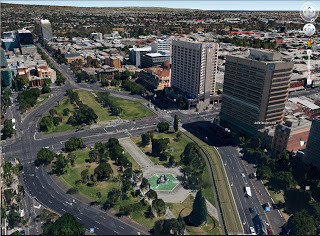
Playing with this and my SpacePilot Pro – what an a fun experience!! Basically, much of the world now seems to have 3D depth – houses have height, trees protrude up from the terrain, city CBDs are highly detailed. With the SPP, I can fly around, look in every direction. How am I supposed to get real work done when I can play Google Earth SPP Flight Sim?
After receiving and using my SpacePilot Pro, I can honestly start with a simple:
Wow.
Have you ever wondered:
Is the SPP difficult to setup and start using?
Is the SPP compatible with my modelling software of choice?
Revit and the SPP – is it worth it?
Should I buy one?
If you have, then read on…
The SpacePilot Pro is the top-of-the-range 3D navigation peripheral offered by 3Dconnexion (formed in 2001 by Logitech). Other products include the SpaceMouse Pro, SpaceExplorer, SpaceNavigator for Notebooks and the SpaceNavigator.
There are three main parts to this review – you can find them by scrolling to the big underlined headings:
The Revit Part
The Other Part
The Summary
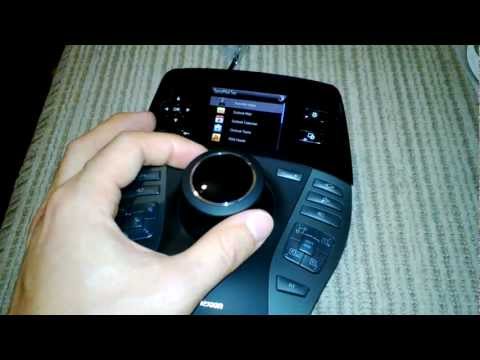
Unboxing and First Impressions
I was quite excited to unbox and start using it. I really wanted to put it through its paces properly, in multiple 3D tools and in Windows 7 in general, before passing judgement. So, I took my time… I wanted to make sure that I didn’t just fall in love with the ‘idea’ – I wanted to try it in a number of different practical scenarios.
I opened the box and had a little play with the joystick. 3Dconnexion calls it “6DoF” – it means it has six degrees of movement. X and Y panning, X and Y roll, pull Up and push Down, and Twist anticlockwise and clockwise. Here’s a short vid:
The general feel and build quality is very good. It is a heavy, solid, well built unit.
At this point, I also read the Feature Guide. The image below shows the primary functions of the device:
Connection and Setup
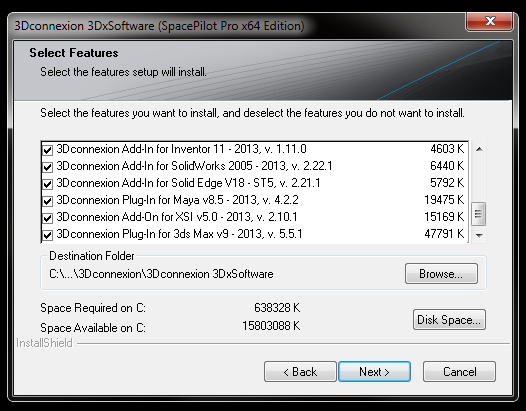
After connecting the device Windows 7 64-bit tried to find drivers on Windows Update, but, as expected, it couldn’t. So I popped in the installation CD. The Setup program prompted me to check for updates on the 3dconnexion website. The /checkupdates link that Setup opened appeared to be broken (or perhaps some incompatibility with Firefox), so I installed drivers using this page. These were the files I downloaded – drivers (3DxSoftware64SPP_v3-16-2_r1356 at 154mb) and a release notes PDF.
Once drivers were downloaded, I ran the exe. Choosing Custom allowed me to see all of the software plugins that were going to be installed, such as AutoCAD, Inventor and 3dsMax. The setup program then prompted me to install the Autodesk 3dconnexion hotfix for AutoCAD 2013. I downloaded the hotfix while the setup program continued to run. After setup was completed, I opened AutoCAD to check if I had installed SP1 already (as this was a requirement for the hotfix). SP1 was installed, so I installed the hotfix by replacing the acvmtools.crx in my AutoCAD 2013 folder.
Finally, I allowed setup to launch the proprietary 3DxWare program. Oh, and I took the plastic cover off my SPP LCD screen 🙂
First tasks
I ran the Trainer software and it was certainly an eye opener. While I could immediately see the potential and I could grasp how the device worked, I wouldn’t say that I was especially confident with it upon first use. In fact, I played the placement game and I was informed that it “wasn’t the fastest time” the game master had seen 🙂
Next, I ran the Viewer and tried the 4 different control modes using the Menu button – Object, Camera, Target Camera and Helicopter mode. I wonder which will be most useful in Revit?
I tried using Design Review at this early stage, and I struggled a little bit, but I thought “give it some time”. I have a feeling this is to do with Design Review forcing the placement of the cameras to be outside the building envelope.
Now (drumroll please), on to … The Revit Part
The device worked straight away (no configuration necessary). I was pleased to see it Pan and Zoom in 2D views (Plans, Sections, Elevations etc) very easily and intuitively. Switching to 3D, I couldn’t figure out how to Zoom. I tested the shortcuts to Top/Bottom, Front/Back, Right/Left and they all worked nicely. Sometimes I had to press Top and then Left or Right to show proper respect for gravity. I could get Iso1 to work, but Iso2 did not.
It turns out that the Zoom problem was me… I found that you had to put one finger on the side of the dial nearest the LCD, and your thumb on the other side, to effectively use the push/pull motion to zoom. It will take some practice – don’t expect to wow your colleagues if you have just bought it and plugged it in! In fact, controlling the push/pull zoom on the device may be your biggest challenge – move slowly, and feel the resistance in the device. Skip down to “Having Problems with the SPP and Revit?” to learn more.
The default shortcuts for Revit are not too bad, mainly to do with view styles (but I will talk more about customization and shortcuts later). Interestingly, a VirtualNumPad is provided, so you can enter numbers using the mouse without taking your hands off either your standard mouse or your 3D mouse.
Of the Navigation Setting Keys, the Pan and Zoom key and the Rotation key essentially toggle (you always have to have one of them on, or both). In Revit, you will commonly turn the Rotation key on and off (because you can’t really ‘Tilt’ a view in Revit anyway).
The overall Revit Experience
Using the SPP with Revit is very enjoyable. It gives you a new, tactile way to experience and visualise your building. You can really get inside the model, look around, and check things out. However, to truly increase your productivity, you are going to have to take some time: time to get used to the controls, time to set up shortcuts to your liking, time to see how the SPP reacts under different conditions.
One of the biggest limiting factors is your general computer and display hardware. If it is poor, then your experience will likely be choppy (check out the Supporting Hardware section below).
Specific Revit Tasks
I tested the SPP in the following Revit tasks:
Family creation
Conceptual massing / modelling
Building modelling
Building navigation and visualisation
Revit Tips
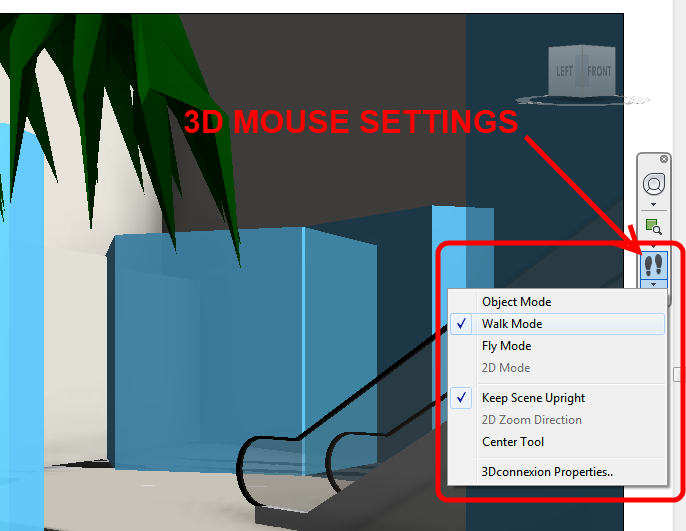
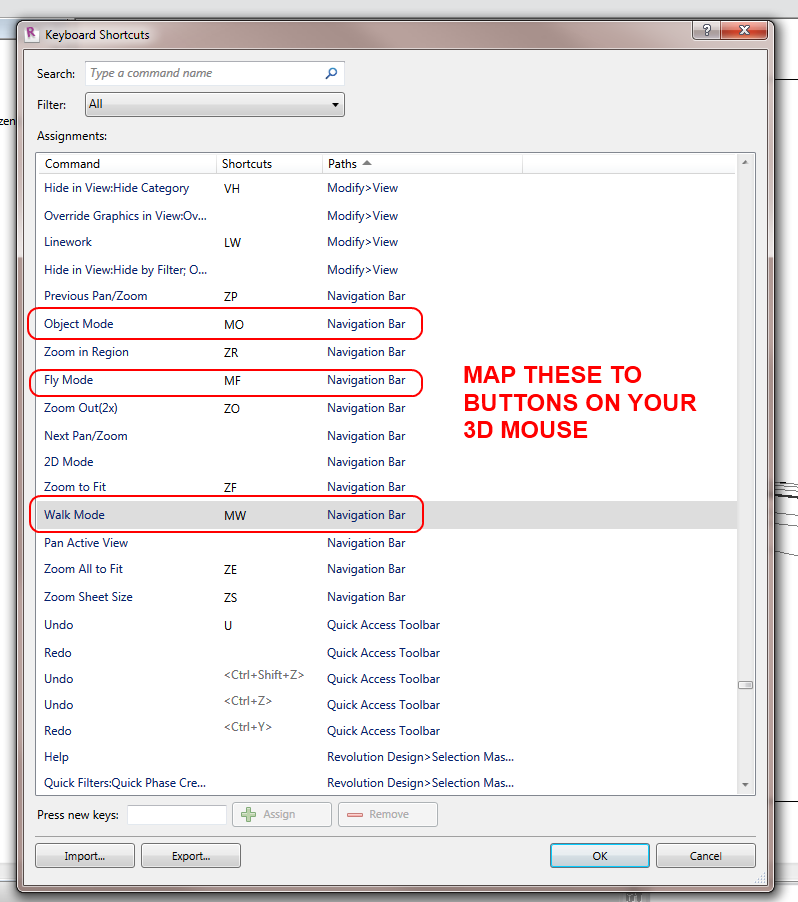
The single biggest tip is this – in Revit 2013 you can only switch between Object, Walk and Fly modes in a Perspective 3D view. And only in 3D views will you see the little 3Dconnexion gizmo in the Navigation bar, which allows you to set the mode (between Object, Walk and Fly):
You can also set shortcuts (in Revit) to these modes and map them to buttons (in the SPP utility):
When using Walk mode, I recommend that you turn Dominant Axis off (top right hand button on the SPP).
In a 3D ortho view, it will help to use a Section Box if you are working with a large site or sparse 3D objects – it can be difficult to control if the extents of the model objects are geographically distant from one another, but a Section Box mitigates this problem.
Other tips:
Use your normal mouse to select objects as you visualize your building. This will set the Pivot (centre of rotation) that the SPP will use. Otherwise, you may find your building flying off over your shoulder. Interestingly, the “pivot” in Revit get set to the selected object – but then that Pivot setting will persist even after objects are de-selected.
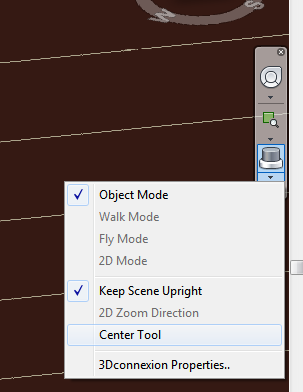
You can also use the Center Tool option to place the pivot / orbit point with a left-click of your “normal” mouse:
You should probably turn the Dominant Axis switch on, at least to start with. Its a bit more forgiving.
You can use the Esc key on the SPP to stop commands or unselect objects in Revit as you navigate the model. You can (obviously) also use Ctrl button on the SPP to select multiple objects.
Having Problems with the SPP and Revit?
If you run into trouble, there are a few steps to take:
Don’t panic!
Click the Fit button
Try the Top / Left / Right buttons
Map a button to Rezero. If things go a little wacky, hit Rezero then close and re-open the 3D view.
Use the ZoomToAwesome shortcut described below to quickly zoom the selected object
If you are struggling with the Zoom speed (like things are moving too close or too far away), then go into the SPP settings in Revit (by clicking the Menu button on the SPP), and turn the Zoom Speed all the way down, like this:
You may need to play with this setting to get it just right.
Revit Shortcuts and Customization
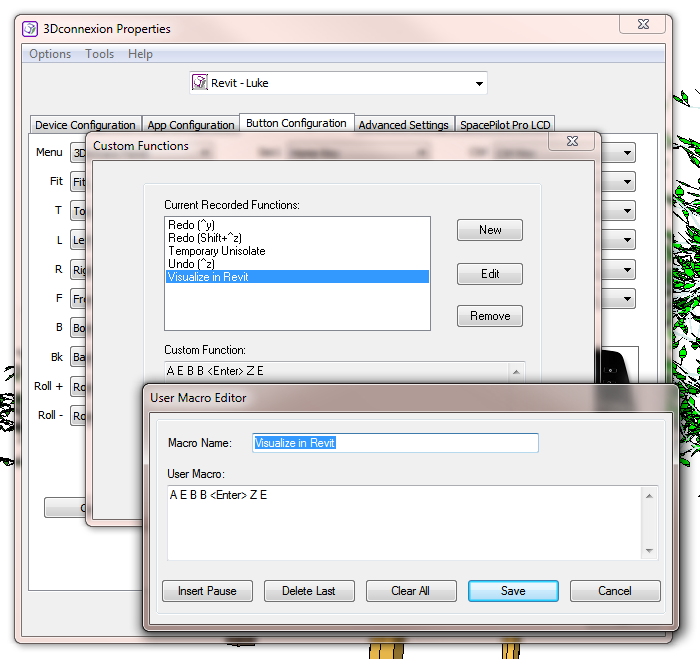
If you want to make the most of the SPP, you should use the plethora of buttons on the device to speed up common tasks. I made a few awesome shortcuts. One of these does three things with one click = Temporary Isolate – AutoSectionBox – Zoom to Fit. Simply select an object, then press one button, and all this happens! On my system, it looks like:
I also set a shortcut to remove the section box and Reset the Temporary Isolate. (Note – autosectionbox only works in 3d ortho views).
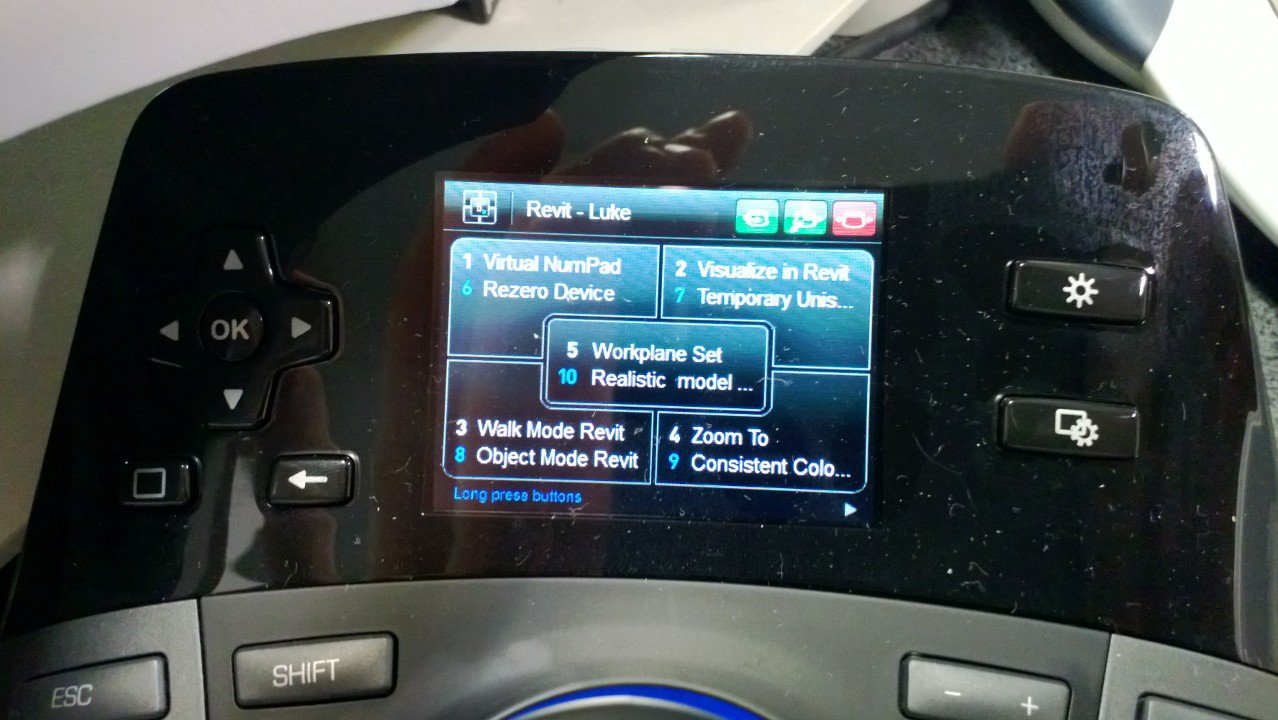
I followed the lead on Wikihelp help video and made a custom shortcut that does two things – Show Workplane, and then Set Workplane. I mapped this to the centre shortcut (number 5) on the SPP.
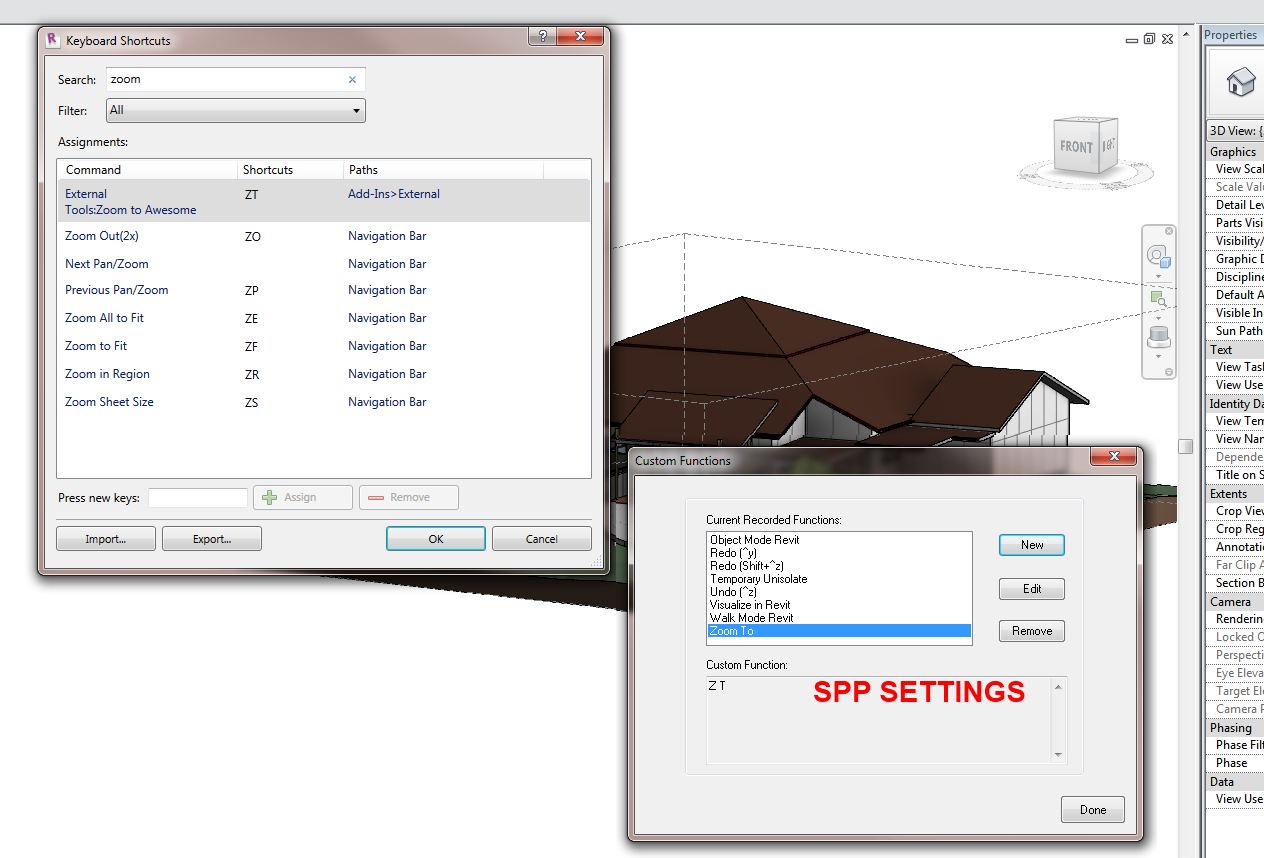
Do you remember Zoom to Awesome? Well, we can make a shortcut to Zoom To the selected object with the SPP:
I set the Alt button on the SPP to be used as a Tab press – its very close to the main dial on the SPP… and in Revit, we are always tabbing.
For prolific Revit keyboard shortcut users (like me):
Don’t forget that you can right-click your normal mouse to access a list of Recent Commands – that way you can keep your two hands on their respective mice
I had already mapped most of my keyboard shortcuts (in Revit) to be under my left hand (near the ASDF keys) on a standard keyboard. This way, its only a short ‘jump’ from the SPP to the LH side of the keyboard…(if you are right handed, that is).
My main Revit shortcuts look like this:
Revit Wishlist
My main item on the Revit wishlist would be the ability to use Walk mode in a 3D orthographic view. As most of our actual modelling work gets done in an orthographic view (primarily because Revit doesn’t let us do things in a perspective camera view), then it just makes sense for the SPP to allow the more intuitive Walk mode in ortho / isometric 3D views.
I corresponded with 3Dconnexion’s Director of Global Marketing on this issue, and he notified me that “the 3D mouse integration (in Revit) is handled by Autodesk. We can make requests but in the past it’s proven more effective for Autodesk’s actual customers to make them”. So, in some ways it is back on us (as users) to notify the Factory of what we want, perhaps by using this form and asking for Walk Mode in 3D orthographic views.
Supporting Hardware
I tested this on a PC running a Core i7 975 XE at 3.4ghz, with 12 gb of RAM – not a bad system. Initially, I tested using a Nvidia Quadro FX 580. This video card is getting a bit old now, and it showed (in fact, I generally ran it with Graphics Acceleration and Antialiasing turned off in Revit, for stability reasons). The SPP causes you to want to smoothly rotate and zoom your model in a natural, gestural fashion – but if your graphics hardware can’t keep up, the experience is a bit choppy and laggy.
Thankfully, I upgraded to a Gigabyte GTX 660Ti WF2 Edition, and it completely changed my experience with the SPP and Revit. Even with this high end card, however, I had to steer clear of Ambient Shadows and Realistic shading if I wanted to keep things smooth. Anti-aliasing was no problem…
Note on Revit 2014 and the SPP
I anticipate that day-to-day use of the SPP with Revit 2014 will be more pleasing, due to the Graphics hardware performance tweaks that are present in the new version. Things should be a bit more ‘fluid’ than in 2013…
The Other Part AutoCAD Tips
You will probably want to disable rotation when using AutoCAD for architectural purposes (plans / sections etc).
Design Review Tips
You can’t really use Walk mode in ADR 2013, but you can approximate it by using a mixture of the Full Navigation or Tour Building Wheels and your ‘standard’ mouse, and turning off Rotation on the SPP. You can now look with one mouse, and pan and zoom with the SPP. A true Walk mode would be better, however.
3ds Max Design 2013 x64
There is nice integration between the SPP and 3ds Max. Pressing the Menu button allows you to switch viewing modes easily.
Device Specifics – LCD
The LCD was initially very handy for viewing and opening emails. Just press the home button (little rectangle with gears) then use arrow keys and OK.
Weird things
I found that my PC’s keyboard or numpad would occasionally seem not to respond – it wasn’t really a big issue.
After switching between a few apps, the controller got ‘lost’. It would not function in any programs (though the LCD screen would still work). To fix this, I forcibly closed the 3dxsrv.exe process and then opened 3DxWare from the Start menu. I then had to close the 3DxWare tray application (!) and close and reopen Revit. This seems like a driver issue. This only happened once.
On another occasion, everything seemed to be ok, but nothing was happening when I moved the SPP. In this case, I closed 3DxWare from the tray, then restarted it from the Start menu, and finally closed and reopened a Revit document.
If your controller doesn’t show a blue ring, it won’t work. Unless you have turned off the LED in the settings, but why would you 🙂
Sometimes the view would ‘flip upside down’ in Revit and it was difficult to find the Top again (it seemed that even the ViewCube was flipped somehow). It looked a bit like this:
Inverted view – press FIT to fix
On one occasion, I was running in a big etransmit in another instance of Revit, and it kept stealing focus. This did not play well with the SPP.
Tested Software and Operating Systems (this list will be progressively updated)
Software that I used with the SPP: Win7 64-bit
Design Review 2013 — works ok
Revit 2013 (update 2) — see above
VEO (version 1.5.1) — did not work
meshmixer 08 — did not work
Google Earth 7.0.3.8542 — did not work
AutoCAD 2012 — works nicely
Inventor Fusion 2012 — works nicely (Object, Walk, Fly and 2D modes all available)
Hosted Revit 2014 (Citrix Receiver) — did not work (possibly a Citrix config issue)
Adobe Reader X — worked intermittently
Adobe Acrobat XI — did not work
Autodesk 3ds Max Design 2013 64-bit — works nicely
Win8 64-bit
AutoCAD Mechanical
AutoCAD Electrical
Autodesk Alias Design 2014 — works nicely
Sketchbook Designer 2014 — did not work
Most of the above results can be verified on the Supported Software page.
Note: where software is marked as did not work above, this likely means that 3Dconnexion has not yet added a plugin for that piece of software to the SPP drivers.
The Summary
In the competitive AEC, CAD and BIM fields, each individual and company needs to establish a point of difference in order to establish their reputation and prove their inherent worth. For most of us, our point of difference is our unique experience and breadth of knowledge. However, experience needs to be paired with suitable tools – in technical terms, this means good quality PC hardware, and reliable input devices.
The SpacePilot Pro can give you an edge, a competitive advantage that differentiates you from your colleagues.
What about our questions from the start of the review? Here are the answers:
Is the SPP difficult to setup and start using? No, it’s easy.
Is the SPP compatible with my modelling software of choice? Most likely, but you can check to make sure.
Revit and the SPP – is it worth it? I think so – once you have set shortcuts and become used to the device, it is an enjoyable and productive way to interact with Revit.
Should I buy one? Depends… do you want to have an edge that differentiates you from your colleagues? 🙂
Further reading 3Dconnexion 3D Mouse – WikiHelp
“Walk and Fly modes can only be used in a perspective projection (a camera view). Use Object mode to navigate an orthographic view, such as the default 3D view.”
…
In Fly mode “The orientation and height of the current view is not maintained.”
3D Mouse Navigation: A Better Way to Design So What’s It Like When You Don’t Use a 3D Mouse?
We meet some pretty passionate 3D mouse users. Sometimes, they’re even more passionate about what it’s like working without one.
“It’s like driving a stick-shift transmission for the first time,” says Jonathan Landeros. “I have to remember which keys are used for navigation, and I have to make sure to move my hand to that icon or hotkey. Without my 3D mouse, navigation isn’t quite as clean and smooth.”
So, how are you finding it?
I have a Space Navigator and find it a little sluggish with Revit projects, but Revit Family creation is pretty cool. It works really well with Inventor too. Basically, anything which is small component size.


