The Maxwell Render team are very excited to announce a brand new plugin for Revit! Revit users can now enjoy this new comfortable and timesaving workflow for editing and rendering scenes, using Maxwell Render directly from the Revit interface. Here are a few of the highlights:
Compatibility with Revit 2012 and 2013 – any edition
Support for Revit lights including IES
Support for many built-in Revit materials
Ability to override scene materials with MXM files
Maxwell Grass
Multilight read-back: changes made to lights in Multilight can be imported back into the Revit scene
Easy access to the Maxwell material gallery directly from inside the Revit UI
For full release notes and plugin user guide please refer to our support center here The Revit plugin is free to all of our customers and is available for download now from the customer gateway. If you cannot log-in or do not know your password please contact us here.
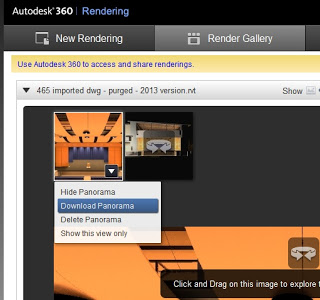
Most of you already know that 360 Cloud Rendering will allow you to create a 360 degree panoramic view directly from Revit. But did you know that you can download and view that interactive panorama offline?
In Revit 2013, Render in Cloud is on the View panel. If you have lots of 3D views it can take a while to load the first dialog.
Obviously, make sure you choose Interactive Panorama. Use ‘Advanced’ Exposure (this may allow for more flexibility later). Note: Set your DPI before choosing ‘Interactive’. Small will match the views crop dimensions.
Once you have started the Render, it can take a long time to upload the data, but you will get an email telling you when it is ready.
It will prompt you to open something – choose the panorama jpg.
Once loaded, you will be in a full-screen viewing mode. You can use your mouse to ‘look around’. Use UP and DOWN arrow keys to zoom in / out and LEFT and RIGHT arrow keys to pan.
There are many ways to present a building in context (with trees, vehicles and other entourage) in Revit 2010, but they fall into two main categories – using a Shaded view or using a Rendered view. At Dimond Architects we use both methods, depending on the project and the situation.
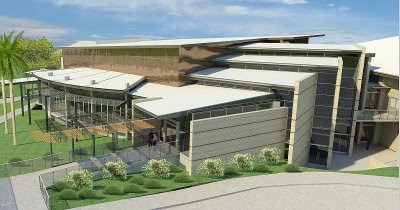
We are currently working on a number of school projects. One such project is a large Multipurpose Building (meaning it can be used as a sports hall, theatre and the like) for a local private school. The Client wants the building to achieve an ‘iconic’ status. One of our staff members recently produced the rendered view below: The above image was produced from Revit 2010 using some standard RPC. Some work was done in Photoshop (mainly on the sky).
Now, to shaded views – why would you want to use them?
They can take less time to produce than rendered
Indicates less ‘finality’ to the Client – conveys ideas without being heavy handed
WYSIWYG – don’t need to worry about materials not being applied etc
The negatives? Shaded views can:
Clog up your model
Be hard to find content for.
The workarounds to the above two points:
If detailed shaded views really slow things down for you, try this – make a new phase after the final construction phase. Call it ‘Drafting Phase 1’ or similar. Select the ‘detailed’ 3D objects (cars, trees, people) and set them to this phase. Now, set your shaded 3D presentation view to this phase. This stops Revit from thinking about and drawing those objects when you are working in the project generally.
Content for shaded views can be found at Google’s 3D Warehouse. First, download some of the Sketchup models that you like the look of. In Revit, create a New-Generic Model family. Then, import the SKP file using Import CAD. Make sure the resulting geometry is of an appropriate size. Save the family and load it into your project. Heaps of shaded content is available for everyone!
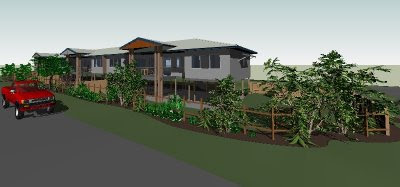
Here’s a shaded view I worked on this week: In some cases, you may need to use ‘Shaded’ instead of ‘Shaded with Edges’ (as the Sketchup files may present with a heap of edges – nasty). This technique is not for everyone, and it certainly is not useful in every instance. But once you have some content in your library, it can be a very quick way to convey how a building looks in context. Let me know what you thought of this tip – feel free to comment.