Have you ever tried getting thumbnail images to show up for Entourage families? After reading a few tweets on this recently… I’ll admit, using a Journal “script” to open family, switch to Elevation View, enable Realistic mode and save the thumbnail is not too shabby (by Aaron Maller):

While the above method is definitely cool, it still relies on you having a good RPC Entourage library in the first place. So, are you looking for a plug-and-play software solution to manage all of your Entourage and RPC content? And do you want to be able to preview the RPC, and then use it in Revit or Photoshop?

Then you may want to check out the latest update released for Archvision Dashboard. I’ve posted recently about how easy the RPC creation is now – it is literally drag and drop, and pretty much automatic, meaning that your potential for generating custom RPCs is virtually unlimited. Now with the preview mode and Photoshop drag-and-drop integration, Archvision Dashboard is starting to feel like one of those things that just “makes sense” if you are doing any kind of rendering and presentation work in Revit (and / or Photoshop).

Here’s a video of the new Viewport feature:

Download it from this page
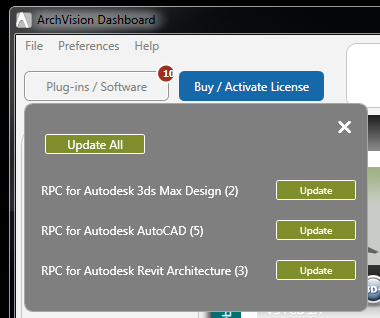
The next time you fire up your ArchVision Dashboard you should see a prompt to update to the latest version (v 2.1) which includes the new Viewport viewing mode.
Viewport for Dashboard not only lets you preview and spin around any 3D or 3D+ RPC but you can also drag & drop directly into applications like Photoshop! Just hit the Render button and drag the thumbnail into Photoshop. Viewport for Dashboard improves the workflow for using RPCs in Photoshop and does away with the need for the Photoshop Viewport plug-in.

This new version of Dashboard also include a new Filters feature which works hand-in-hand with Channels letting you drill down to the right content in just a few clicks.

via email

Previewing RPCs and using them in Photoshop just got easier! We’ve added a new viewing mode within Dashboard called Viewport. Not only can you preview and spin around any 3D or 3D+ RPC but you can also drag & drop directly from Viewport into applications like Photoshop! Just hit the Render button and drag the thumbnail into Photoshop.
via email

Link:
Archvision Dashboard

In case you missed it:

also:
Drag and Drop updated build of ArchVision Dashboard available that just came out as a ‘pull’ update. This includes the admin license panel tools and also has Drag & Drop enabled for Revit 2013 and later / 3ds Max / AutoCad. We expect to deploy a new RPC creation feature at the end of April, where you will be able to take any 2D image with an alpha channel, drag it into our creation tool, assign a name and height and have an RPC available to use immediately in any supported application.

You may also be interested in my previous posts about Archvision:
https://wrw.is/search/label/archvision

I’m honest enough to admit that Revit has the unfortunate reputation as a tool that is “bad” for presentation. Happily, BIM After Dark aims to correct that – by making all of us better at using Revit for a variety of presentation tasks.

BIM After Dark is essentially a training video series prepared by Jeffrey A Pinheiro, who many of you know as the author of the excellent, long-standing Revit blog The Revit Kid!

I had the opportunity to preview this video series prior to its release, and I must say I am impressed. Firstly, I’m sure you all realise that as good as Revit is, we still need to use other tools for certain presentation tasks, the foremost being Photoshop. It’s great that Jeff covers the effective use of Photoshop in considerable detail, and provides task-specific and industry-specific tips that will give you a real head start over the competition. Jeff covers some truly advanced, unique methods, and at the same time he includes some basic stuff that will help you if you are just starting out with Revit.

The plethora of included content and samples are also of very high quality, so if you can get access to them, I recommend that you do so.   It includes texture, background and entourage images, Revit library files and some Photoshop PSD files too.

Here are some examples of the tips and workflows covered in this series:

  • how to override the Shaded representation of RPC trees
  • 70 50 20 method for shadows (I guess the old 10 6 10 is superseded now) 
  • overlay method in Photoshop for images, such as section perspectives (“multiply”)
  • comparing 2am rendering quality for local vs cloud
  • “core” method for quick interior context
  • panel sized bump mapping for realistic glass
  • “screen” layer overlay for lighting rays (combine with various blurs to increase effect)
  • cgtextures and gobotree
  • using the burn tool for ambient occlusion of entourage

These are just a few reasons why you should check out this new series.  If you are serious about using Revit for presentation, BIM After Dark will definitely be worth it for you.

You can get it from here:
http://www.bimafterdark.com/

Here are some example videos:

A few thoughts I had while viewing the series

  • the autoclicker tool could be launched using the script launching method I describe here
  • Jeff mentions he doesn’t quite understand something that happened with site cut pattern – this was because the extra bit of the puzzle is the “poche” setting in Site Settings 
  • you can right click on the ViewCube to quickly align a 3D Persective view to a normal Section view

Doing an interesting roundtrip today:

  1. Export Revit floor plan to DWG – basic walls / doors / floors only
  2. Add floor finishes / landscape / people / vehicles in Impression
  3. Save PDF, open in Photoshop
  4. Add extra Entourage (furniture etc) and text in Photoshop
  5. Save for Web and re-import into Revit.  Scale to match floor plan from step 1.

It may sound like a pain, but its working quite nicely…

Some of you may be surprised to know that Windows Photo Viewer and Office Picture Manager are not the only ways to view and edit image files 🙂  Here are three of my favourites:

1)  Irfanview has been updated to version 4.35.  You can download from CNET here.  This is a superfast image viewing and editing program.  I love it for its highly adjustable batch image processing ability.

You can download all the current plugins from here.  This includes a new plugin that will allow Irfanview to open DXF files, as per this list.  The DXF plugin is provided by BabaCAD – they also provide free CAD software for download at http://www.babacad.com/index.html

2)  Paint.NET – quick and easy

3)  Photoshop – awesome filters and effects, and great at enhancing still photos of your buildings

4) GIMPAndy Milburn reminded me about this in the comments.  I haven’t used it for a long while, but it is essentially a free replacement for Photoshop.

5) pixlr – another great tip from the comments.  RicardoCC referred me to this online image editor that was actually purchased by Autodesk.  Have you tried it yet?

EDIT:  The free content at vyonyx has been moved to http://www.gobotree.com/

Are you getting tired of using the same RPC people and trees in all your Revit renders?  Maybe you should try adding some of these free trees and people in your render post-editing program (such as Photoshop):

Cutout People | VYONYX

Cutout Trees | VYONYX

From their Disclaimer: All the contents in our download section are absolutely free of any charge and there is no limitation on their personal or commercial use! …

Along similar lines, I previously posted about Immediate Entourage here.

vyonyx also host:
Textures | VYONYX
 and
References | VYONYX (think water, grass, backgrounds etc)

I’m sure many of you are very experienced Photoshop users, so I won’t bore you with too much detail.  There are just two things I wanted to mention:

  1. If you have a photo that was taken in less-than-perfect light, try the Image – Adjustments – Shadow/Highlight tool.  Some experimentation with this adjustment can yield very good results.
  2. One principle of Architectural Photography is that of Straight Verticals.  If you have an image that has warped verticals due to perspective, you can use the Filter – Distort – Lens Correction tool in Photoshop.

Here is an example:

Original Photograph
Adjusted Shadow / Highlight and Lens Correction

For more photography and composition principles, check out AB4061 Is That a Photograph? Architectural Photography for 3D Rendering

The Revit Kid demonstrated today that PNG files exported from a Revit render have no background.

In the spirit of one-up-man-ship, I recommend that you use TIF if you want to keep the background, but quickly separate it from the model elements.  When you export as TIF, you get a bonus Alpha channel that you can use to create a selection area and move the background to a new layer.

In simple terms:

  1. Export Revit render as TIF
  2. Open in Photoshop
  3. Isolate the Alpha channel
  4. Use Magic Wand to pick everything that is ‘white’
  5. Turn the color channels back on
  6. Invert the Selection
  7. Convert the background to a true layer
  8. Edit – Cut
  9. New Layer
  10. Edit – Paste
  11. Done!

Now you can manipulate the model elements and the background separately.

Here is a video:

 
Of course, you can also do this easily by:

  1. Doing two separate renders, 
  2. one of them with Model Elements turned off (which will just show the background) – Export this to any format except PNG
  3. and one of them with Model Elements on (export this to PNG)
  4. Copy and paste these two images to separate layers in Photoshop

 The TIF method is probably quicker and easier in most instances.

Here is a link to the aforementioned PNG post:
The Revit Kid.com!: Revit Tip – Export Rendered Images Without a Background