Basically, if you have one site toposurface, and you cut it with pads in different phases, then an ‘outline’ around every single pad appears in the creation phase of the toposurface (they affect the topo backwards in time).  It looks ugly …  Additionally, there will be ‘holes’ cut in the toposurface for the pads.

I recently handled this by making a Design Option Set for Topography, then for each Stage / Building Option combination, I added the entire site Toposurface.  From here, I could use model groups to transfer pads between the different options / phases, while still retaining their size and position and editability.  It was a pain to set up, but once configured properly (with views etc), it seems to work ok.

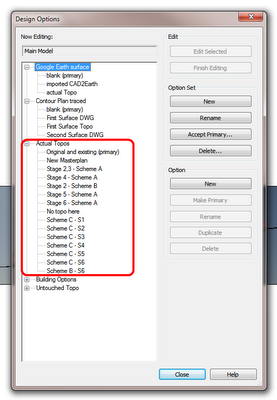
The most ‘logical’ way to configure it would be:

  1. Make a Design Option Set
  2. Make an Option called ‘Existing’.  Add your original / untouched site topography here.
  3. Duplicate the Option, call it Stage 1.
  4. Make all the Stage 1 pads, then group them.
  5. Duplicate Stage 1 topography option, call it stage 2 (the grouped pads will come through).  Add additional pads in Stage 2 option, then group Stage 2 pads and the Stage 1 pad group (forming a nested group.)
  6. Rinse and repeat

I never said being a Revit pro would be easy.

You can read about the problem at:
Re: Building pads don’t seem to respect phases. – Autodesk Discussion Groups

Sometimes you have a bunch of model objects of different categories and you want to quickly change the Phase Created of all of them at once.  And sometimes, I find that the persistent Properties in Revit doesn’t always reveal ‘Phase Created’ when objects of different categories are selected (this is in Revit 2013 – more investigation required).

In any case, to quickly change the phase of lots of model objects:

  1. Go to a Plan View
  2. Group the objects you want to re-phase
  3. Duplicate the active plan view.  Change the phase of the new view to the ‘target phase’ of the objects (the phase you want to change them to)
  4. Go back to the original Plan View (from step 1)
  5. Ctrl-X or Cut
  6. Go to the new Plan View (from step 3)
  7. Paste Aligned – Same Place
  8. All of the objects have now adopted the Phase Created value from the duplicated Plan View


Sometimes you want to save some Revit elements for later – like throwing them in the cupboard until you need them.  Here are five ways to do that:

  1. Group, then Link, then Unload the Link (you can copy / paste things from a link instance later)
  2. Add the elements to a secondary Design Option
  3. Put the elements on a Hidden Workset
  4. Put the elements in a Future Phase (after the current job phase).  Or, put them in a phase previous to Existing and then demolish them all in the same phase.  You can also put Views, like Sections, in a Future Phase to keep them in the model but stop them from showing in any plan views.
  5. Group the elements, Pin the Group, Duplicate the Group Type, then delete everything from the new type.  (Technically, you will need to keep at least one thing in the Group – so keep something that won’t print in there.)

What does Revit Want when it comes to demolition and phasing?  Revit pro Steve Stafford provides the answer:

Demo is not a phase in “Revit land”. It’s a phase in “People land” because people do demolition things before some other construction things. Revit however considers demolition to occur during the new work.

via
Revit OpEd: Demo Is Not a Phase

A great list showing the Visibility/Graphics priority, thanks to Revit Fix.  From most powerful to least powerful:

  1. Line Work Tool
  2. Override graphics in view by elements
  3. Filters
  4. View Depth -Beyond system line type (plan views only)
  5. Phasing graphic overrides
  6. Advanced model graphics – silhouette edges.
  7. Visibility / Graphic overrides – Halftone
  8. Visibility / Graphic overrides – Override host layers (Cut line styles)
  9. Visibility / Graphic overrides – (projection & cut lines)
  10. Project object styles

Revit Fix: Battle of the “line” overrides