Ok, this is a bit counter-intuitive but:
If you want to export parameters from Revit to an IFC file, note that the parameters should not be grouped under the category “IFC parameter”, but under a different (eg, .. ID data, text) category.

This is because the IFC parameter group is for inbuilt / standard IFC parameters.

via
Autodesk BIM Blog – Tipp f�r IFC-Parameter Export f�r Revit Produkte

I think this was previously called DataSlider.  To get it, just close Revit and Vasari and open your Case Add-in Manager (it may want to update itself).  Then tick the Migrate Parameter to Parameter box and Install/Update checked.

From their website:
CASE APPS Migrate Parameter
Have you ever needed to schedule an item of data that Revit would not let you? This is a common hurdle for many and now there’s a free tool that you can use to get around this. Common uses include migrating Wall Base Constraint Element Names (Levels) into a schedulable parameter. I’m sure you guys will find lots of uses for this one.


David hinted at this a little while back:
Revit: Can’t schedule wall constraint – part 2

In the Parameter Properties dialog, click Export.

Note:  The Export option is not enabled if the selected parameter is already in the current shared parameter file.

A message displays informing you that the shared parameter will be exported to the shared parameter file you set up in Step 1.

Here is the rest of the how-to:
Exporting Shared Parameters to a Shared Parameter File – WikiHelp
Edit:

You can export from the Family or Project environment. If you already have a SP with the same name in your current SP file, you will need to switch to a blank SP file, export the parameter, and then possibly you can “hack” it into your current file by text editing the SP files (maybe).

Revit doesn’t let you tag Wall Volume by default, so Avisotskiy puts RDBLink to good use – he uses Microsoft Access to update a Shared Parameter with the wall Volume data, and then simply uses a tag to grab the manually updated and manually created Volume data.

This is not a ‘live’ link, but it shouldn’t take too long to round trip the project to update the Volume information prior to document transmission or printing.

From his blog:
Revit does not allow to directly make a mark in the volume of the object.

4. Unload in Access, using the Query Designer update the “_Obem”, taking data from the parameter “Volume”.

Image from http://avisotskiy.blogspot.com.au/


via
Google Translate
of
http://avisotskiy.blogspot.com.au/2012/03/revit-db-link.html

Here is how you can assign a material parameter to a painted surface in a family:

  1. Go to Family Types dialog box
  2. Add – Material Parameter
  3. Paint
  4. Choose the material that you made – it will have the suffix (param)
  5. Done!  Save and load into project…

You can do this for multiple different materials on different painted surfaces.

This method was mentioned on the French ‘Mastering Revit’ blog:
Translated version of post

Original post
Revit mastering: Peindre

Martijn de Riet has pointed out something very useful when you are trying to use a Calculated Value to pull together a bunch of similar-but-different parameters.  If you come across an error, don’t forget about the ‘Add to all elements in the selected categories’ check box in the Parameter Properties dialog.

The Problem:
When you create the first (window) schedule you’ll notice a whole bunch of width parameters, all referencing the total width of different windows (fig 1)
After creating the schedule you figure: let’s create a “scheduled width” parameter which adds up all those separate width parameters. This way you can clean up your schedule (fig 2). Only to find that it won’t calculate. In this case, the family “ontwerpraam doesn’t have the parameter “breedte_vo” so in the schedule it returns no value. Therefor, the total cannot be calculated (fig 3).

The Solution:
Open the schedule properties, go to the Fields Tab, select the parameter causing problems and click Edit.
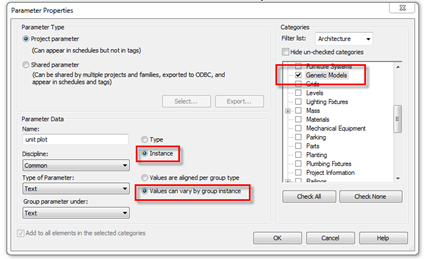
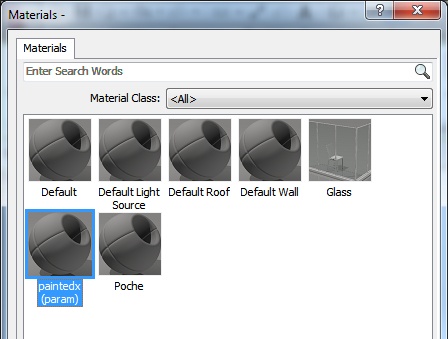
In the Parameter Properties, check the checkbox “Add to all elements in the selected category”, select the category “windows” and choose whether it should be an Instance or Type Parameter (fig 4).
The parameter is now accessible in the schedules, even with the families it’s not actually in. You can now fill in a value and the Scheduled Width parameter will calculate properly (fig 5). It will even show up in the family’s properties (fig 6).

The Original Forum Post:
Push parameters in the project environment

Thanks Martijn de Riet!!

So you have added a bunch of Shared Parameters to your Project, but you never bother to set the ‘Group Parameter under:’ property correctly…you are naughty, aren’t you?

It can make using Revit a lot easier if you Group Parameters properly – its what revit wants you to do.

How do you do it?  Quite simply:

  1. Manage – Project Parameters
  2. Select Parameter – Modify
  3. Change ‘Group Parameter under:’ property to something more appropriate.
  4. OK, OK etc
Here is a quick video on how to do it:
Annoyingly, you can’t change the grouping of parameters that are ‘built in’ to Revit.  It annoys me that ‘Drawn By’ is not grouped with Checked By, Approved By and Designed By on the Sheet Parameters:
If you know how to fix this, please comment!

I had a bit of a problem using Revit OOTB (out of the box) parameters to group sheets by Revision, so I did it super-quickly using a custom parameter.

Here are the steps:

  1. Add a new custom parameter to sheets, such as ‘Sheet Revision Group’ or similar.
  2. Open a schedule that shows the Revision you would like to group, and add this parameter to the schedule.
  3. Modify the custom parameter on all the sheets to match the Revision (you can do this quickly by toggling the ‘Itemize each instance’ tick box).
  4. Now you can easily use this parameter to group your sheets by the Revision.

Please note that this technique forms a ‘break’ between Revit native revision data and the custom parameter, so only use this technique if you understand this issue.

I have provided a quick video of the technique: