
Tag: MeshMixer
“used to generate a branching tree structure to support overhangs in 3D printing. The results are still a work-in-progress, but usually require significantly less material than other support structure techniques, and as the models get larger, also significantly improve print times. “
Learn more:
Meshmixer – 3D Mashups & Remixes
In related Maker news, download 123D Design for multiple platforms including desktop:
Autodesk 123D Design
More about MeshMixer:
Organic Modelling into Revit
Heads-up:
http://area.autodesk.com/blogs/maxstation/n201-meshmixer-20-is-available

If you are interested in learning Blender from an API (Python) perspective, check out:
Nathan’s Blender Python Notebook – THE PROVING GROUND
At the moment, the content is primarily along the lines of ‘getting started’ and basic modelling. I’m sure it will get more advanced very soon…
I played with Blender back in mid-2008. At the time I was using some of the randomization capability to make some organic forms for ultimate use in Revit. I used a plugin called Blender World Forge (ver 0.1.0). I had some success, but it wasn’t total. Here is an example:
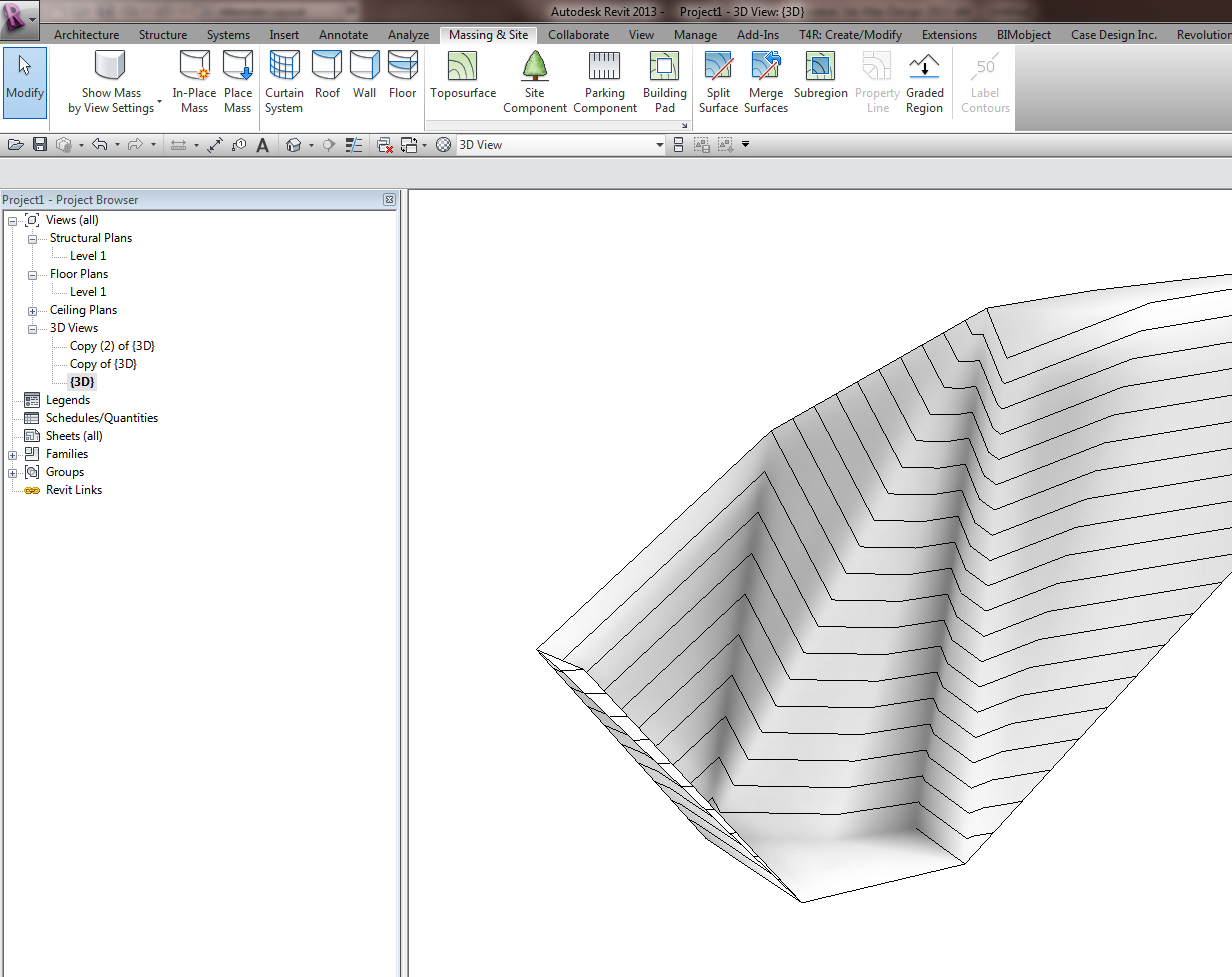
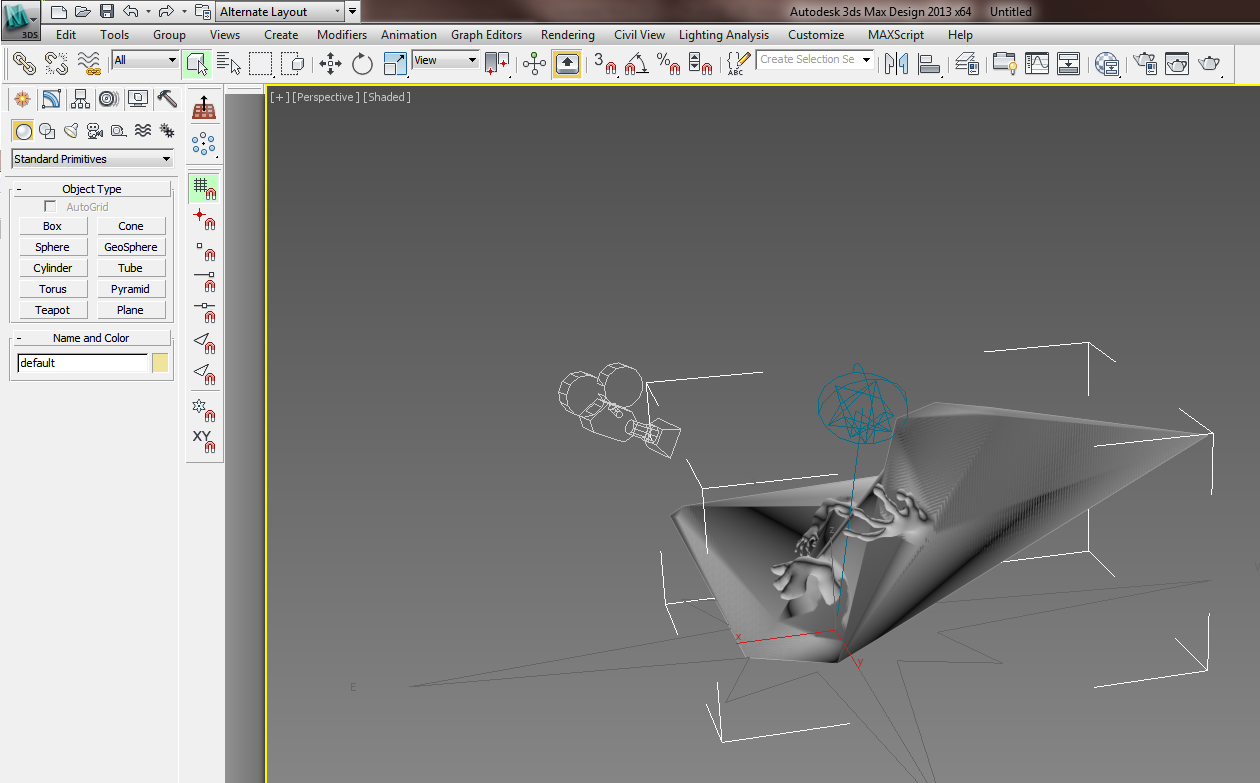
I have since had more success with organic forms in Revit using meshmixer:
Using meshmixer to morph your Revit Topography
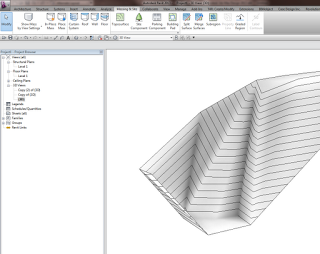
Yeah, Revit topo tools aren’t that great. Why don’t we try exporting to a sculpting tool like meshmixer, and see if we can make it work?
Let’s start with a simple Revit toposurface.
Export to Max by using Suite Workflows – 3ds Max Design Exterior Rendering
Once in Max, export selected (the toposurface) to OBJ using the Mudbox preset.
Open meshmixer (now at version 08). File – Import the OBJ. Start playing around with it, using the brush tools to smooth or warp the site. You may need to ‘scale’ up your active tool by using the middle mouse button to see real results.
I added some body parts to the site:
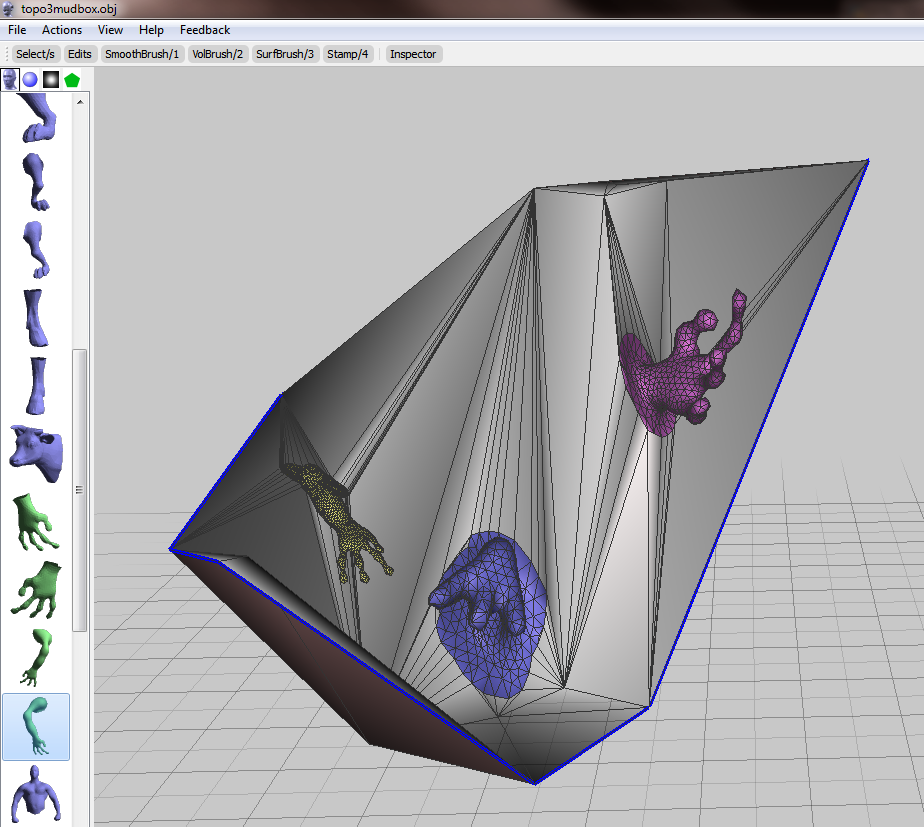
Export to OBJ from meshmixer.
Back in Max, select the previous surface object. Then Import, select the new OBJ you just made.
Now, export selected the new OBJ (with morphs) to a DWG file.
Import the DWG in Revit. If you haven’t gone too wild, you should be able to use Auto – Center to Center option effectively.
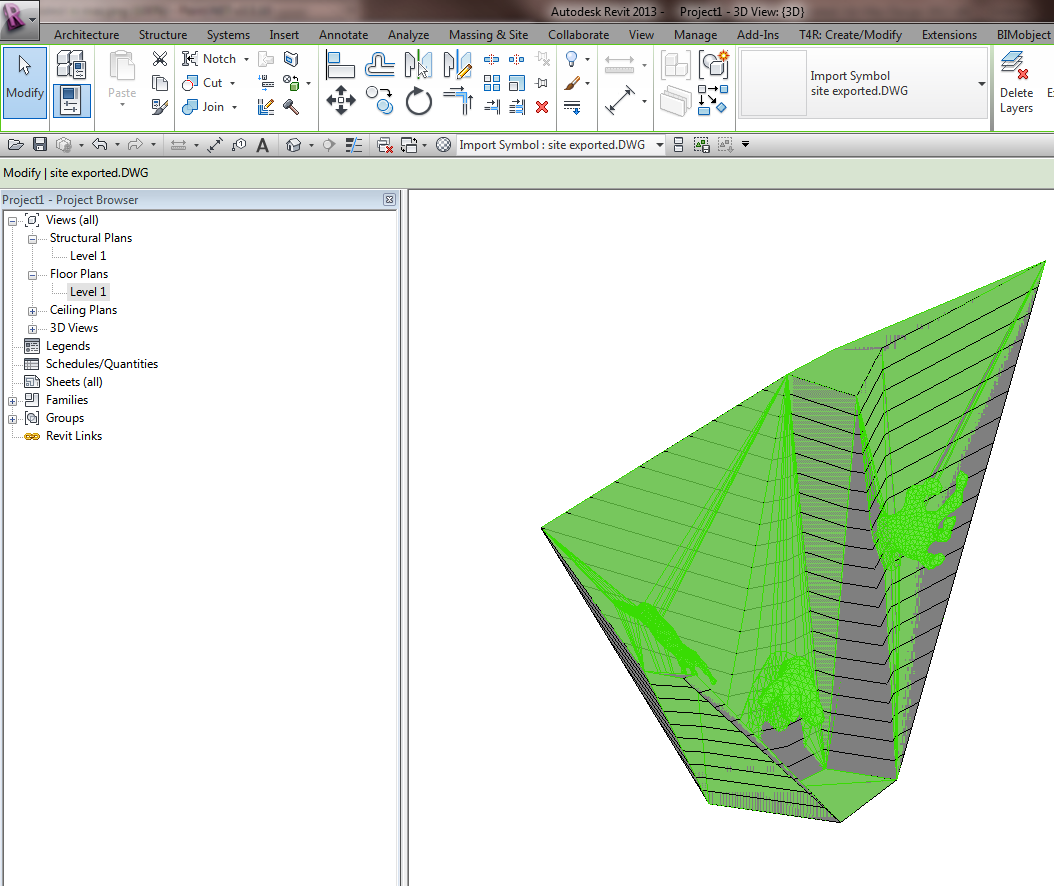
Finally, Revit won’t like this import very much – it probably won’t find points to make a surface. You will need to round-trip this DWG import by exporting out to DWG from Revit and then importing it back in again.
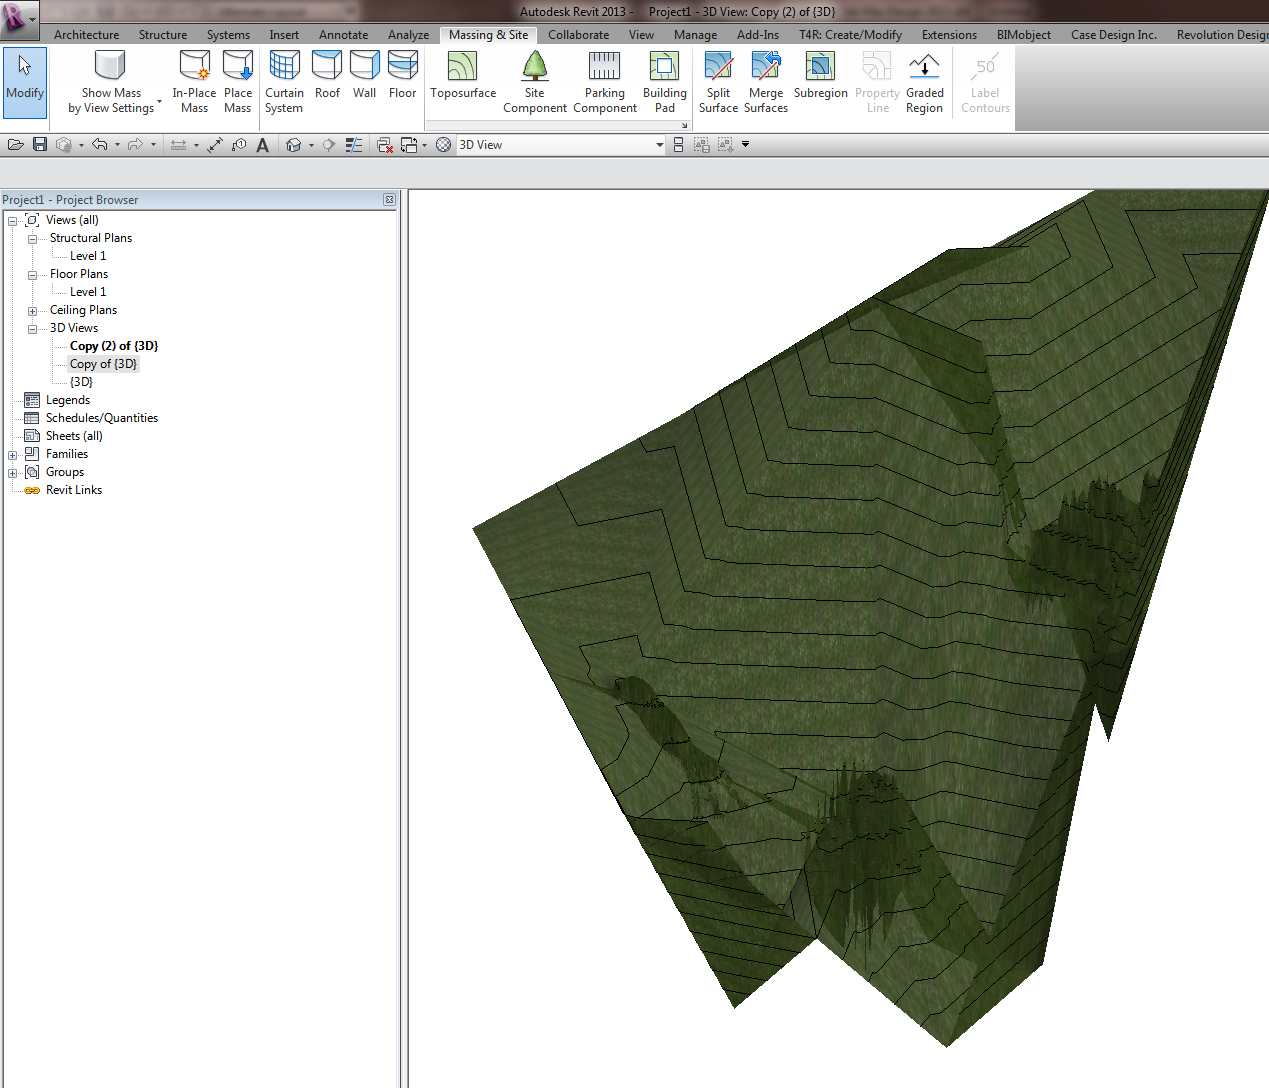
The ’round tripped’ import symbol can be used to generate the Toposurface, now morphed:
You may also be interested in:
Freeform and organic modelling from MeshMixer to 3ds Max to Revit
meshmixer08 is available for Microsoft Windows and Apple Mac OS X…
Windows
(tested on Win7 x64)
Windows
(tested on Win7 x64)
| [meshmixer08 Win 32-bit] | (Latest: October 26, 2012) |
| [meshmixer08 Win 64-bit] | (Latest: October 26, 2012) |
Mac OSX
(tested on Lion 10.7, should also work on Snow Leopard 10.6)
| [meshmixer08 OSX 64-bit] | (Latest: October 26, 2012) |
via
MeshMixer


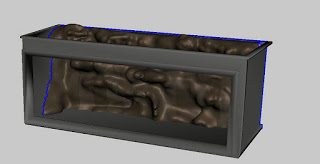
I was speaking to CJ from Crossley Architects yesterday. He said that he had been experimenting with creating freeform rocks in Meshmixer and bringing them into Revit. Here is an example of what he has produced:

As part of his workflow, he first of all used the STL Exporter add-in to export the fishtank context from Revit. This ensures that sculpting work is done in a way that can be accurately scaled and proportioned.
After importing the STL context into Meshmixer:
- Bring a plane object (Import Plane) into Meshmixer and transform it to suit the tank wall that is to be sculpted.
- Do the freeform modelling in Meshmixer.
- Export to 3ds Max (see previous post). Holes may need to be capped.
- Go from 3ds Max to a SAT file into a Revit family.
I’m glad to see that the Meshmixer organic workflow is getting some real-world Revit use!
Here is my previous post on Meshmixer:
What Revit Wants: Freeform and organic modelling from MeshMixer to 3ds Max to Revit
I am deeply interested in interoperability between form creation tools, as well as workflows that allow you to translate forms between these tools. Unfortunately, there is really no reliable way to bring forms from other tools into Revit and retain parametricism. They have to be imported into Revit as geometry that Revit ‘likes’ (smooth ACIS solids), and then the geometry needs to be re-created as vanilla, or native, Revit geometry.
However, the end result is a good one – because you are giving Revit What it Wants.
This post will look at the following main topics:
- Translating geometry from Mesh to Solid
- Rebuilding or re-creating the Solid as native Revit geometry
- Going from Revit into Rhino via gb XML
- Some plugins for Grasshopper
Mesh to Solid
I am always on the lookout for ways to convert a mesh 3D form into a nice ACIS solid. From what I hear, Rhino / Grasshopper is the best way to do this.
Here are a couple of other methods:
Automesher
This is essentially an AutoCAD plugin that can translate polyface mesh forms to proper solids.
Geomagic
I installed Geomagic Studio 2012 64 bit. It comes as a fully functional 30 day trial. This software does have various plugins to facilitate parametric data exchange – including one for Inventor. It can convert a mesh to polygons, and fill holes in a the object. It can also smooth faces.
You can convert an object to Points, and then Wrap the points in a new Mesh, use some Mesh tools to tidy it up etc. You can save as a 3DS or Open Inventor file…
From ACIS solid to genuine Revit Form
Once you have a nice, smooth closed ACIS solid form, it is time to import into Revit.
Earlier this year, David Light provided an example on how to re-create a (relatively simple) form that was imported from Rhino. His method essentially involves:
- Importing the geometry into a Conceptual Mass family
- Divide surface of the imported geometry
- Create a template of intersections on the U and V grid.
- Trace the form using a few closed profiles
- Remove the Import
- Create the form using the traced profiles
You can read his full post here:
Revit: Rebuilding forms in Vasari or Revit 2012
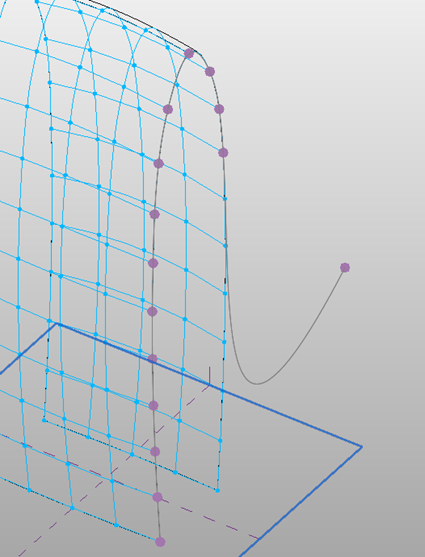 |
| Image from http://autodesk-revit.blogspot.com.au/ |
Going the other way – Revit into Rhino via gbXML
Sometimes you may want to translate geometry from a Revit model and bring it into Rhino for analysis. The following quoted paragraph provides one method, and a plugin:
I wanted to streamline the process of transferring Revit geometry into Rhino and simplifying it for DIVA analysis. gbXML seemed like a good way to do that. So that being said, the plugin currently only uses a small portion of the gbXML schema to transfer basic geometry. I would be interested in feedback as I am sure there are bugs…
You can download the plugin at the link below. Installation instructions and an example are included.
http://www.hilojacobs.com/?page_id=464
 |
| Image sourced via http://www.grasshopper3d.com/forum/topics/chameleon?xg_source=activity |
via Hiroshi Jacobs at Chameleon – Grasshopper
Things you can do in Grasshopper with C#
Grasshopper features an impressive amount of highly interlinked components – from lines to trees, from circles to graph editors. Sometimes, however, when design tasks become more advanced, we might need to further customize this plugin by directly borrowing from Rhino commands. With these scripting components, the user can quickly solve otherwise more complex design behaviors.
This list of C# scripts is a work in progress and is open for requests. Supporting v. 0.8.2 and some previous versions.
Above paragraph via Giulio Piacentino
 |
| Image from http://www.giuliopiacentino.com/grasshopper-tools/ |
Go to http://www.giuliopiacentino.com/grasshopper-tools/ for download links to the scripts, and the complete list.
Conclusion
Hopefully some of this information has been useful to you.
Feel free to post other methods or workflows as a Comment. Thanks.
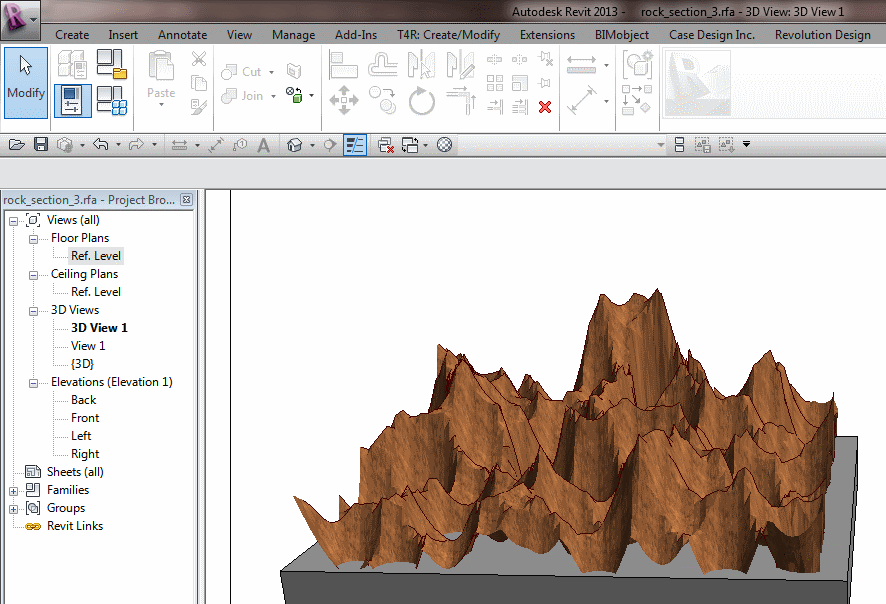
I’ll admit it – I’m a bit excited about MeshMixer. I downloaded it today and was very pleased at how easy it is to sculpt things. A few years back, we worked on an aquarium project with another architect, and it was suggested that it would be great if Revit could generate freeform rock formations that looked realistic. At the time, I played with Blender and a little add-on called ‘Blender World Forge’.
However, I think MeshMixer can also do the job. After installing the program I was very surprised that it is actually called Autodesk meshmixer – anyone tell me what is going on here?
Anyway, to see me create some organic-looking rocks and bring them into Revit, check out the video:
Basically, this was my workflow:
- Install MeshMixer
- Open it, grab a Sphere, do some sculpting.
(EDIT: You can probably skip steps 3,4 and 6 if you use the built-in Export feature on the File menu… let me know if it works for you.) - Create a part out of the sculpted form you made
- Save the project, and find the part OBJ file at
C:UsersusernameDocumentsmeshmixerlibrariesdefault - Import that into 3D Max
- Cap the holes in the mesh
- Export to SAT
- Import into Revit family, adjust materials.
- Load into Project.
Here is the download link again:
MeshMixer
Heads-up via http://labs.blogs.com/its_alive_in_the_lab/2012/03/software-makes-me-look-20-years-younger.html