At Virtual Built, we typically create a federated Revit model for every project we work on. This allows us to run a host of automated processes on the links, right from the federated file.

Recently we received a dataset for a high rise building. The Architect had used 5 typical linked ‘module’ files, copied throughout a master file.

Initially, I used a Dynamo script to collect all the link instances into a saved selection set. I could then copy / paste aligned the link instances into our federated Revit model:

Link Instances to Selection Set


The Problem

This works fine, but in this models there were also nested consultant links inside the Architectural linked modules. So we have:

Architectural container file -> Architectural module files -> Consultant nested links


We want:

Federated Central file -> Everything else (no nested links)


Next challenge: how can we quickly promote those nested links into our federated model? Well, we currently have the module files populated, so how can we leverage those positions to promote the nested links?


Promoting Nested Links

It is a bit hacky, but here is how I went about it. For each module file:

  1. Create an empty proxy file (New Revit project, no template)
  2. Open the Module file and resolve all link paths (so they are loaded)
  3. Set links to Attachment
  4. Copy / paste the link Instances from the module file (Level 0 or Base Level) into the empty file (Level 1, default level). You can use Dynamo graph above.
  5. Save the new proxy file as ‘ModuleContainer’ or similar. We know have a file that only has link instances in it.
  6. Open a detached copy of the Federated Central file (you can save as temporary copy if you like)
  7. Manage Links
    • Select the current Module file,
    • Reload From,
    • replace with the ModuleContainer you created. Once you have done all the modules, you are ready for binding as described below.

After populating the detached Federated Central file, we just need to Bind and then Copy / Paste the free instances:

  1. After load, Bind the ModuleContainer files to the detached Federated Central model
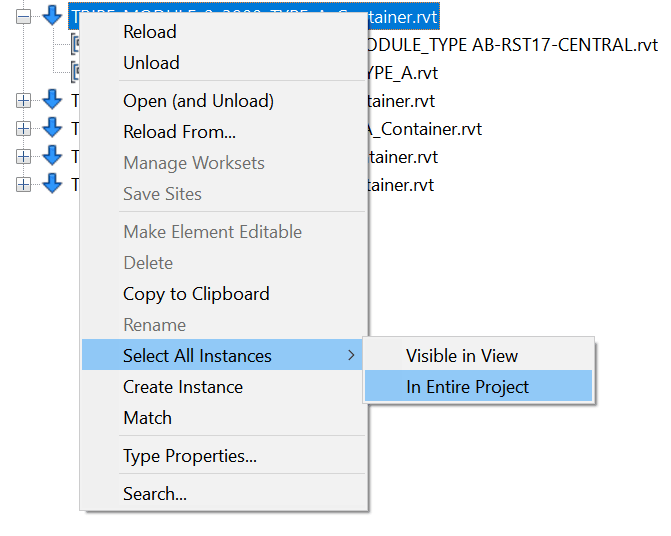
    1. To do this, right-click on the file in Revit Links in Project Browser

    2. Select All Instances – In Entire Project
    3. In the Ribbon, click Bind Link
    4. Untick Attached Details, Levels, Grids
    5. Click Remove Link when prompted
    6. Your nested links are now promoted!
  2. Optional: Ungroup all of those bound free instances (select all from Project Browser, Ungroup in Ribbon)
  3. Open the real Federated Central file
  4. Copy / paste the populated free instances from the detached Federated Model to the real Federated Model. Use the Dynamo script to collect them.
    Tip: Paste into a closed workset for better performance.
  5. Close the detached one, and sync the real one

The only thing we technically ‘broke’ or lost in this process is the module link->nested link relationship. So if someone decides to move one of the nested links in the module link, obviously that won’t replicate into the Federated Central file.

Hope this helps some of you out there building or dealing with large federated models.


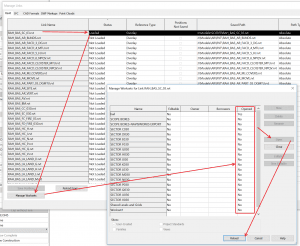
When working in Revit with linked files and worksets, it can be pretty exciting / maddening to figure out where an element actually is. I’m not talking about the 33 Reasons Something Might be Hidden (and here), the Order of Linework Overrides, Places to Hide Things, or even the View Discipline.  I’m talking about whether or not an object is actually even loaded into the Revit session for viewing purposes…

Consider this hierarchy and let me know what you think:

“I can’t find this object, is it loaded?”

  • If the current model is non-workshared:
    1. Does the object reside in a link?
    2. Is the link loaded?
    3. In Manage Worksets for the link, is the relevant Workset open?
  • If the current model is workshared:
    1. Is the object in the current model?
      • If yes, is the Workset it resides on open?
    2. Does the object reside in a link? If yes:
      • Is the Link Type Workset Open?
      • Is the Link Instance Workset Open?
      • Is the Link loaded in Manage Links?
        • In Manage Worksets for the link, is the relevant Workset open?

The above does not even consider the next level of nesting (Attached Links to a Link loaded in the current Host Revit model).

Enjoy Revit everyone 🙂

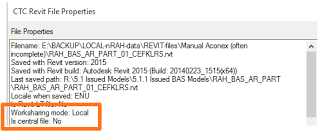
Revit Wants you to transmit ‘detached copies’ of Central files for linking into other models. If you ignore this and transmit your Local copy instead, Revit always remembers where that instance of the Local file was saved, and it causes havoc in a federated model situation. You can use the free CTC explorer extension to quickly check this:

Or you could use Dynamo with my Bakery package:

 Hypothetically, let’s say you have received a file from a consultant, and after reloading you realise it was a Local file, not a Central. Now, your federated model may already have changed the name of the file to match whatever the local was called. Let’s say this problem has caused another problem: multiple instances of that same model have been loaded into this file.

If you are using View Templates, only one of these instances will be the point-of-truth for your View Template Revit Link Overrides. Time to get out your magnifying glass and investigate. Firstly, we will create multiple copies of the RVT file with different names, and then use Reload From (in Manage Links) to get these loaded into the current Revit session. This will create a Local alias:

Now, only one of these is the historical, correct link in the context of this federated model. How do we know which one to keep and which ones to remove?

We can use our View Template Revit Link Overrides to tell us… after all, they are the reason we are going through this process, right? We want Revit to ‘remember’ the overrides we have made in those templates. So let’s have a look at the View Template and see what it tells us.

Basically, by reviewing the Custom overrides here, I was able to determine which version of the Link to keep. It just so happens that the correct historical link had:

  • a lower number as its instance name (shown above as 149), and
  • a lower number as its element ID (450048 compared to 1288492). I found this by using Project Browser, Select All Instances – In Entire Project and then Manage – IDs of Selection

The above two ‘numerical’ investigative methods are probably not 100% reliable, but they may give you a good idea of which link instance is older in terms of this project.

Now, simply Remove the wrong links using the Manage Links dialog, and be aware of not re-linking multiple new instances if you just so happen to get a Local copy from someone in the project team. And remember…

What does Revit Want? Central copies for linking purposes.

Here’s how:

  1. Make a View parameter (Text) in Revit that will hold the list of RVT Links that are visible in a given view
  2. Install Dynamo and my Bakery package
  3. Go to the required View
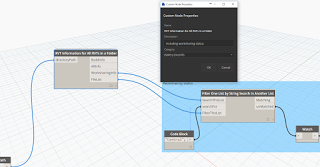
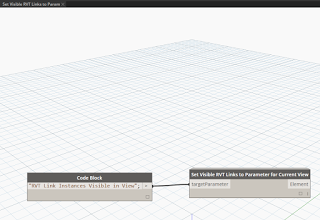
  4. Set up your definition as below and run it:

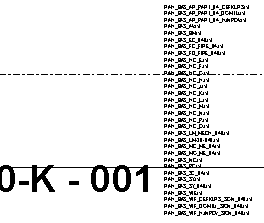
This will create a list and convert it to a single string with a line break between each entry, meaning that the resulting view Label in your View Title needs to account for it to ‘grow’ (vertical align to Top or Bottom as required).

 This will need to be run each time you want to ‘update’ the visible Revit link parameter.

Let’s say you have 15 RVT links in FileA, and you want to copy them into FileB. Revit doesn’t usually want you to have two instances of the same linked file loaded into two different open files in a single instance of Revit (that was a mouthful!) 

However, we need to work in the same instance of Revit to be able to copy/paste. So, here is how you can do it (relatively reliably):

  1. Open FileA.rvt
  2. Open FileB.rvt
  3. In FileA.rvt, Select all of the Revit links that you want to copy (easiest in a 3D view)
  4. Switch to a Plan view and Ctrl+C
  5. Still in FileA.rvt, open Manage Links dialog and unload all of these links that you are copying
  6. Switch to FileB.rvt, and go to a Plan view that matches the one in step 4
  7. Modify – Paste – Aligned to Current View
  8. Even though they are unloaded in FileA, the important stuff is in the Clipboard in memory, so Revit can still paste properly into FileB, and you don’t have a “conflict” of the file being loaded in two files at once
  9. Save FileB, close FileA without saving (or reload the links etc)

There you go, you have learned how to copy unloaded RVT links. Enjoy!

(Note: this was tested on Revit 2013 Update Release 3)

If you want your entire geographically separated team to have access to the same linked files, you need to upload them to Revit Server. This also goes for CAD / DWG files, which will need to be imported into an RVT if you want to save them directly to RS.  2D DWG files can be referenced by Linked View in the host project if necessary.

Here is a bit of a workflow that may help:

1 Open the consultant model in appropriate version of Revit
2 Enable Worksharing (if it isn’t already)
3 Save As … 
a) if this is the first “save” of the consultant model to Revit Server, use a generic name like link-Structural.rvt and save onto Revit Server in the appropriate folder (if you have one for links)
or/ 
b) if this is an updated model, overwrite the existing consultant model, using current name in the Revit Server Link folder
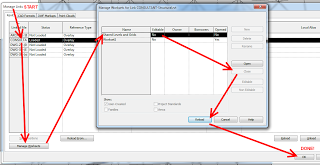
4 Use Reload on this new Consultant model in Manage Links of Architectural (our) host model
5 Close the Shared Levels and Grids workset for the Consultant Model, like this:
 
6 Sync with Central.  The Consultant model has now been imported / updated onto Revit Server, and other team members should be able to access it.

More info:
Help: Linking Server-Based Workshared Models

Other links and info:
This RFO post details what some firms are doing with Revit Server and links:
Revit Server & Linked Consultant Files

Revit Server Administrator 2013 displays “Server Error” upon loading the GUI

10 Things to Know About Revit Server – The Revit Clinic

Removing and Replacing Models on Revit Server – The Revit Clinic

Posted by Mark Petrucci:

  •  Did you know there is another point called the Startup Location? Be default, the PBP and SP are located on top of the Startup Location. What is the Startup Location used for? It’s used for linking models ORIGIN-TO-ORIGIN.
  • If you are an engineer and want to link the Architect’s project file origin-to-origin, you need to do this before you start the engineering model.
  • if a structural engineer lays out column grids without the architects model and then links files later, origin-to-origin will not work.
  • never, I repeat never move the building. I’ve read blogs on how to move a building using infinite view ranges. This does not work…

via
Applied Software Blog: Revit Shared Origin Survey Startup Base Location…

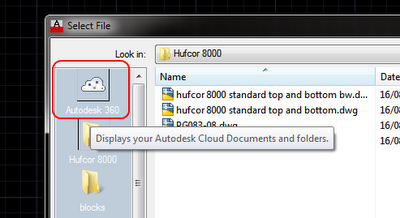
I find it interesting that AutoCAD 2013 can directly link (XREF) DWG files directly from the Autodesk Cloud.   Just Insert – DWG Reference… – then press the Autodesk 360 button in the dialog.

Revit Server is necessary technology (at the moment), but it is essentially a ‘do it yourself’ server system.

When will see the little Autodesk 360 button appear in our Revit Link dialog?

Read more at:
XREF Drawings from Autodesk 360 | The CAD Geek Blog